
Open VTS Workflow
Workflow lets you automate fleet operations by connecting a trigger, decision or processing steps, and actions into a visual flow. A workflow can react to vehicle telemetry or run on a schedule, evaluate conditions, generate reports, send notifications, call external systems, register events, and perform other supported actions without building the complete process manually each time.
Last updated August 20, 2026
Workflow
Workflow is the automation workspace in Open VTS.
It allows you to define a process once and let Open VTS follow that process whenever the required event occurs.
Instead of repeatedly checking vehicle data and performing the same action manually, you can build a visual flow that tells Open VTS:
When this happens → check or process this → then do this.
For example:
Incoming Vehicle Data → IF a condition is true → Send Notification
or:
Schedule → Generate Report → Send Email
A workflow is built by placing individual nodes on a visual canvas and connecting them in the order they should run.
Before You Create a Workflow
A good workflow starts before you open the editor.
You should first understand what should start the workflow, what information it needs, and what should happen at the end.
1. Define the Outcome
Start with one clear question:
What do I want Open VTS to do automatically?
For example:
- Notify me when a vehicle condition matches a rule
- Record an event when a particular telemetry condition occurs
- Generate a fleet report every day
- Send a report by email
- Forward selected vehicle data to another HTTPS system
- Send a supported command to a vehicle device
Having one clear outcome makes the workflow easier to build, test, and maintain.
2. Decide What Should Start the Workflow
Every published workflow requires one enabled trigger.
The current Workflow builder provides two primary trigger types:
Incoming Data
Use Incoming Data when the workflow should react to vehicle telemetry.
This is appropriate for workflows based on information such as:
- vehicle movement
- speed
- GPS data
- sensor or attribute values
- changes in incoming vehicle data
You can select the vehicles that the workflow should monitor.
Only vehicles that are authorized and available to your User account can be selected.
Schedule
Use Schedule when the workflow should run at a particular time or interval rather than waiting for vehicle data.
For example:
- every day
- every few hours
- selected days of the week
- a custom schedule
A timezone is also configured so the schedule runs according to the intended operating time.
Important: A workflow must have exactly one enabled trigger before it can be published.
3. Make Sure the Required Data Is Available
A workflow can only act on information that is actually available.
For an Incoming Data workflow, make sure the required vehicles are assigned to your User account and that they are sending the telemetry needed by the workflow.
For example, if your condition depends on a sensor value, that value must be available in the incoming vehicle data.
Incoming Data workflows can work with information such as the current vehicle data, previous data, vehicle information, IMEI, and other available normalized telemetry fields.
Using real test data before publishing helps confirm that the field you want to use actually exists.
4. Prepare Any Required Integration
Some workflow actions depend on another Open VTS service being configured.
You only need the integrations required by the nodes you plan to use.
| Workflow Action | What May Be Required |
|---|---|
| Send Email | Email/SMTP configuration |
| Send Notification | Firebase/FCM configuration for Web or Mobile Push |
| Send WhatsApp | Configured WhatsApp integration |
| HTTP Request | Reachable HTTPS API |
| Code | Workflow isolated code runner enabled on the server |
| Generate Report | Required vehicles and report data |
| Send Device Command | Supported and authorized vehicle/device |
| Register Event | Current authorized vehicle context |
If a required service is not configured, the workflow may fail validation, publishing, or execution for that action.
5. Use a Desktop-Sized Window for Editing
The Workflow canvas is designed for a larger workspace.
When the editor window is narrower than approximately 900 px, Open VTS changes the canvas to read-only mode.
You can still inspect the workflow and execution information, but editing nodes and connections requires a wider desktop-sized window.
Understanding a Workflow
A workflow becomes much easier to understand when you think of it as three layers.
Trigger
The trigger answers:
When should this workflow start?
Examples:
- Incoming Data
- Schedule
Every workflow begins here.
Logic and Processing
These nodes decide what should happen to the data before an action is performed.
Available logic nodes include:
- IF
- Wait
- Code
For example:
Incoming Data → IF temperature is above a threshold
The IF node can send the workflow down different paths depending on whether the condition is True or False.
Action
An action answers:
What should Open VTS do?
Current action nodes include:
- HTTP Request
- Send Email
- Send Notification
- Send WhatsApp
- Generate Report
- Send Device Command
- Register Event
A workflow may contain more than one action when required.
The Basic Workflow Formula
Most workflows can be understood using this simple structure:
Trigger → Logic → Action
For example:
Incoming Data↓IF a condition matches↓Send Notification
A more advanced workflow could be:
Incoming Data↓IF condition↓Register Event↓Wait↓Send Notification
Or a scheduled workflow:
Schedule↓Generate Report↓Send Email
You can build only the steps that your process actually requires.
How to Create a Workflow
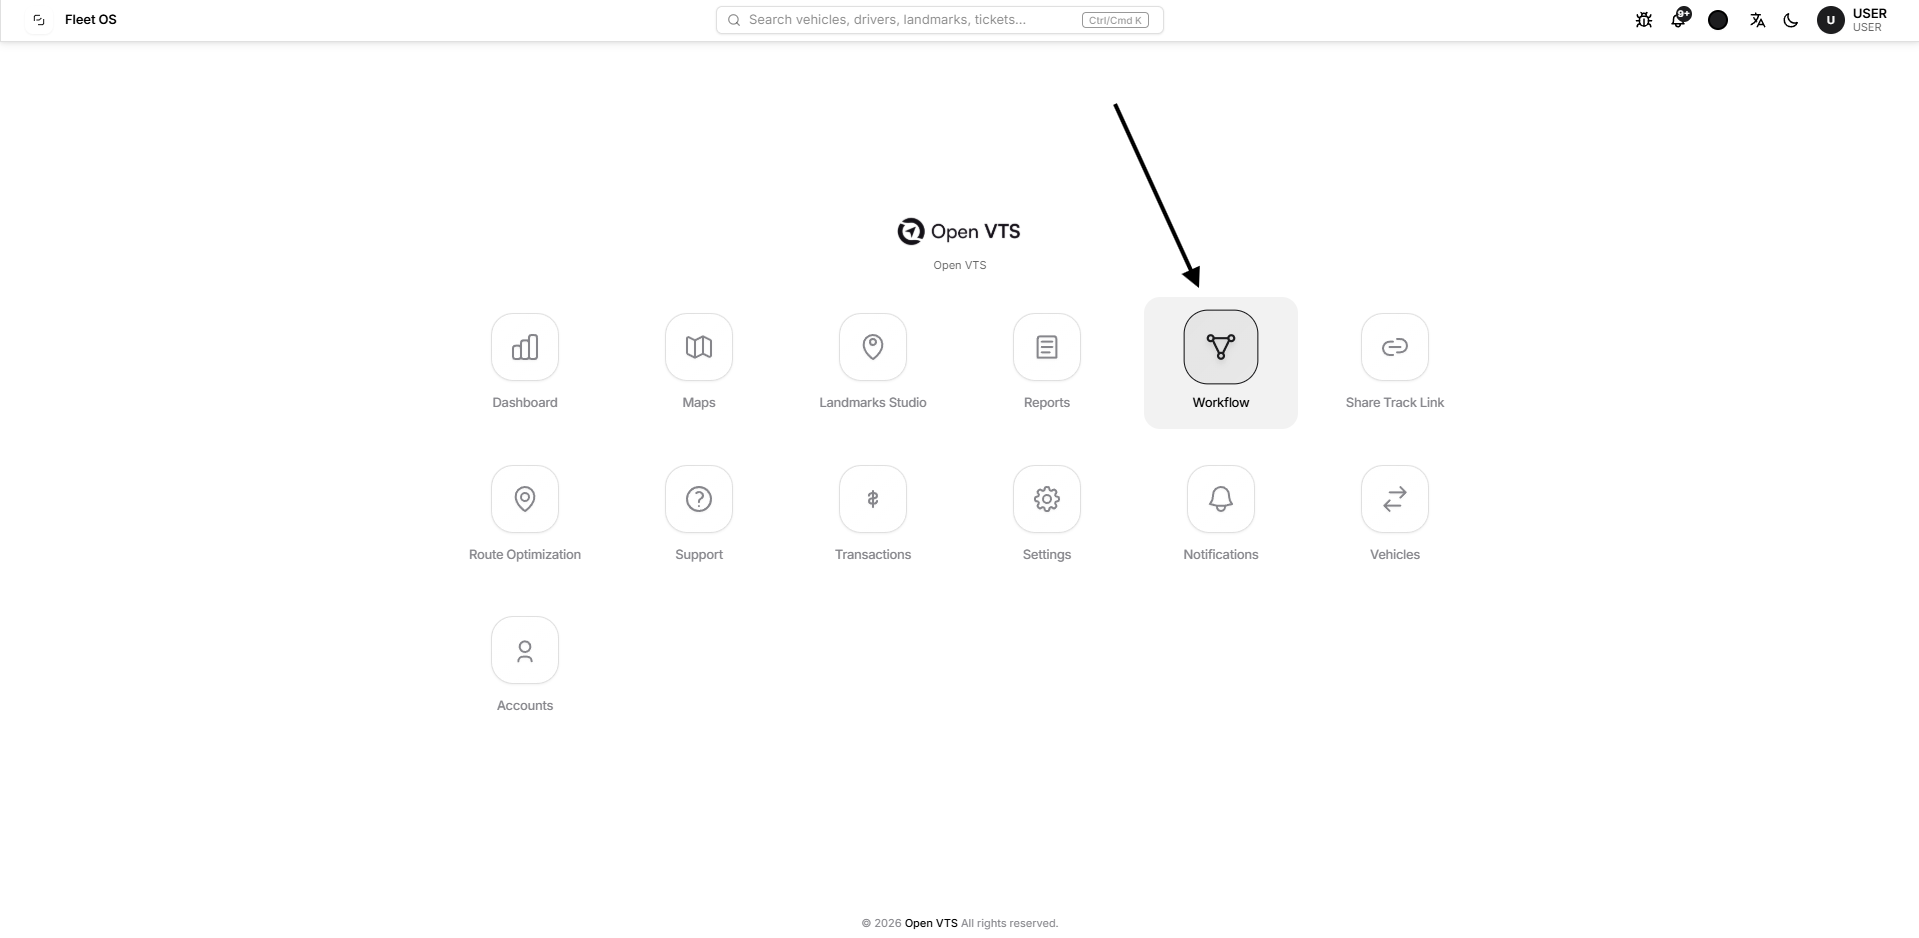
Step 1 — Open Workflow
From the User Home page, open Workflow.
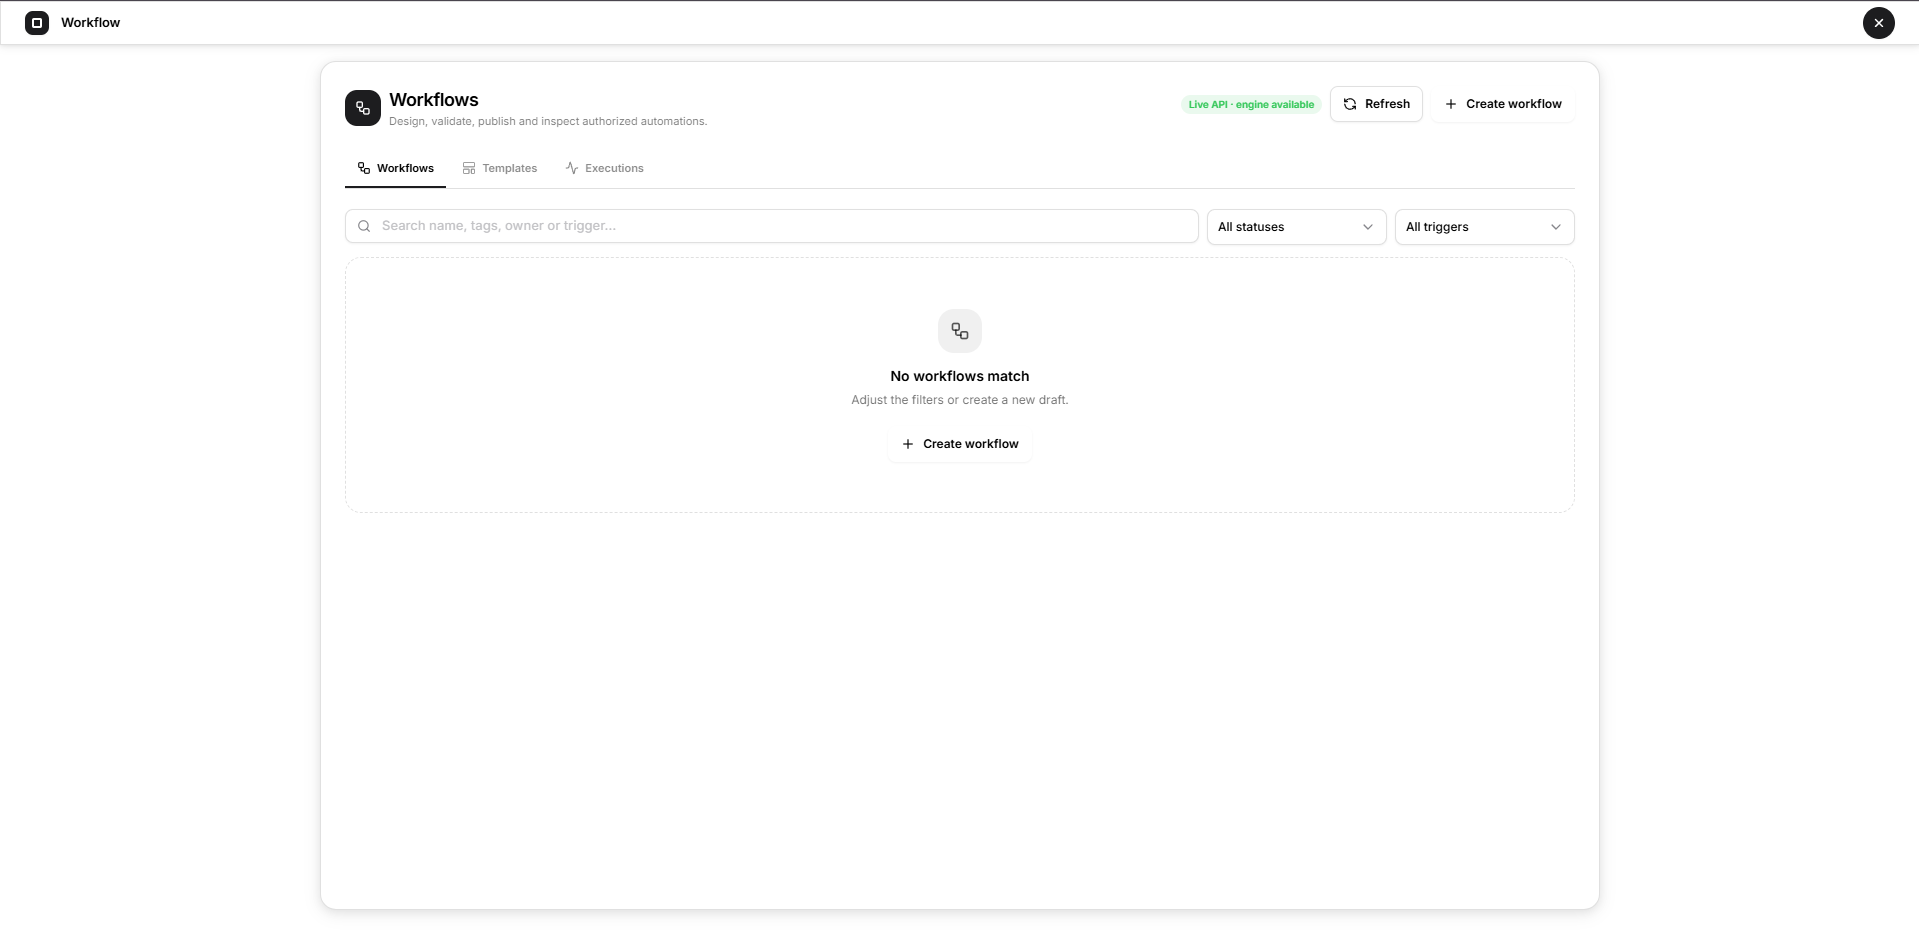
The Workflow page contains three sections:
- Workflows
- Templates
- Executions
Workflows
Shows workflows created under your User account.
Templates
Provides predefined starting structures that can help you build common workflows faster.
Executions
Shows workflow runs and lets you inspect what happened during previous executions.
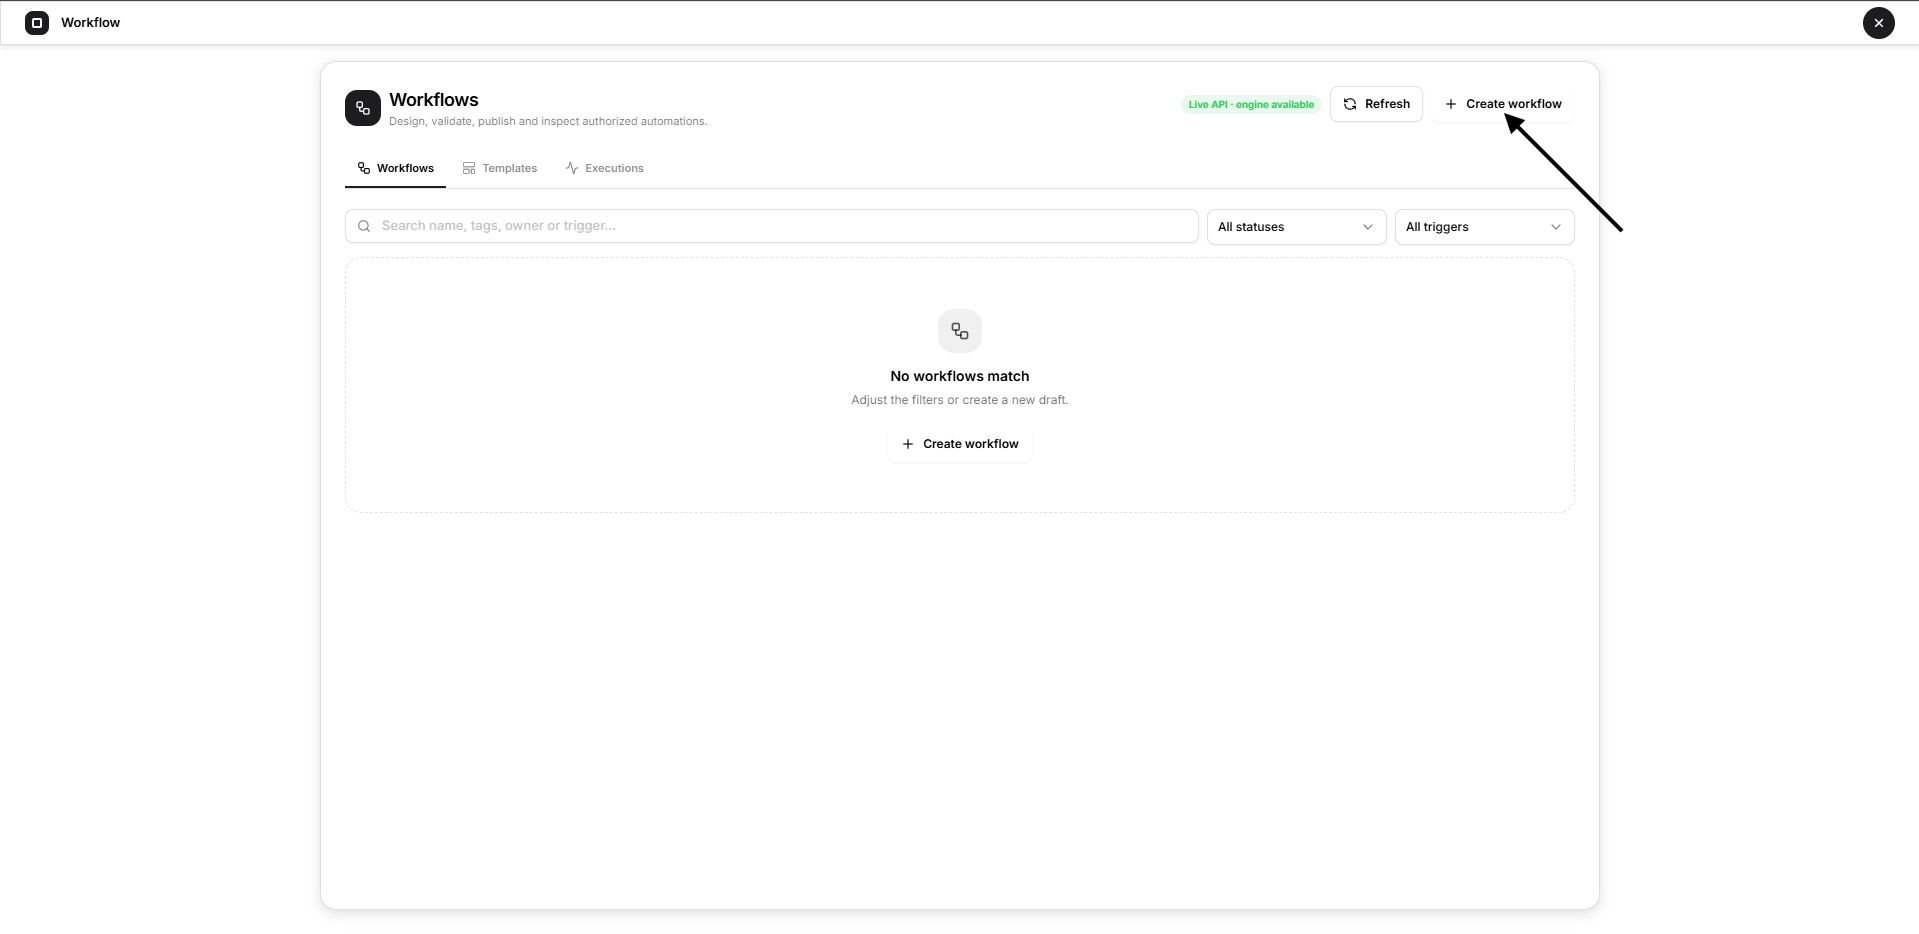
Step 2 — Select Create Workflow
Select Create workflow.
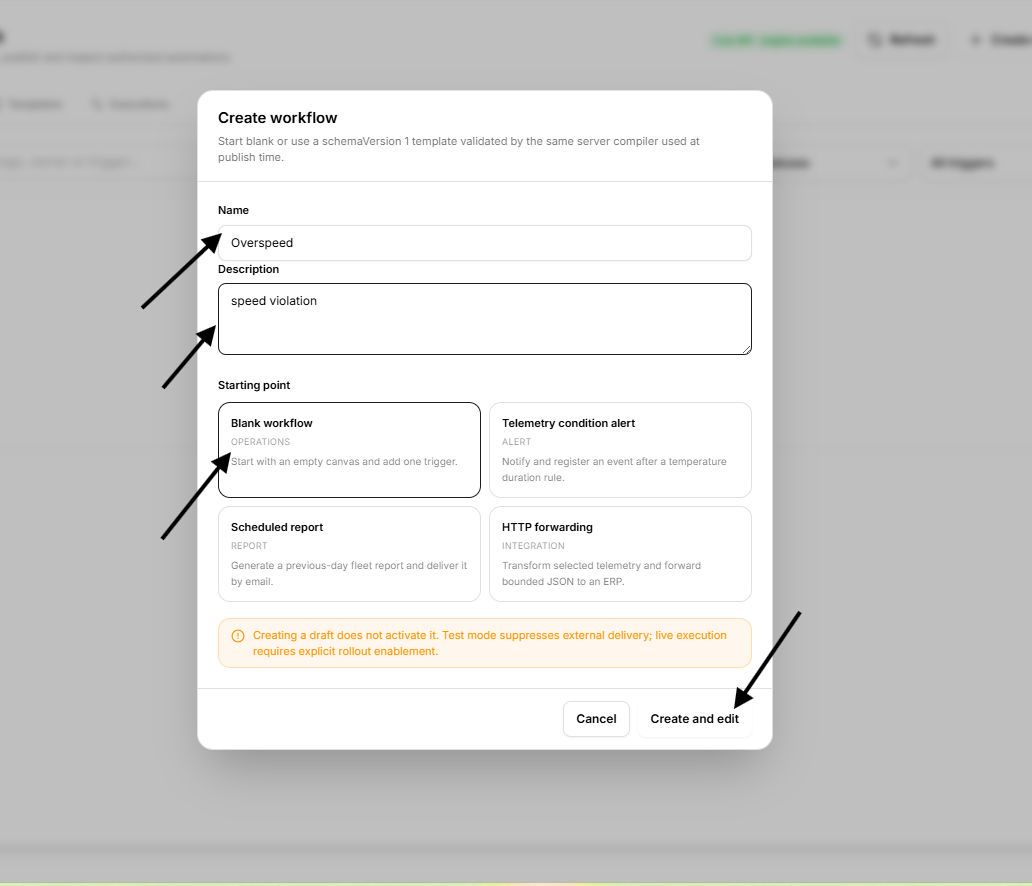
The Create workflow window asks for:
- Name
- Description
- Starting point
Name
Give the workflow a name that describes what it does.
Good names are specific and easy to recognize.
For example:
Daily Fleet Report
or:
Vehicle Temperature Alert
Description
Use Description to explain the purpose of the workflow.
This becomes especially useful when several workflows exist.
Starting Point
You can:
- start with a blank workflow, or
- use an available template
A template gives you an existing node structure that you can modify instead of starting from an empty canvas.
Select Create and edit to open the Workflow editor.
Creating a workflow only creates a draft. It does not make the workflow active.
Step 3 — Add the Trigger
Every workflow needs a starting point.
From the node panel, add either:
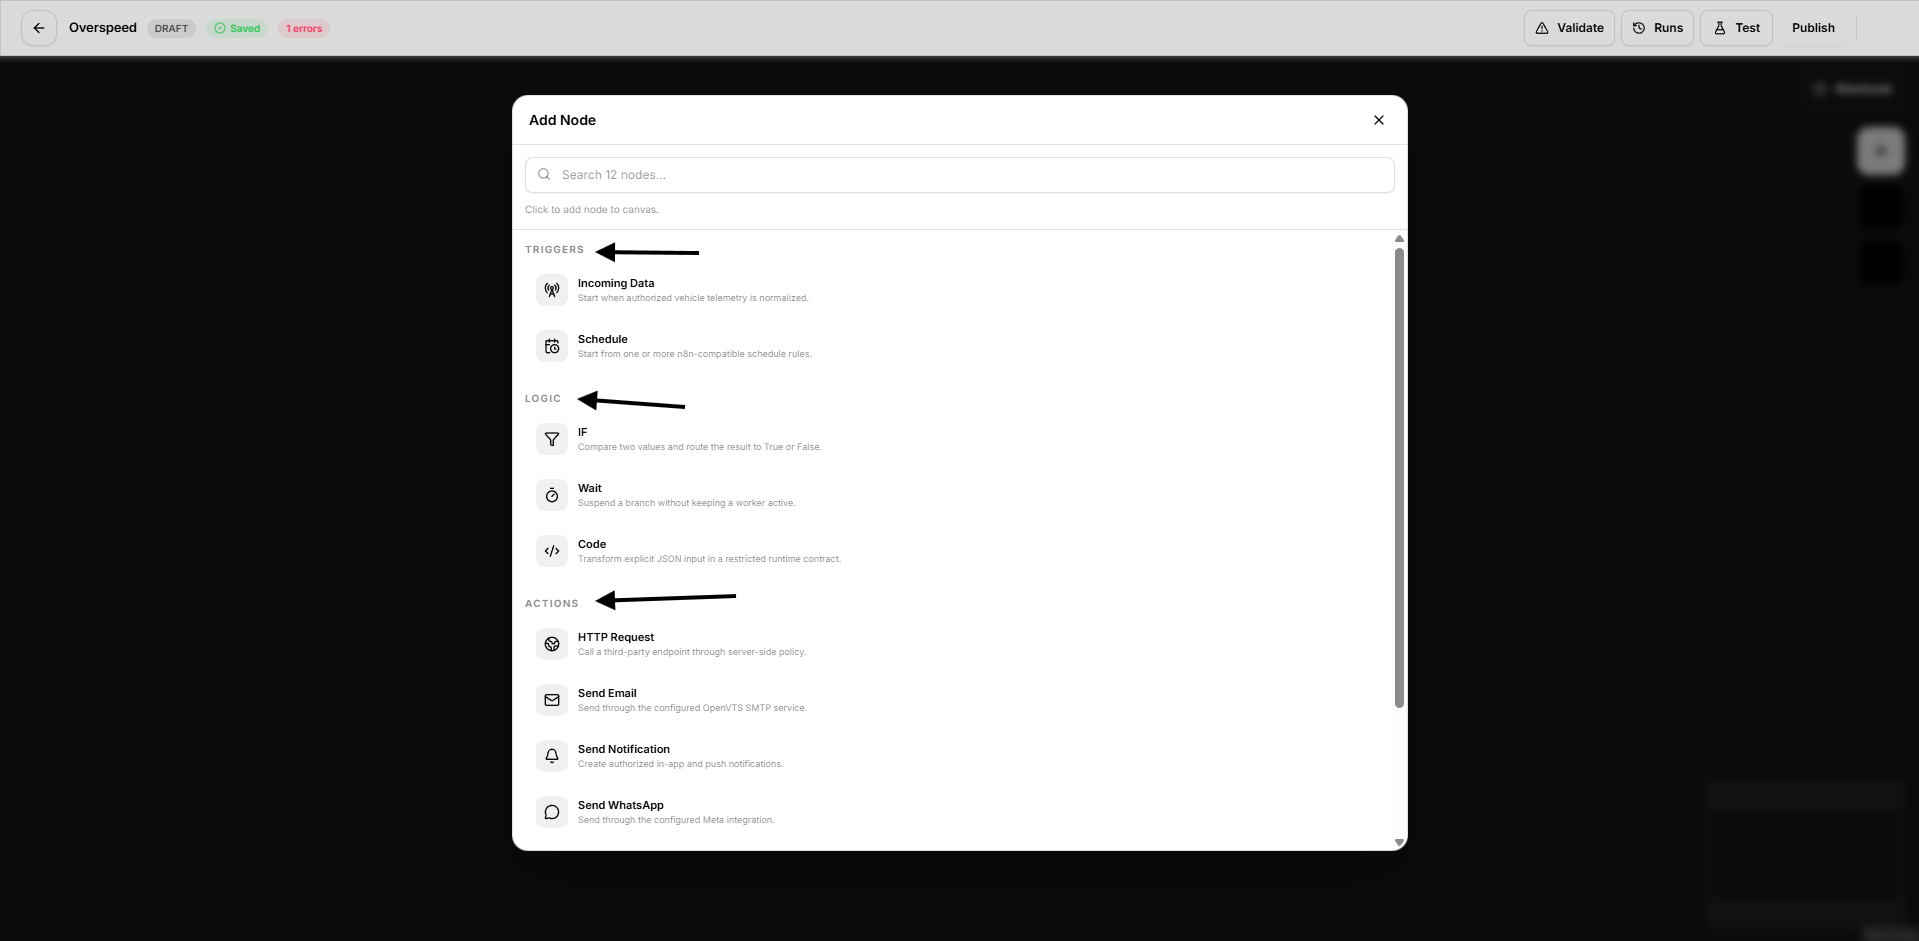
Incoming Data
Use this when the workflow should respond to vehicle telemetry.
Configure which authorized vehicles the workflow should monitor.
Incoming Data can also be configured to focus on particular changed fields or usable GPS data when required.
Schedule
Use this when the workflow should run according to time.
Configure the schedule rule and timezone.
[Add Screenshot: Workflow editor showing the node palette, canvas, and a trigger node]
Step 4 — Add the Required Nodes
Use the node panel to add the next steps.
You can search the node list or select the node you need.
For example, to create a simple condition-based alert:
- Add Incoming Data
- Add IF
- Add Send Notification
For a scheduled report:
- Add Schedule
- Add Generate Report
- Add Send Email
Do not add nodes simply because they are available. Every node should have a clear purpose in the workflow.
Step 5 — Connect the Nodes
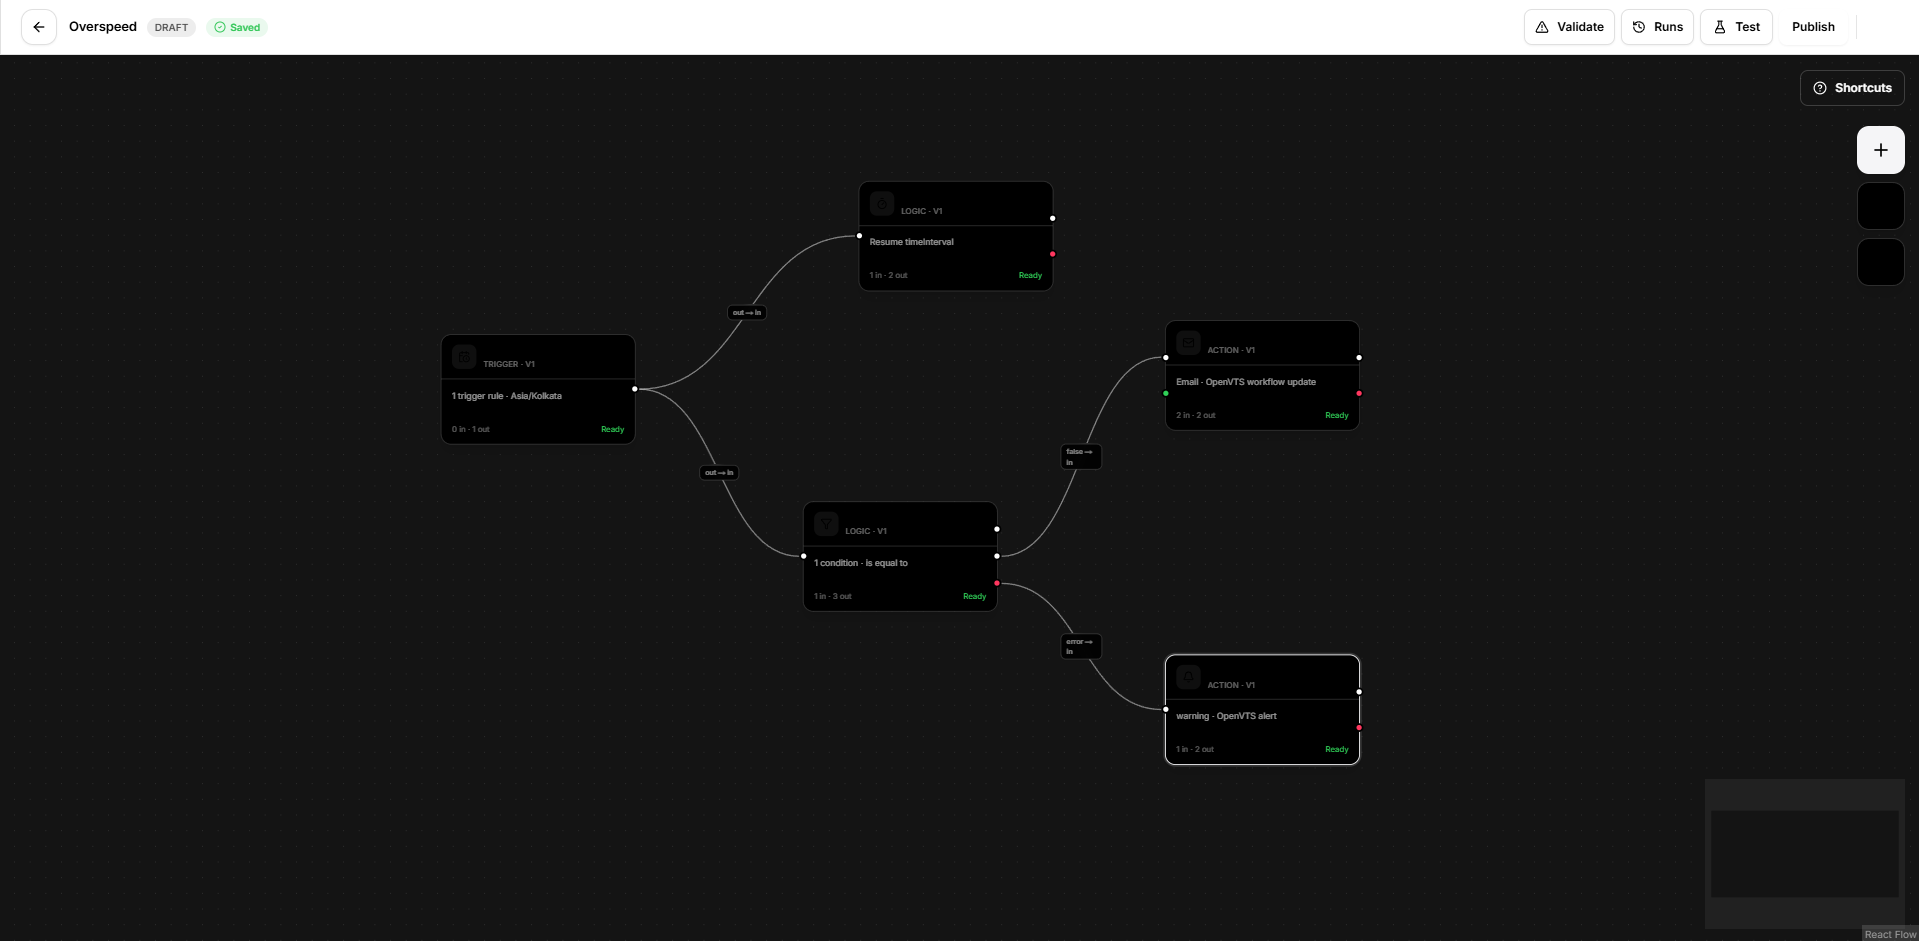
Connect the output of one node to the input of the next node.
The connection determines the order in which the workflow runs.
For example:
Incoming Data → IF → Send Notification
An IF node provides separate paths such as:
- True
- False
Connect the action to the path where you want it to run.
A published workflow cannot contain enabled nodes that are disconnected from the trigger.
Step 6 — Configure Each Node
Select a node to configure it.
Each node has settings appropriate to its function.
For example:
Incoming Data
Choose the vehicles and data scope.
IF
Choose:
- the value you want to examine
- the comparison
- the value it should be compared against
Schedule
Choose when the workflow should run and which timezone should be used.
Send Notification
Configure the notification destination, title, message, and severity.
Generate Report
Choose the report type, vehicles, time period, and required report-specific filters.
The Workflow editor also supports using information produced by earlier nodes in later nodes.
This means later steps can use the actual data that caused the workflow to run instead of requiring every value to be entered manually.
Step 7 — Use Test Data
Testing is one of the most important parts of building a workflow.
For an Incoming Data workflow, use the available test-listening functionality to capture a real sample from an authorized vehicle.
This lets you see the structure of the incoming information before mapping it into an IF, Code, HTTP Request, notification, or another node.
Using an actual sample helps prevent incorrect field paths and assumptions about the data.
Step 8 — Test the Workflow
Use Test before publishing.
Testing allows you to check the workflow path and inspect how nodes behave without immediately relying on the workflow in normal operation.
Test mode is designed to suppress external delivery while you verify the workflow.
You can also execute supported individual steps while configuring them.
A useful testing sequence is:
- Verify the trigger data
- Verify the IF or processing result
- Check which route the workflow follows
- Inspect the action input
- Confirm the expected output
Do not publish simply because the workflow looks correct visually.
Verify the data path first.
Step 9 — Validate the Workflow
Select Validate when the workflow structure is ready.
Validation checks whether the workflow meets the rules required for publishing.
Open VTS verifies items including:
- exactly one enabled trigger
- every enabled node is reachable
- at least one reachable action exists
- node connections are compatible
- invalid cycles are not present
- required node fields are configured
- workflow limits and validation rules are satisfied
Any blocking validation errors must be corrected before the workflow can be published.
Step 10 — Publish the Workflow
When validation succeeds, select Publish.
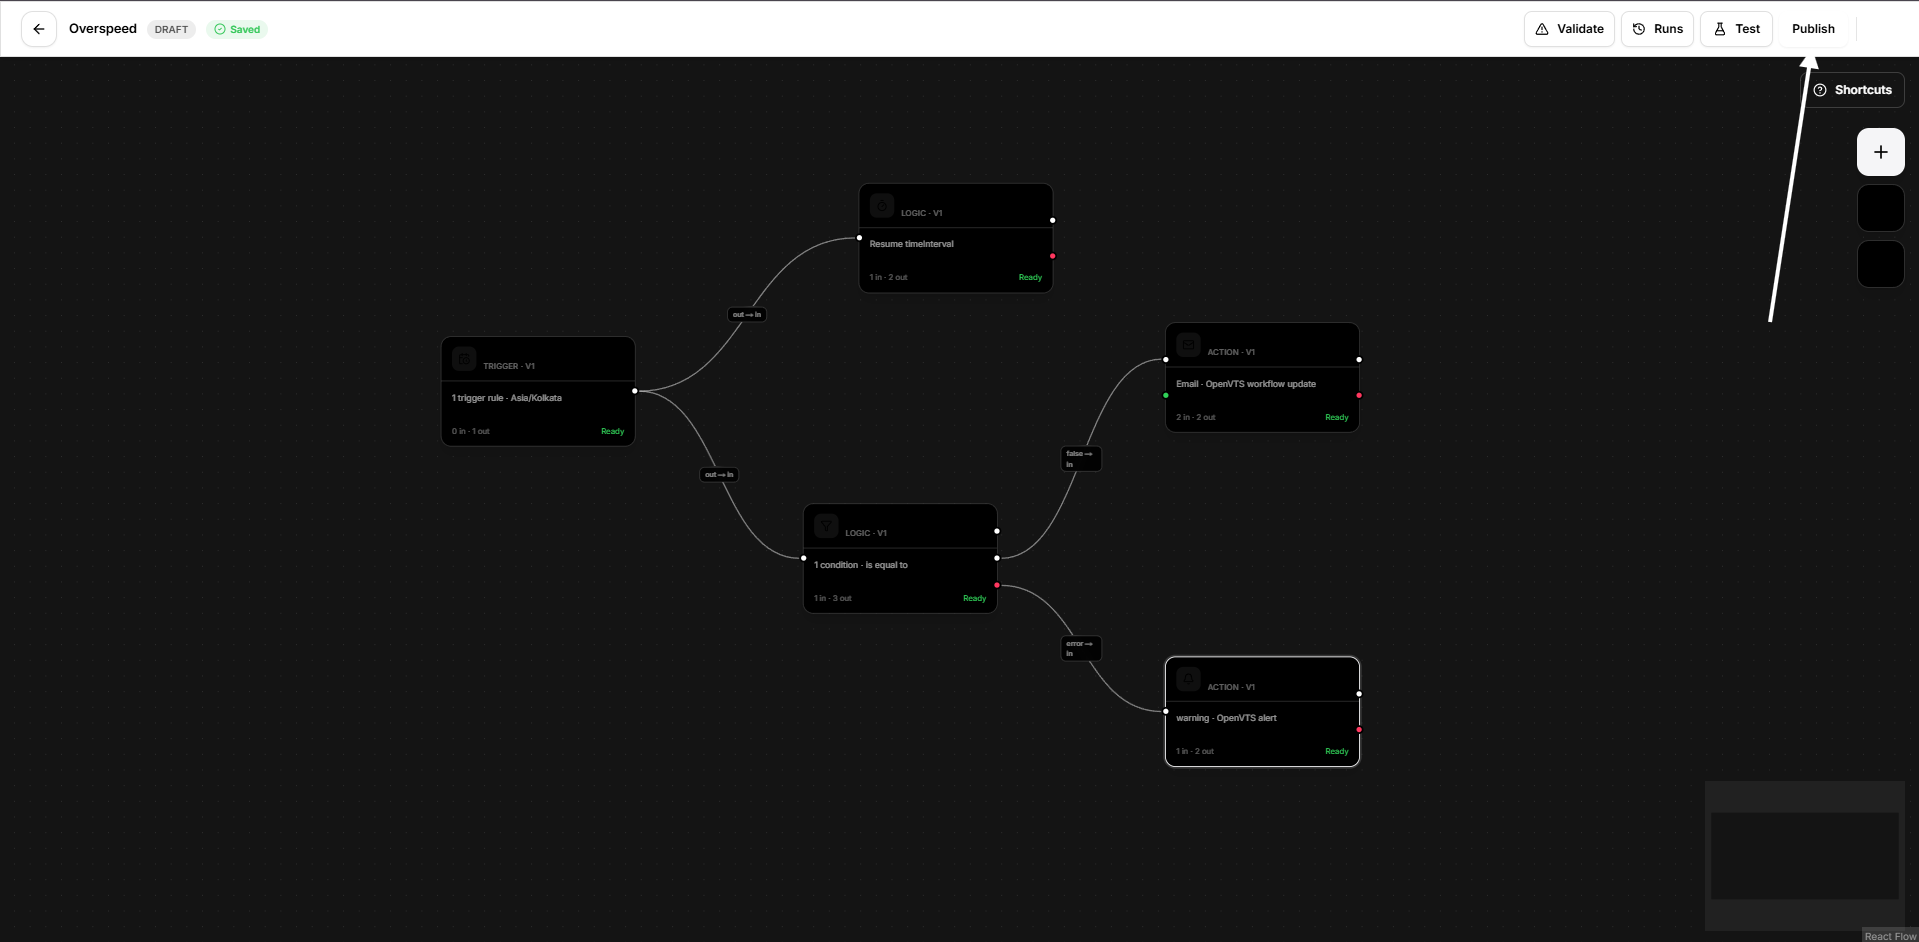
The Publish checklist provides a final review of the workflow.
Publishing creates a server version of the workflow and makes the valid workflow Active.
A published workflow can then respond to its configured trigger while the Workflow runtime is available on the Open VTS deployment.
Incoming Data Workflow
Once active, qualifying telemetry from the selected vehicles can start the workflow.
Scheduled Workflow
Once active, the scheduler starts the workflow according to the configured schedule.
Publishing should therefore be treated as the point where your automation moves from design into operational use.
Step 11 — Monitor Executions
Open the Executions section to review previous workflow runs.
Execution history helps you understand:
- whether the workflow started
- which nodes executed
- which route was followed
- node input and output
- whether an error occurred
- the final execution status
Use execution history when troubleshooting a workflow instead of changing nodes without first checking what actually happened.
Managing a Workflow After Publishing
A workflow can be managed from the Workflows list.
Depending on its current state, available actions include:
- Open editor
- Duplicate
- Activate
- Pause
- Archive
- Restore
- Delete
Pause
Use Pause when you want to temporarily stop an active workflow without deleting it.
Activate
Use Activate to resume a previously published workflow.
A workflow must have a published version before it can be activated.
Duplicate
Use Duplicate when you want to create a new workflow based on an existing one.
This can be useful when the logic is similar but the vehicles, conditions, or actions are different.
Archive
Use Archive for workflows you no longer want in normal active use but do not want to delete.
Delete
Use Delete only when the workflow should be permanently removed.
A Simple Example
Suppose you want Open VTS to notify you when a particular telemetry condition occurs.
The workflow could be:
1. Incoming Data
Select the vehicles that should be monitored.
↓
2. IF
Choose the telemetry field and define the condition.
↓
3. Send Notification
Create the message that should be sent when the condition is true.
Then:
- capture test data
- test the workflow
- validate it
- publish it
- monitor the first runs from Executions
This same pattern can be expanded gradually when your process requires additional logic or actions.
Recommended Way to Build Workflows
For your first workflows, keep them simple.
A strong first workflow usually has:
1 Trigger → 1 Condition → 1 Action
Once that works correctly, add more steps only when they solve a real requirement.
This makes the workflow easier to:
- understand
- test
- troubleshoot
- maintain
- modify later
The goal of Workflow is not to build the largest possible automation.
The goal is to make a repeatable fleet process clear, dependable, and automatic.
Important Notes
A User can only build workflow operations around resources authorized for that User account.
For vehicle-based workflows, selectable vehicles must be active, available to the User, and not blocked by their licence state.
Creating a workflow does not activate it. The workflow must first be configured, tested, validated, and published.
A valid published workflow requires exactly one enabled Incoming Data or Schedule trigger and at least one reachable action.
External actions may require their corresponding Open VTS integration to be configured before they can work.
The Code node cannot be published unless the isolated Workflow code runner is enabled on the Open VTS server.
Publishing creates an immutable workflow version. Later edits are made to the workflow draft and require publishing again when you want the new version to become operational.
Use Executions to understand workflow behaviour and failures rather than relying only on the visual canvas.
The Workflow editor requires a desktop-sized window for safe editing. On smaller windows, the canvas becomes read-only.