
Superadmin Payments
Review Administrator payment activity, monitor revenue and transaction status, filter and export payment records, and manually record payments received from Administrators.
Last updated August 18, 2026
Superadmin Payments
The Superadmin Payments page provides a consolidated view of payment transactions between Administrators and the Superadmin.
From this page, the Superadmin can:
- Review payment revenue
- Monitor successful, pending, and failed transactions
- Compare payment methods
- Filter payments by Administrator and date range
- Search and export transaction records
- Open individual transaction details
- Open the associated Administrator account
- Manually record a payment received from an Administrator
The page is intended for payment record management and financial visibility. It does not replace accounting software, bank statements, tax records, or payment-gateway settlement reports.
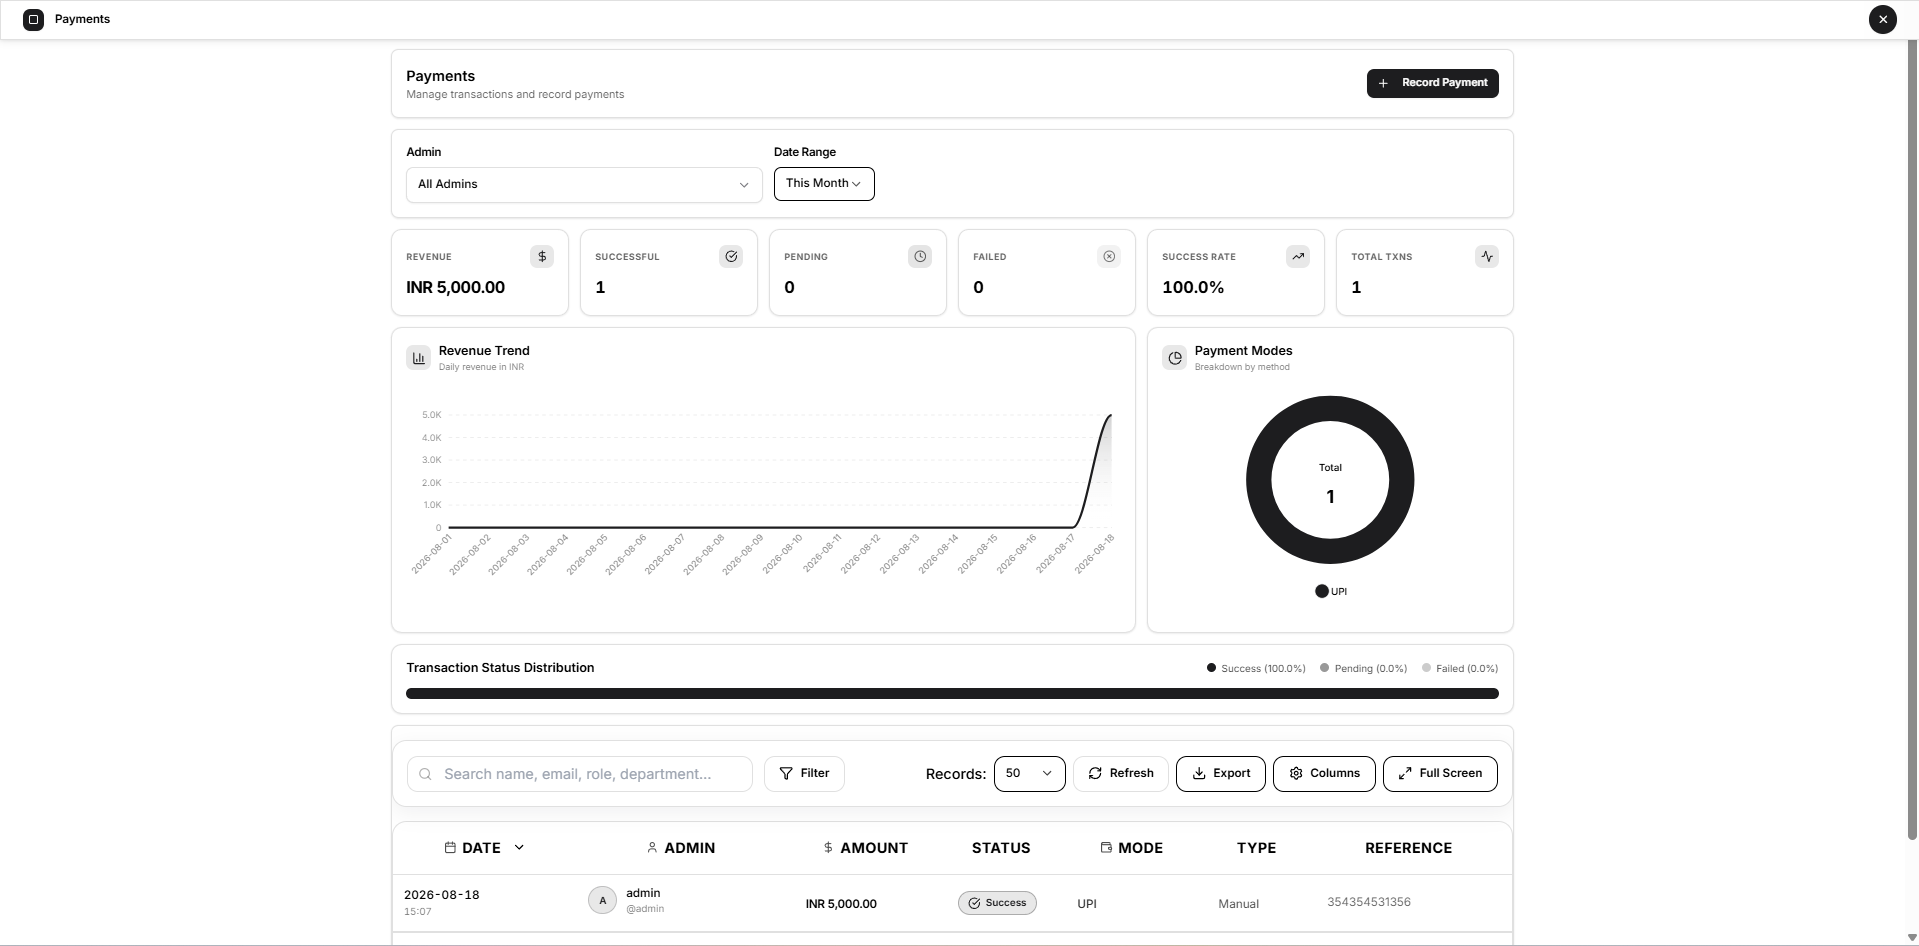
Recommended filename: superadmin-payments-overview.webp
Understanding the Payments Page
The Payments page contains five main areas:
- Page header and Record Payment action
- Administrator and date-range filters
- Payment summary cards
- Revenue and transaction analytics
- Transaction records table
The information shown in the analytics and transaction table is based on payment records associated with Administrators managed by the current Superadmin.
Filter Payments
Use the filters near the top of the page to change the payment information being reviewed.
Administrator
The Admin selector allows the Superadmin to view:
- All Administrators
- One specific Administrator
The default selection is All Admins.
Select a specific Administrator when reviewing:
- Their payment history
- Revenue received from that account
- Payment-mode usage
- Successful or failed transactions
- Manual payment records
Filtering by Administrator updates the payment analytics for that account.
Date Range
The Date Range selector controls the period used for payment analytics.
Available options are:
- This Month
- Last 30 Days
- This Year
- Custom
The default range is This Month.
This Month
Shows payment analytics from the first day of the current month through the current date.
Last 30 Days
Shows payment analytics for the latest thirty-day period.
This Year
Shows payment analytics from the beginning of the current year through the current date.
Custom
Allows the Superadmin to choose an exact start and end date.
When Custom is selected, an additional date-range field appears.
Select both dates to load the required period.
Payment Summary Cards
The summary cards provide a quick overview of payment performance for the selected filters.
The available cards are:
- Revenue
- Successful
- Pending
- Failed
- Success Rate
- Total Transactions
Revenue
Shows the total value of successful transactions within the selected analytics range.
The amount is displayed with its currency.
Example:
INR 50.00
Pending and failed transactions are not included in revenue.
When reviewing Administrators configured with different currencies, filter by a specific Administrator to obtain a clear account-level revenue view.
Successful
Shows the number of transactions with a Success status.
Successful transactions are included in:
- Revenue
- Revenue Trend
- Payment Modes analysis
A manual payment recorded successfully by the Superadmin is created with a Success status.
Pending
Shows the number of transactions currently marked as Pending.
A pending transaction has been created but has not yet reached a successful or failed result.
Manual payments recorded from this page are not created as Pending.
Failed
Shows the number of transactions marked as Failed.
A failed transaction is not included in the Revenue total.
Open its transaction details to review any available:
- Failure code
- Failure message
- Provider information
- Transaction metadata
Success Rate
Shows the percentage of all transactions that completed successfully.
The calculation is:
Successful Transactions ÷ Total Transactions × 100
Example:
100.0%
A high success rate indicates that most transactions in the selected period completed successfully.
Total Transactions
Shows the complete number of successful, pending, and failed transactions within the current analytics view.
Revenue Trend
The Revenue Trend chart shows successful payment revenue by date.
[Image Reference: Keep the Revenue Trend chart visible in the main Payments overview screenshot.]
The chart helps the Superadmin identify:
- Days on which payments were received
- Revenue increases or decreases
- Periods without successful payments
- Payment patterns over the selected date range
Hover over a chart point to view the revenue value for that date.
The chart uses only successful transactions. Pending and failed amounts are excluded.
Payment Modes
The Payment Modes chart shows how successful transactions are distributed by payment method.
The centre of the chart displays the total number of successful transactions included in the breakdown.
Possible payment modes include:
- Bank Transfer
- Cash
- UPI
- Card
- Wallet
- Razorpay
- Stripe
- Other
Only payment modes that contain transaction data appear in the chart.
Example: If one successful transaction was recorded as a Bank Transfer, the chart displays a total of 1 and identifies Bank Transfer as the payment method.
Transaction Status Distribution
The Transaction Status Distribution bar compares the percentage of transactions in each status.
It displays:
- Success percentage
- Pending percentage
- Failed percentage
This provides a quick visual summary of overall payment completion.
Example:
Success 100.0% · Pending 0.0% · Failed 0.0%
Transaction Records
The transaction table provides the detailed payment records behind the analytics.
Each row represents one transaction.
The table contains:
- Date
- Admin
- Amount
- Status
- Mode
- Type
- Reference
Recommended filename: superadmin-payments-transactions-table.webp
Transaction Columns
Date
Shows the transaction date and time using the Superadmin’s configured date and time preferences.
Admin
Shows:
- Administrator name
- Administrator username
Select the Administrator name to open the Administrator’s detailed management page.
Amount
Shows the transaction amount and currency.
Status
Shows one of the following:
- Success
- Pending
- Failed
Mode
Shows the payment method associated with the transaction.
Examples include:
- Bank Transfer
- Cash
- UPI
- Card
Type
Shows how the transaction was created.
A transaction recorded using the Record Payment form appears as:
Manual
Other payment workflows may use a different transaction type.
Reference
Shows the optional reference entered for the transaction.
A dash appears when no reference was provided.
Search Transactions
Use the search field above the table to find matching transaction records.
The table search can match information contained in the loaded rows, including:
- Administrator name
- Administrator username
- Amount
- Currency
- Status
- Payment mode
- Payment type
- Reference
- Date information
Clear the search text to restore all loaded records.
Filter Transaction Records
Select Filter to apply detailed table filters.
Available filter categories include:
- Status
- Payment Mode
- Payment Type
Multiple values can be selected where supported.
Example: Apply Success and Bank Transfer to review successful bank-transfer payments only.
Table filters work together with the search field.
Records per Page
Use Records to control how many transactions appear on each table page.
Pagination controls at the bottom allow navigation between result pages.
The footer shows:
- Number of displayed results
- Current page
- Total number of pages
- First, Previous, Next, and Last controls
Refresh
Select Refresh to request the latest transaction data and payment analytics.
Use Refresh after:
- Recording a manual payment
- Expecting a new transaction
- Changing payment information elsewhere
- Investigating a recently completed transaction
Export Transactions
Select Export to download the currently filtered and sorted transaction data.
Available export formats are:
- CSV
- XLSX
- JSON
- HTML
Exports include Open VTS report branding and the selected reporting-range reference.
Use:
- CSV or XLSX for spreadsheet analysis
- JSON for structured processing
- PDF for a fixed report
- HTML for a browser-readable report
Exported payment records may contain confidential financial and account information. Store them securely.
Columns
Select Columns to customize the transaction table.
The column panel allows the Superadmin to:
- Show or hide available columns
- Reorder columns
- Reset the table to its default column arrangement
Column preferences affect the table display and may also influence the exported report fields.
Full Screen
Select Full Screen to expand the transaction table across the available display.
This is useful when:
- Reviewing many records
- Comparing long references
- Working on a smaller screen
- Preparing an export
Exit fullscreen using the same control or the browser’s standard fullscreen exit action.
Open Transaction Details
Select a transaction row to open its Transaction Details drawer.
[Image Reference: Add a screenshot after selecting a transaction row. Show the amount, status, transaction information, parties, and metadata.]
Recommended filename: superadmin-payments-transaction-details.webp
The drawer can show:
- Amount and currency
- Transaction status
- Transaction ID
- Date and time
- Payment type
- Payment mode
- Reference
- Provider
- Provider reference
- From account
- To account
- Recorded By
- Failure information
- Transaction metadata
Some fields appear only when information exists for the selected transaction.
Copy Transaction Information
Copy controls can appear beside fields such as:
- Transaction ID
- Reference
- Provider reference
Select the copy icon to copy the value to the clipboard.
Parties
The Parties section identifies the accounts associated with the transaction.
For a manual payment recorded by the Superadmin:
- From: Selected Administrator
- To: Current Superadmin
- Recorded By: Current Superadmin
This makes it clear whose payment was recorded and who created the record.
Failure Information
For a failed transaction, the drawer can display:
- Failure code
- Failure message
Use these details when investigating gateway or transaction-processing problems.
Metadata
When additional transaction metadata exists, it appears as structured technical information.
Metadata may identify:
- How the transaction was created
- Related workflow information
- Provider-specific values
- Internal transaction context
Record a Manual Payment
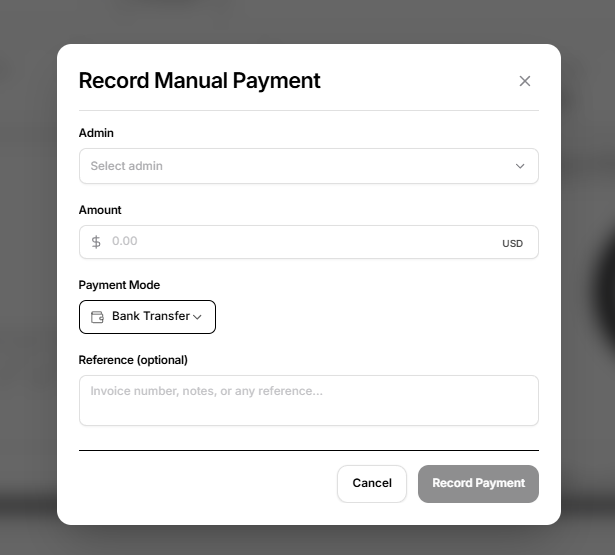
Select Record Payment in the upper-right corner to open the Record Manual Payment window.
Recommended filename: superadmin-payments-record-manual-payment.webp
Use this form when a payment has been received outside an automated online-payment workflow and needs to be recorded in Open VTS.
Examples include:
- Bank transfer received directly
- Cash payment received
- UPI payment verified separately
- Card payment recorded outside Open VTS
- Payment confirmed through another provider
Recording a manual payment creates a financial transaction record. It does not transfer money from the Administrator or contact a bank or payment gateway.
Complete the Manual Payment Form
Admin
Select the Administrator whose payment is being recorded.
This field is required.
Only Administrators managed by the current Superadmin can be selected.
The selected Administrator also determines the currency displayed beside the Amount field.
Amount
Enter the amount received.
The amount must:
- Be greater than zero
- Contain numbers only
- Use no more than two decimal places
Valid examples include:
5050.001250.75
Invalid examples include:
-5050.999Fifty
The currency is inherited from the selected Administrator’s configured currency and is displayed on the right side of the field.
The currency cannot be manually changed from this form.
Payment Mode
Select the method through which the payment was received.
Available options are:
- Bank Transfer
- Cash
- UPI
- Card
- Wallet
- Razorpay
- Stripe
- Other
The default payment mode is Bank Transfer.
Choose the mode that reflects how the payment was actually received.
Reference
Use the optional Reference field to add supporting payment information.
Suitable references include:
- Bank transaction number
- Invoice number
- Receipt number
- Payment note
- Internal finance reference
- Provider confirmation number
Example:
Invoice OVT-2026-0142
Do not enter passwords, card numbers, banking credentials, or other sensitive authentication information.
Save the Manual Payment
After entering the required information, select Record Payment.
The button becomes available only when:
- An Administrator has been selected
- A valid positive amount has been entered
- A payment request is not already being processed
When the record is created successfully:
- The payment is stored as a transaction
- The transaction type is set to Manual
- The transaction status is set to Success
- The selected payment mode is stored
- The selected Administrator becomes the From account
- The Superadmin becomes the To account
- The current Superadmin is stored as Recorded By
- The modal closes
- The payment analytics and transaction records refresh
Select Cancel or the X to close the form without recording a payment.
Manual Payment Does Not Perform Other Billing Actions
Recording a payment does not automatically:
- Assign credits to the Administrator
- Deduct credits
- Renew a vehicle
- Extend a vehicle expiry date
- Activate a subscription plan
- Generate an invoice
- Process a bank transfer
- Capture funds from a payment gateway
- Send a refund
Use the relevant Administrator, credit, plan, or vehicle-renewal workflow when one of these additional actions is required.
This separation prevents a financial record from changing an account or vehicle configuration unintentionally.
Payments and Credits Are Different
A payment records money received from an Administrator.
Credits control the Administrator’s available Open VTS usage balance.
These are separate records:
- Payments: Financial transaction history
- Credits: Platform usage allocation
Recording a payment does not automatically increase the Administrator’s credits.
To add credits, open the Administrator’s Credit History section and use Assign Credits.
Recommended Payment Workflow
Use the following process when recording and verifying payments:
- Open Payments.
- Select the relevant Administrator filter.
- Review existing transactions to avoid duplicates.
- Verify the payment using the appropriate external financial record.
- Select Record Payment.
- Choose the correct Administrator.
- Enter the exact amount received.
- Confirm the displayed currency.
- Select the correct payment mode.
- Add a useful payment reference.
- Select Record Payment.
- Confirm that the new transaction appears in the table.
- Open the row and verify the complete transaction details.
- Perform any separate credit, plan, or expiry action when required.
Preventing Duplicate Payment Records
Before recording a manual payment, check:
- Administrator
- Amount
- Payment date
- Payment mode
- Reference
- Existing recent transactions
Open VTS stores each submitted manual payment as a separate successful transaction.
Submitting the same external payment twice can create duplicate revenue records.
Use a unique payment or invoice reference whenever one is available.
Empty, Loading, and Error States
No Transaction Data
When no transaction records exist for the selected analytics range, the charts display a no-data state.
Empty Transaction Table
The table displays no results when:
- No transactions exist
- The current search has no match
- The selected table filters exclude all records
Clear the search or filters to restore available records.
Administrators Cannot Be Loaded
If the Administrator list cannot be loaded, the selection fields may remain unavailable and an error notification appears.
Refresh the page and try again.
Invalid Amount
An error appears when the amount:
- Is empty
- Is zero
- Is negative
- Contains invalid characters
- Contains more than two decimal places
Payment Cannot Be Recorded
If the server rejects the request, Open VTS displays the returned error message and does not close the form.
Verify the Administrator, amount, permissions, and server connection before trying again.
Important Differences
Revenue vs Total Transactions
- Revenue includes the value of successful transactions only.
- Total Transactions includes successful, pending, and failed records.
Payment Mode vs Payment Type
- Payment Mode describes how the payment was made, such as Bank Transfer or Cash.
- Payment Type describes the transaction workflow, such as Manual.
Payment Status vs Administrator Status
- Payment Status describes the transaction result.
- Administrator Status describes whether the Administrator account is active or inactive.
Manual Payment vs Online Payment
- Manual Payment: Records a payment verified outside the automated payment workflow.
- Online Payment: May be created through an integrated payment provider and can move through Pending, Success, or Failed states.
Security and Privacy
The Payments page contains sensitive financial and account information.
Before publishing screenshots, recordings, or exports, hide or replace:
- Administrator names
- Usernames
- Email addresses
- Transaction IDs
- Payment references
- Provider references
- Invoice numbers
- Customer company information
- Internal metadata
- Exact financial amounts when confidential
Never enter or publish:
- Banking passwords
- Card numbers
- CVV codes
- UPI PINs
- Private API keys
- Payment-gateway secrets
- Login credentials
Use demonstration accounts and sample payment records in public documentation.
Next Step
Continue to Superadmin SSL to configure or review secure HTTPS access for the Open VTS deployment.