
Admin Vehicle Management
Add Vehicle, import, assign, configure, monitor, and manage vehicles from the Open VTS Admin workspace.
Last updated August 19, 2026
Admin Vehicle Management
The Vehicles workspace allows an Admin to manage the complete lifecycle of vehicle records within their business.
Use this section to:
- Add vehicles individually or through CSV bulk upload.
- Assign vehicles to users.
- Manage vehicle identity and account status.
- Review telemetry logs and vehicle events.
- Send commands to tracking devices.
- Create computed sensors.
- Upload vehicle documents.
- Configure distance, speed, odometer, engine hours, and ignition behaviour.
Required Role
You must be signed in with an Admin account.
The Vehicles list and all related records are limited to the current Admin’s scope.
How to Open Vehicles
- Open the Admin Home page.
- Select Vehicles.
- The Vehicles workspace opens in a full-screen application window.
Select the X button in the upper-right corner to return to Admin Home.
Vehicles List
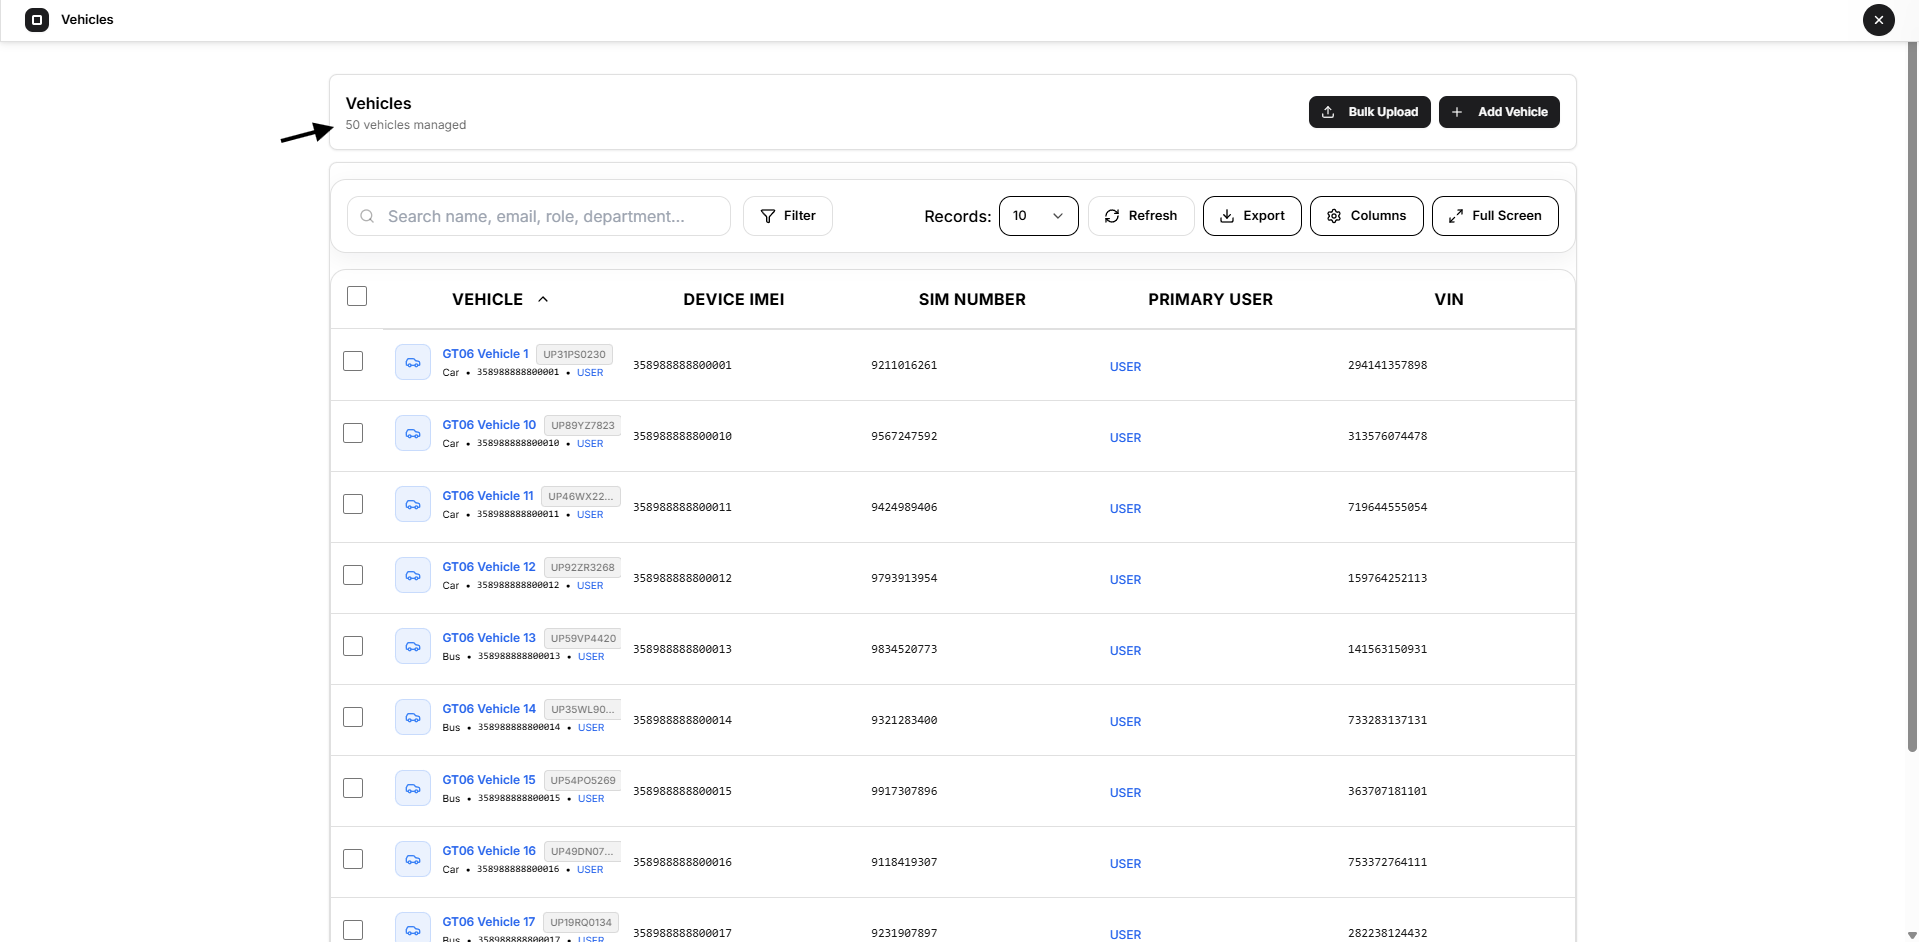
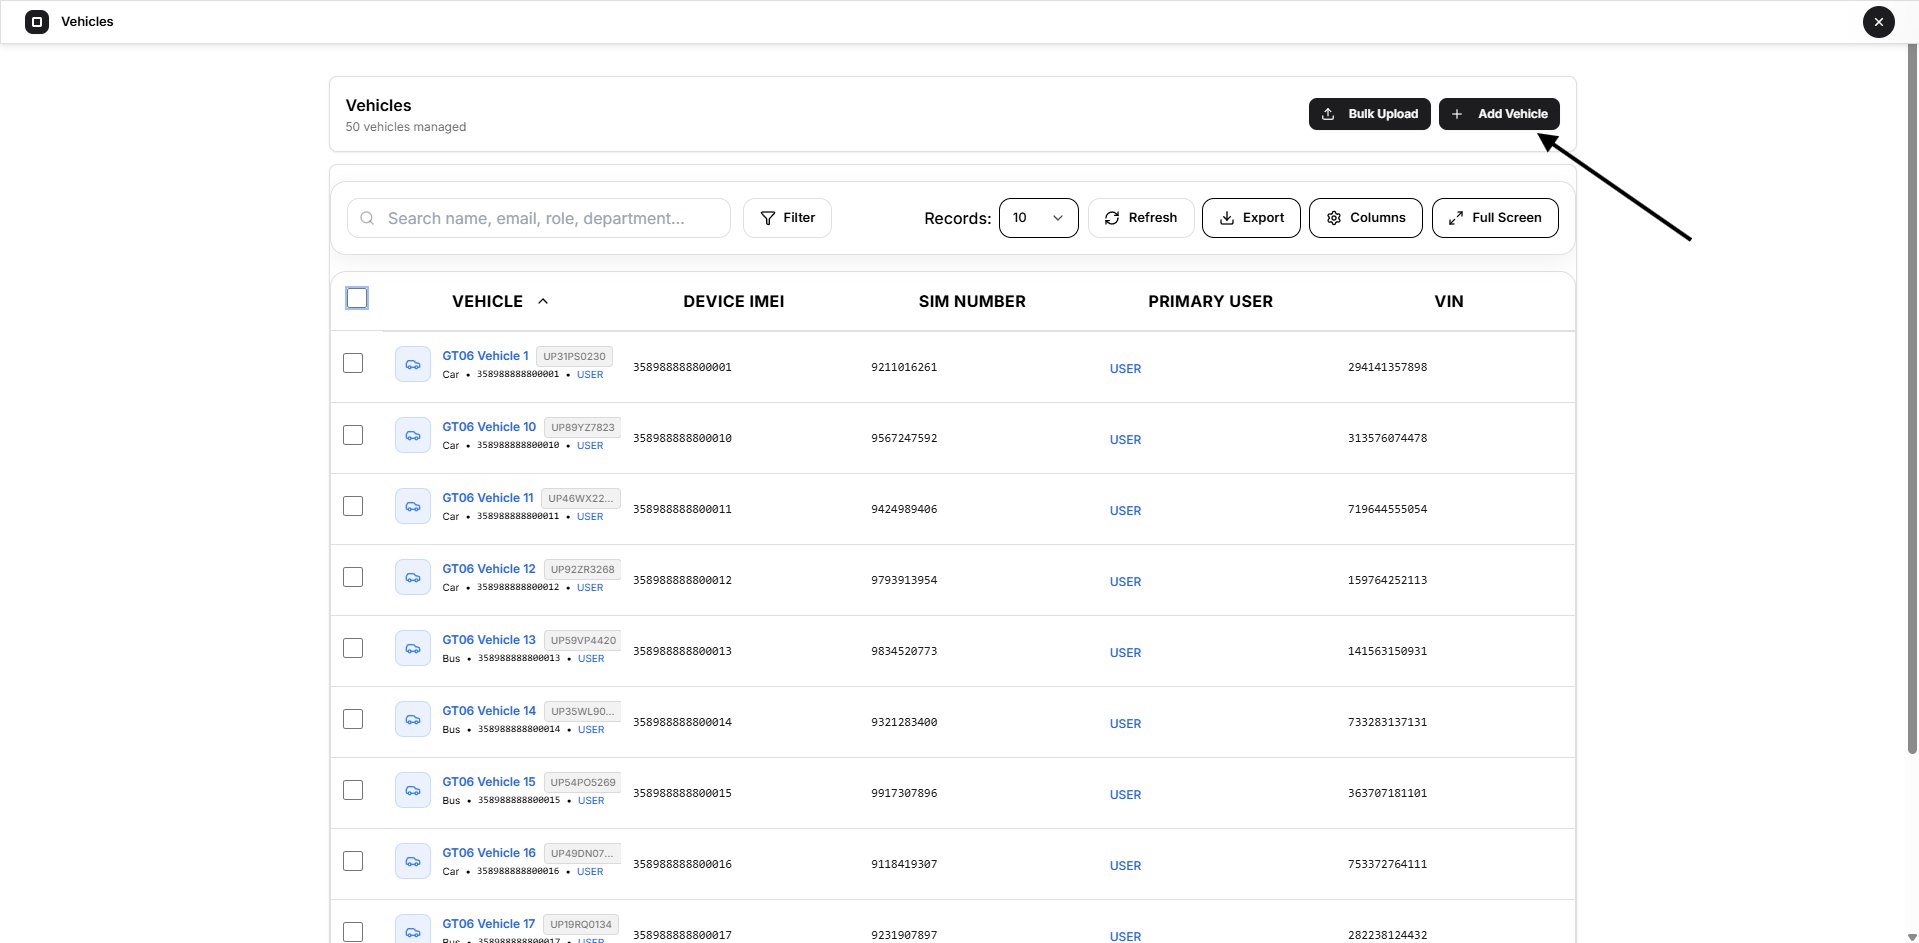
The main Vehicles page displays all vehicle records managed by the Admin.
Vehicle Table
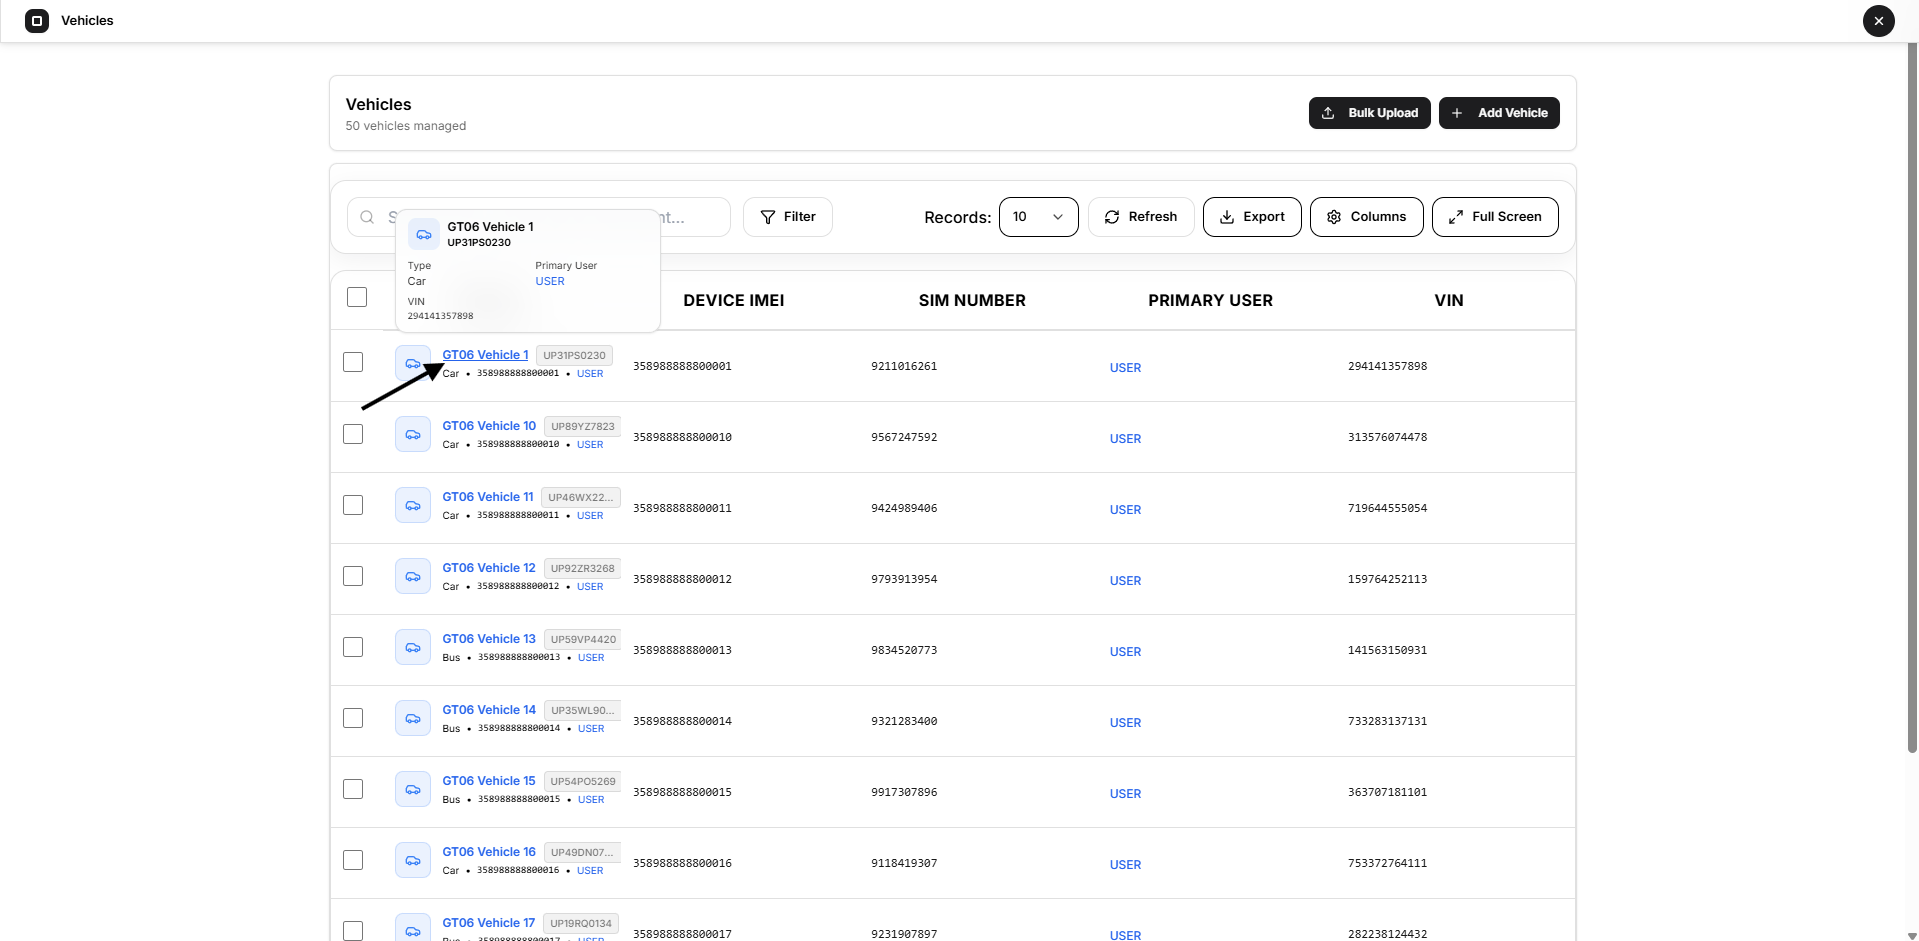
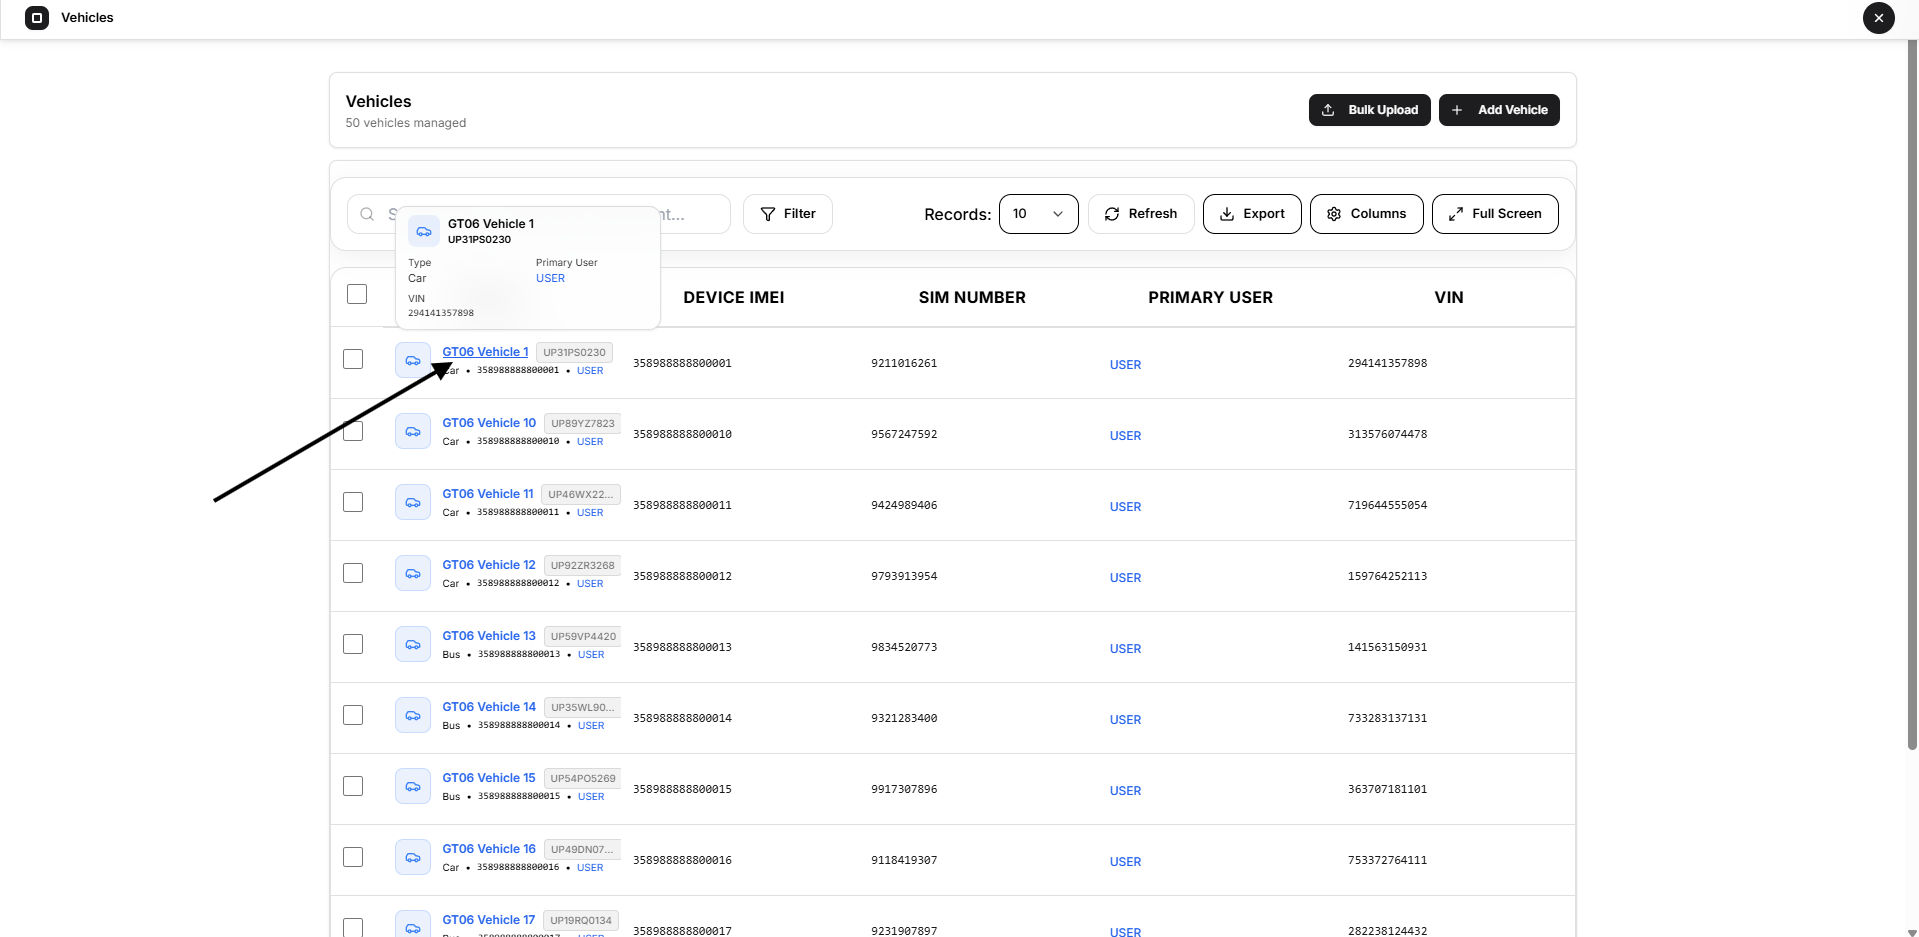
Select a vehicle name to open its complete vehicle profile.
Filter Vehicles
Select Filter to open the dynamic-filter drawer.
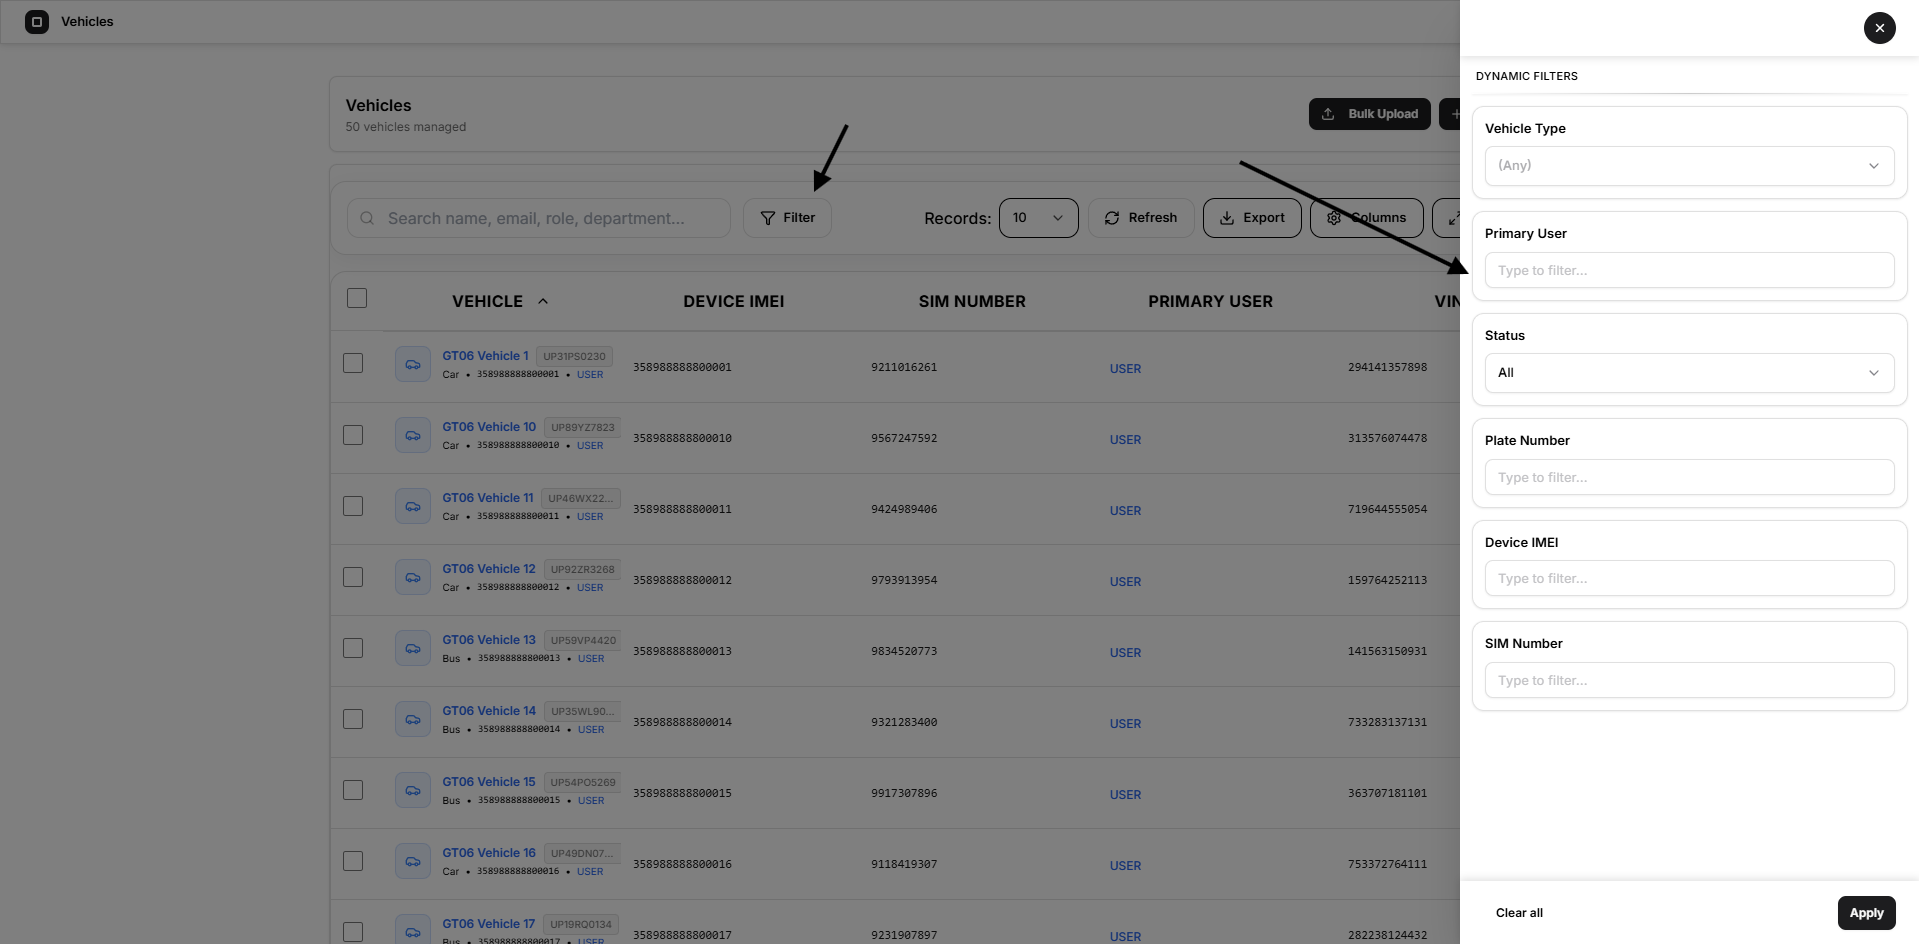
Available filters are:
- Vehicle Type
- Primary User
- Status
- Plate Number
- Device IMEI
- SIM Number
Select Apply to use the selected filters. Select Clear all to remove them.
Bulk Vehicle Actions
Select the checkbox beside one or more vehicles to display the bulk-action bar.
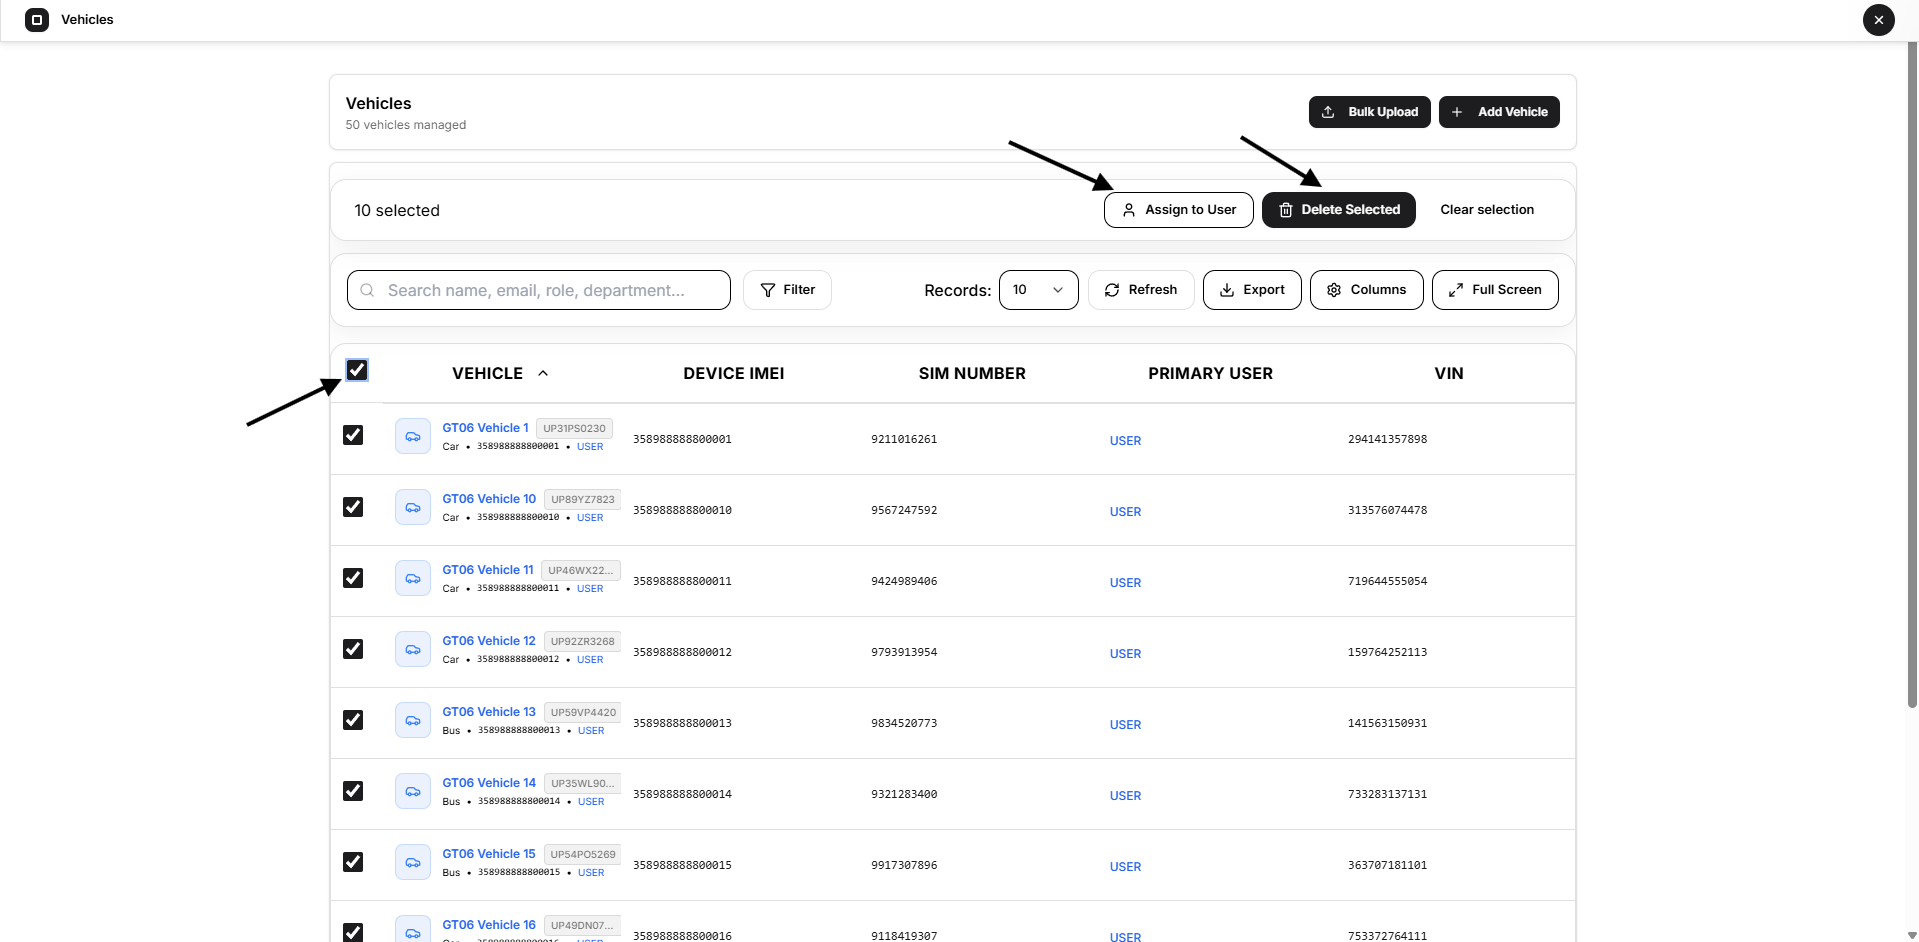
Available actions are:
- Assign to User
- Delete Selected
- Clear selection
Assign Selected Vehicles to a User
- Select the required vehicles.
- Select Assign to User.
- Choose an available user.
- Select Assign.
Open VTS links the selected vehicles to the chosen user.
This action assigns access to the selected records. It does not change their device, plan, or vehicle identity.
Delete Selected Vehicles
Select Delete Selected to open the confirmation dialog.
Vehicle deletion is permanent and cannot be undone.
Add a Vehicle Manually
Select Add Vehicle to create an individual vehicle record.
Add Vehicle Fields
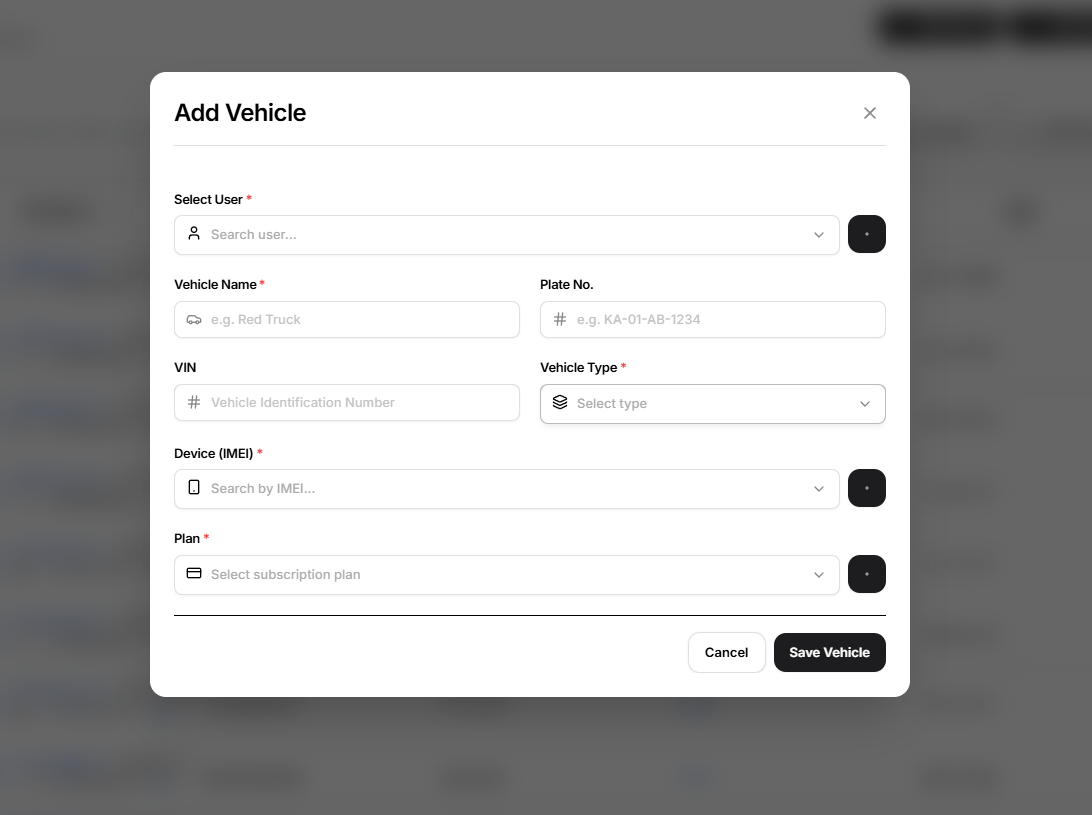
The Plan selector displays the configured plan name, price, currency, and duration.
Create the Vehicle
Select the primary user.
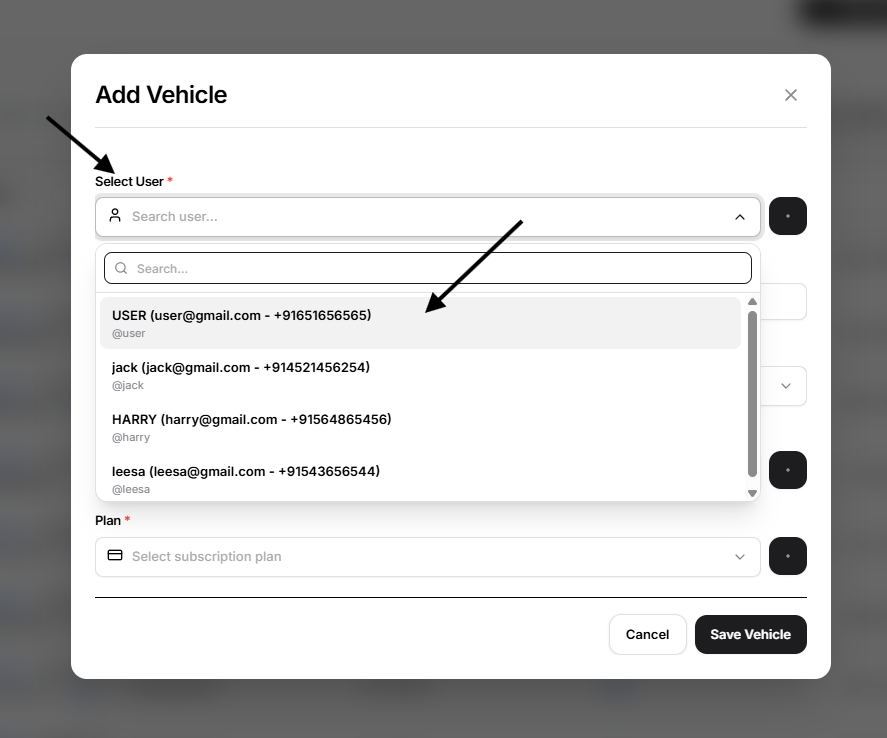
If the user is not created before then create new user here directly.
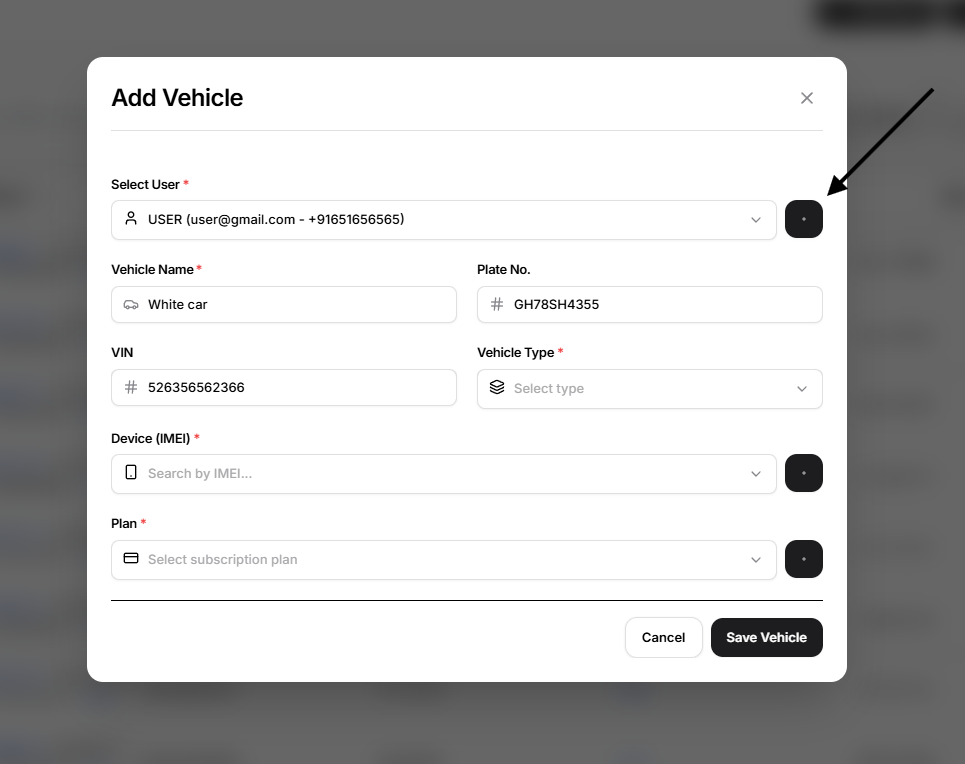
Enter the vehicle name.
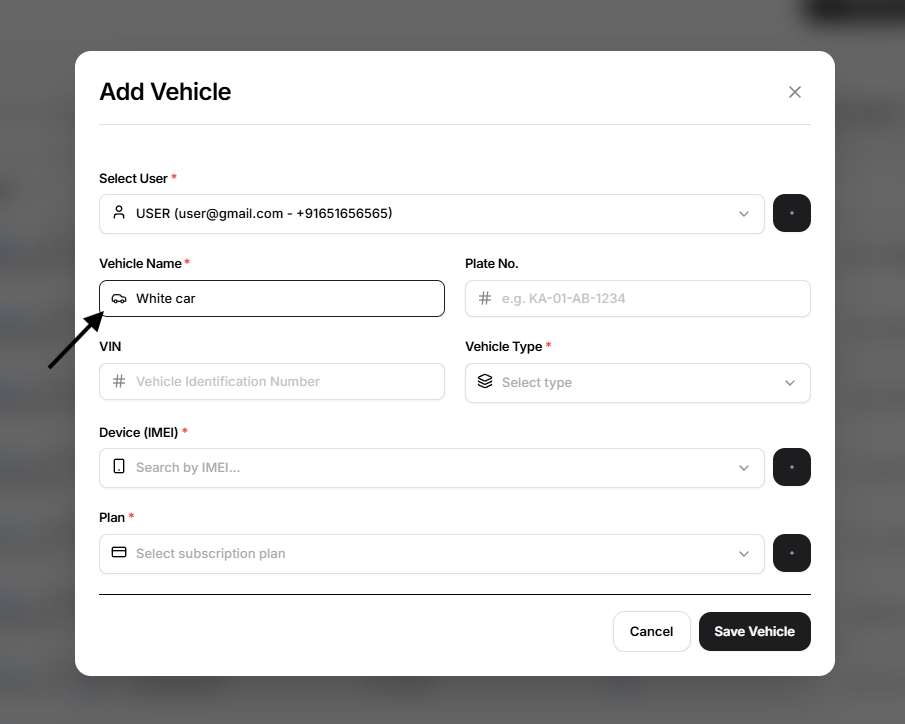
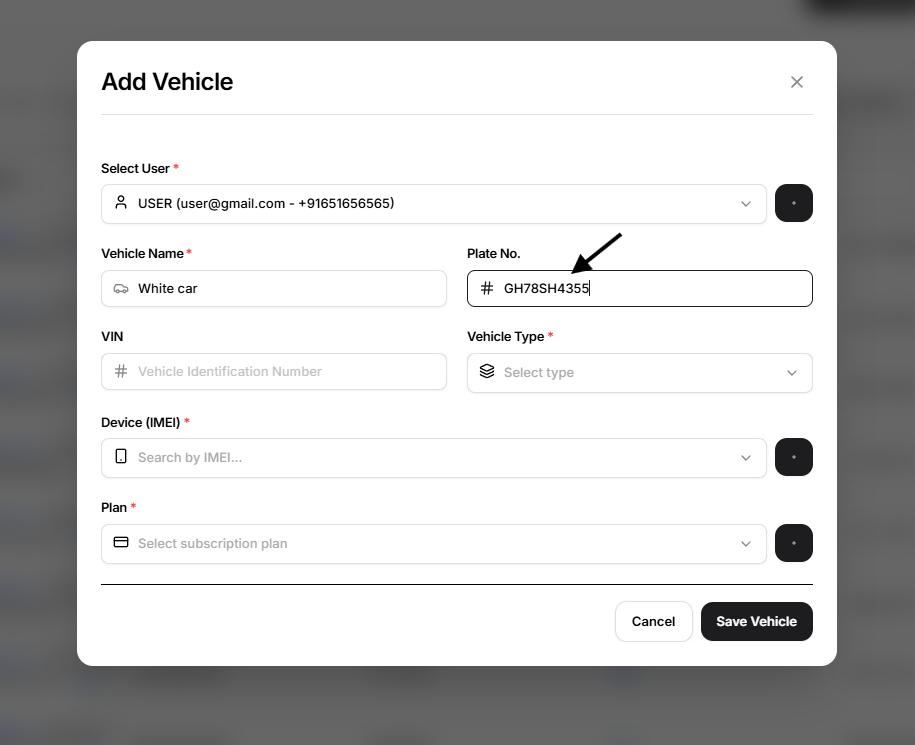
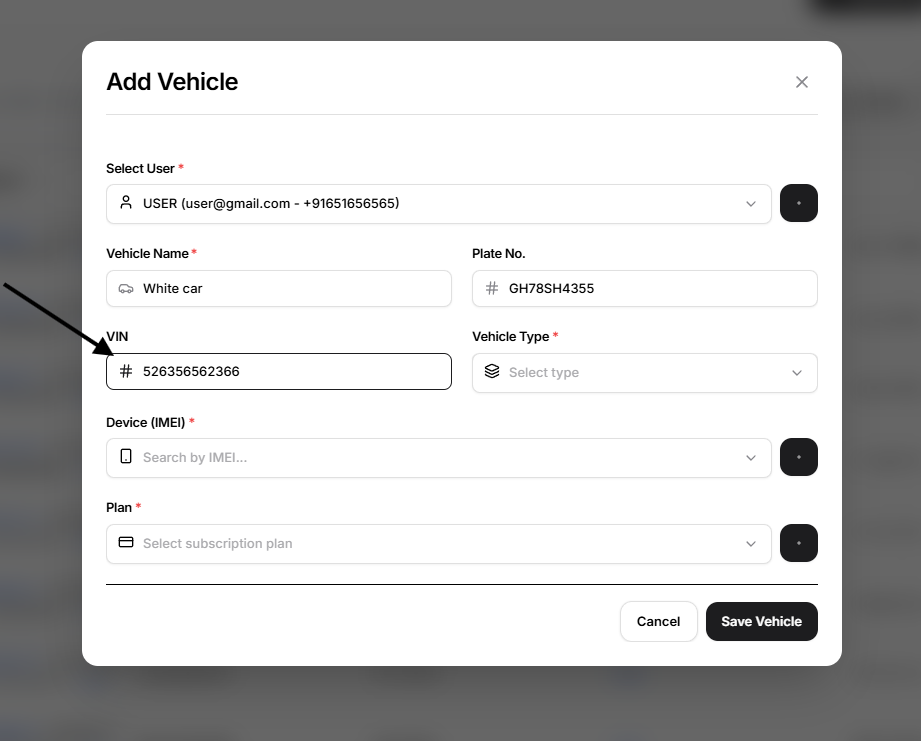
Add the plate number and VIN when available.
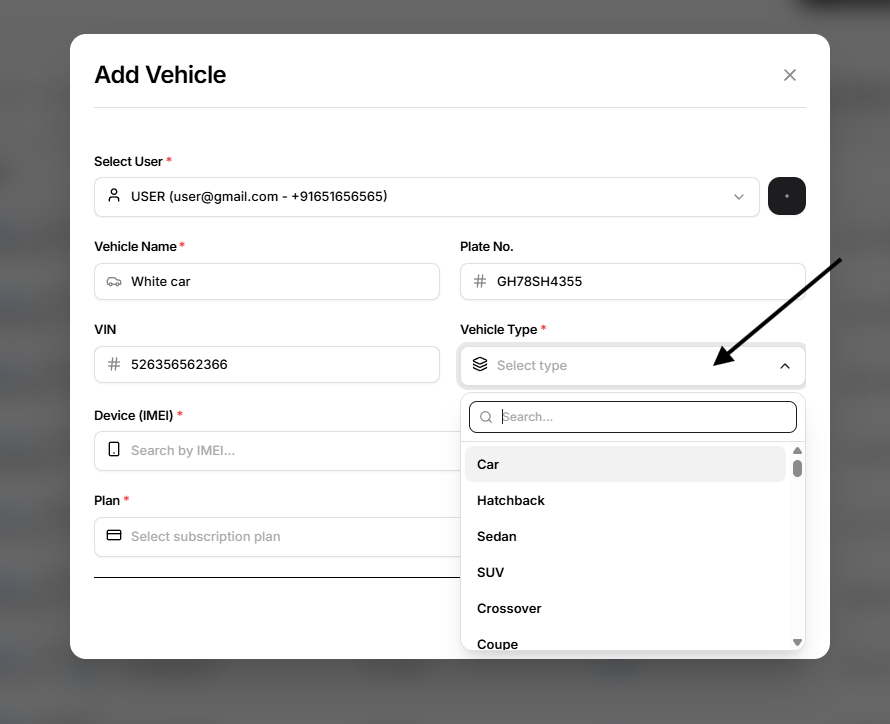
Select the vehicle type.
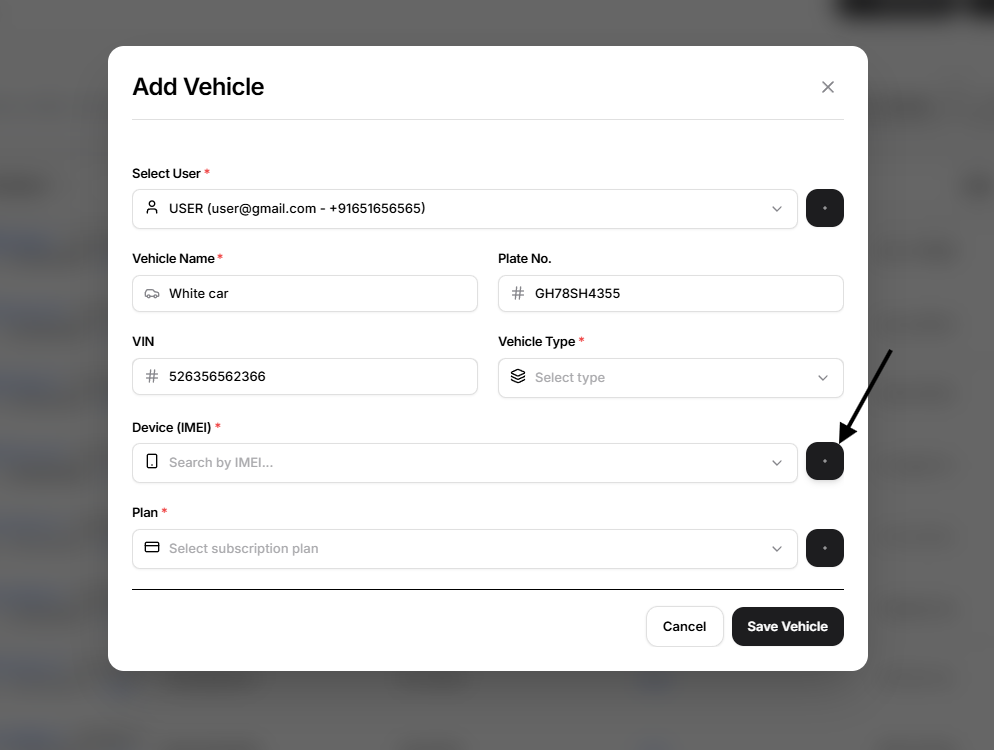
Select the device IMEI.
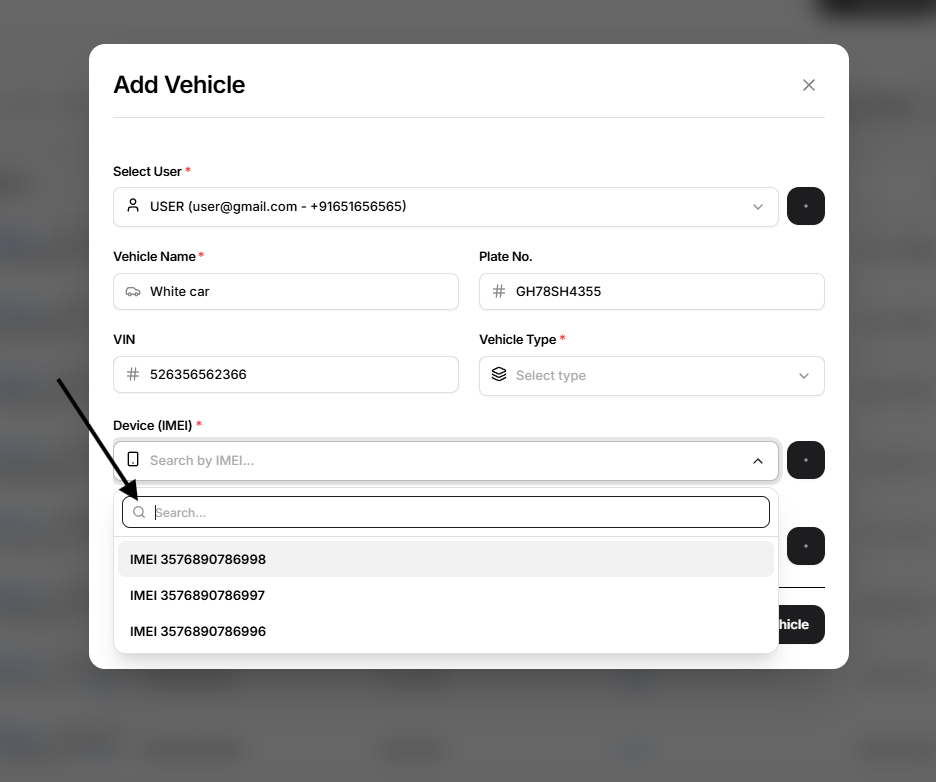
If IMEI is not created in inventory then create new IMEI here directly.
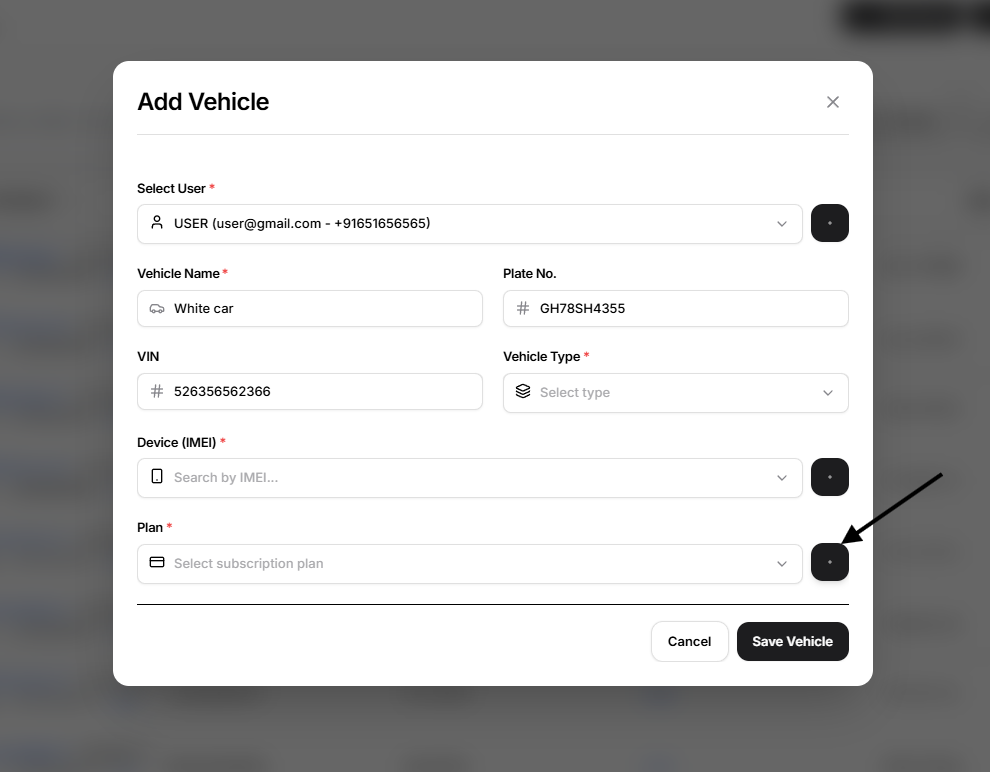
Select the subscription plan.
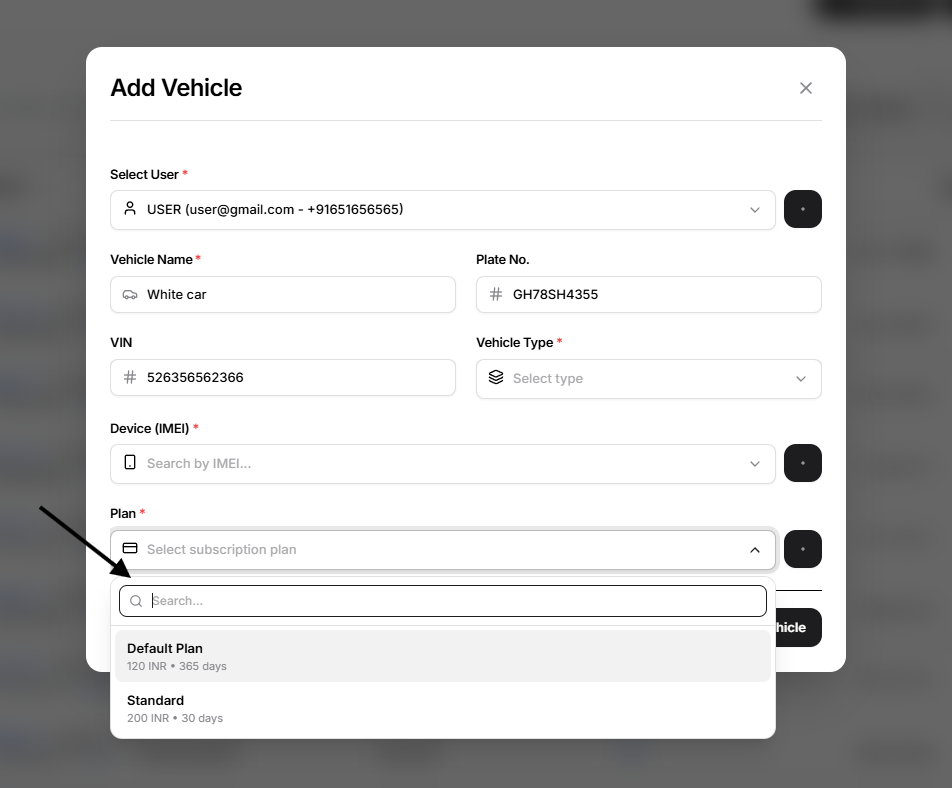
If plan not exist or created before in plan section then create new plan here directly
Select Save Vehicle.
Open VTS validates the required information before creating the record.
Vehicle Bulk Upload
Select Bulk Upload when several vehicles need to be created together.
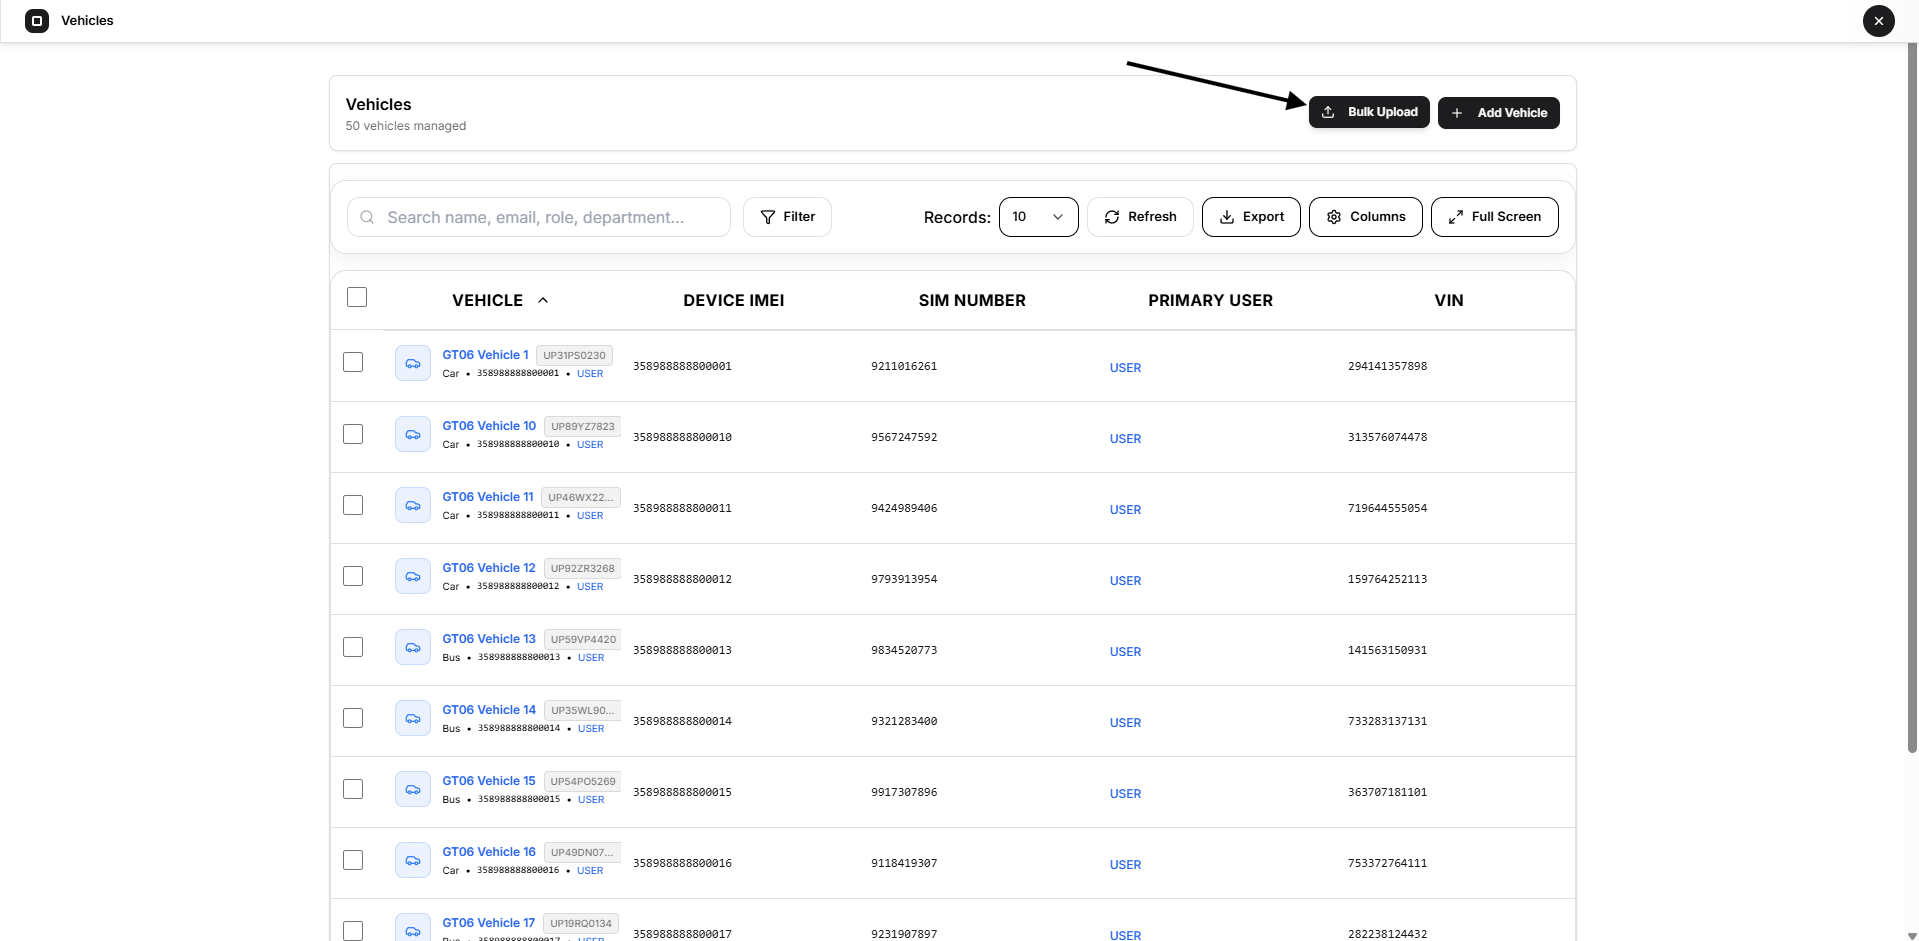
The workflow follows these stages:
Upload → Map → Validate → Process → Completed
Step 1 — Upload or Paste CSV
Choose:
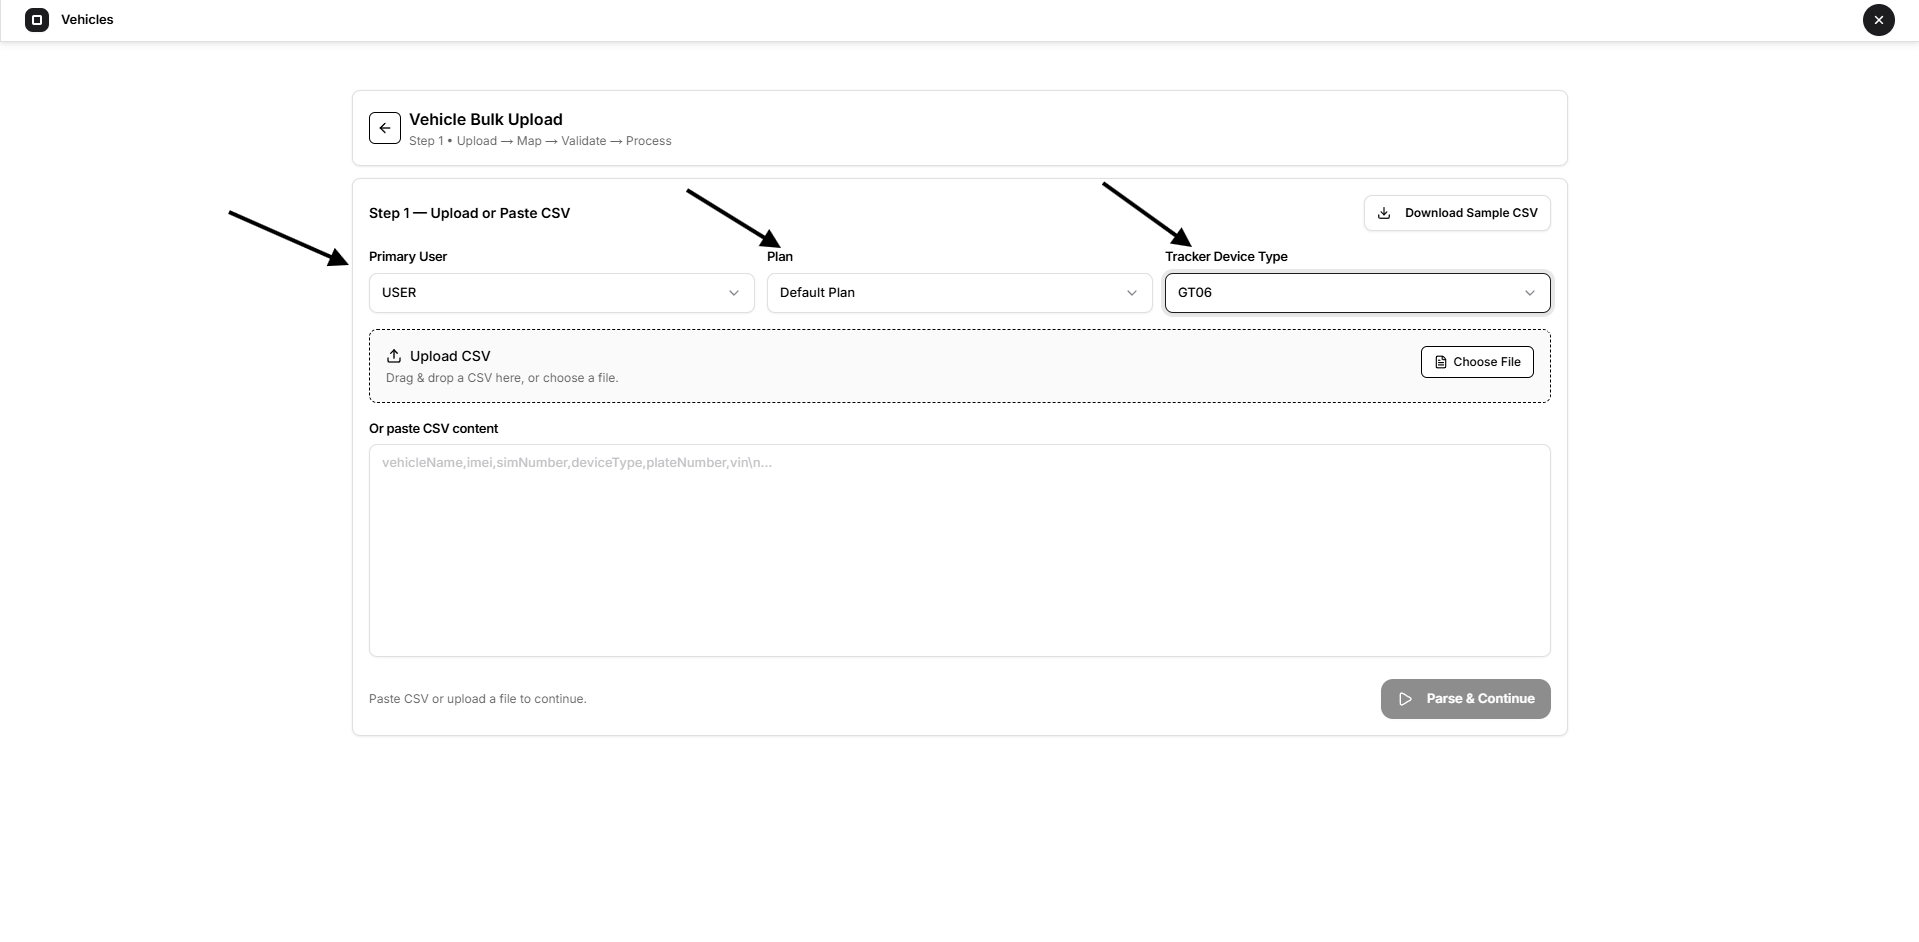
- Primary User
- Plan
- Tracker Device Type
You can then:
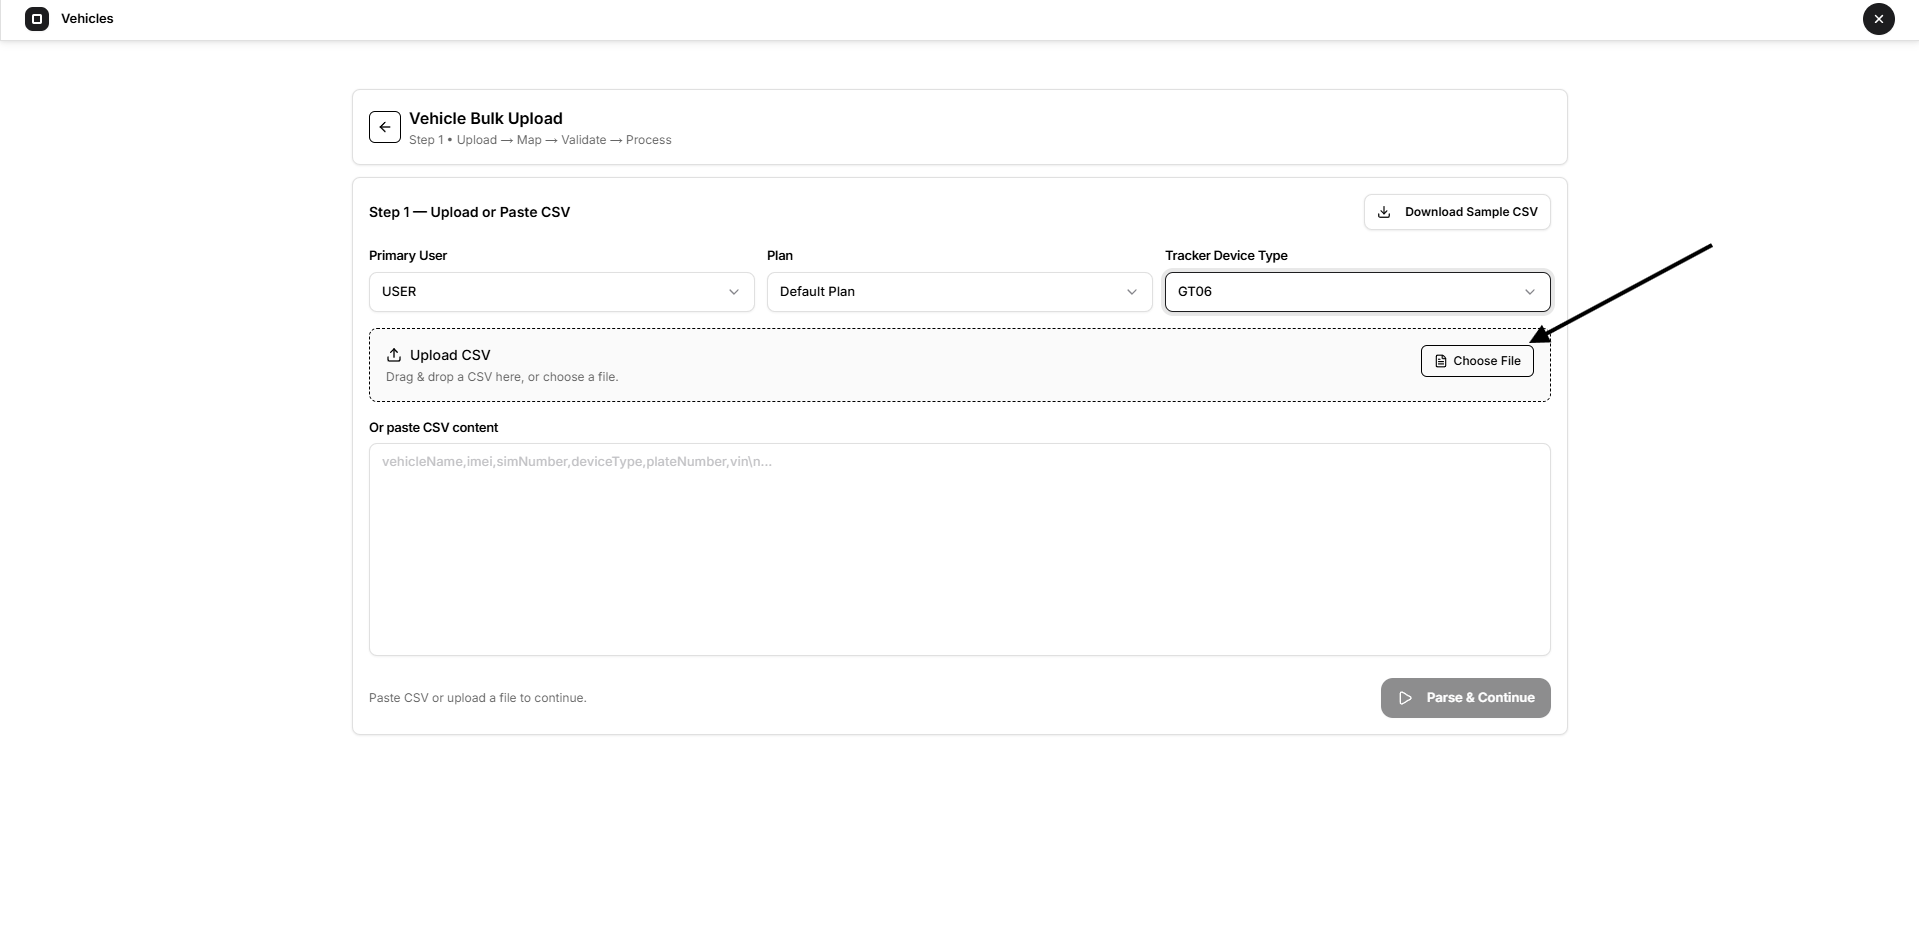
- Drag and drop a CSV file.
- Select Choose File.
- Paste CSV content directly.
- Select Download Sample CSV to obtain the expected format.
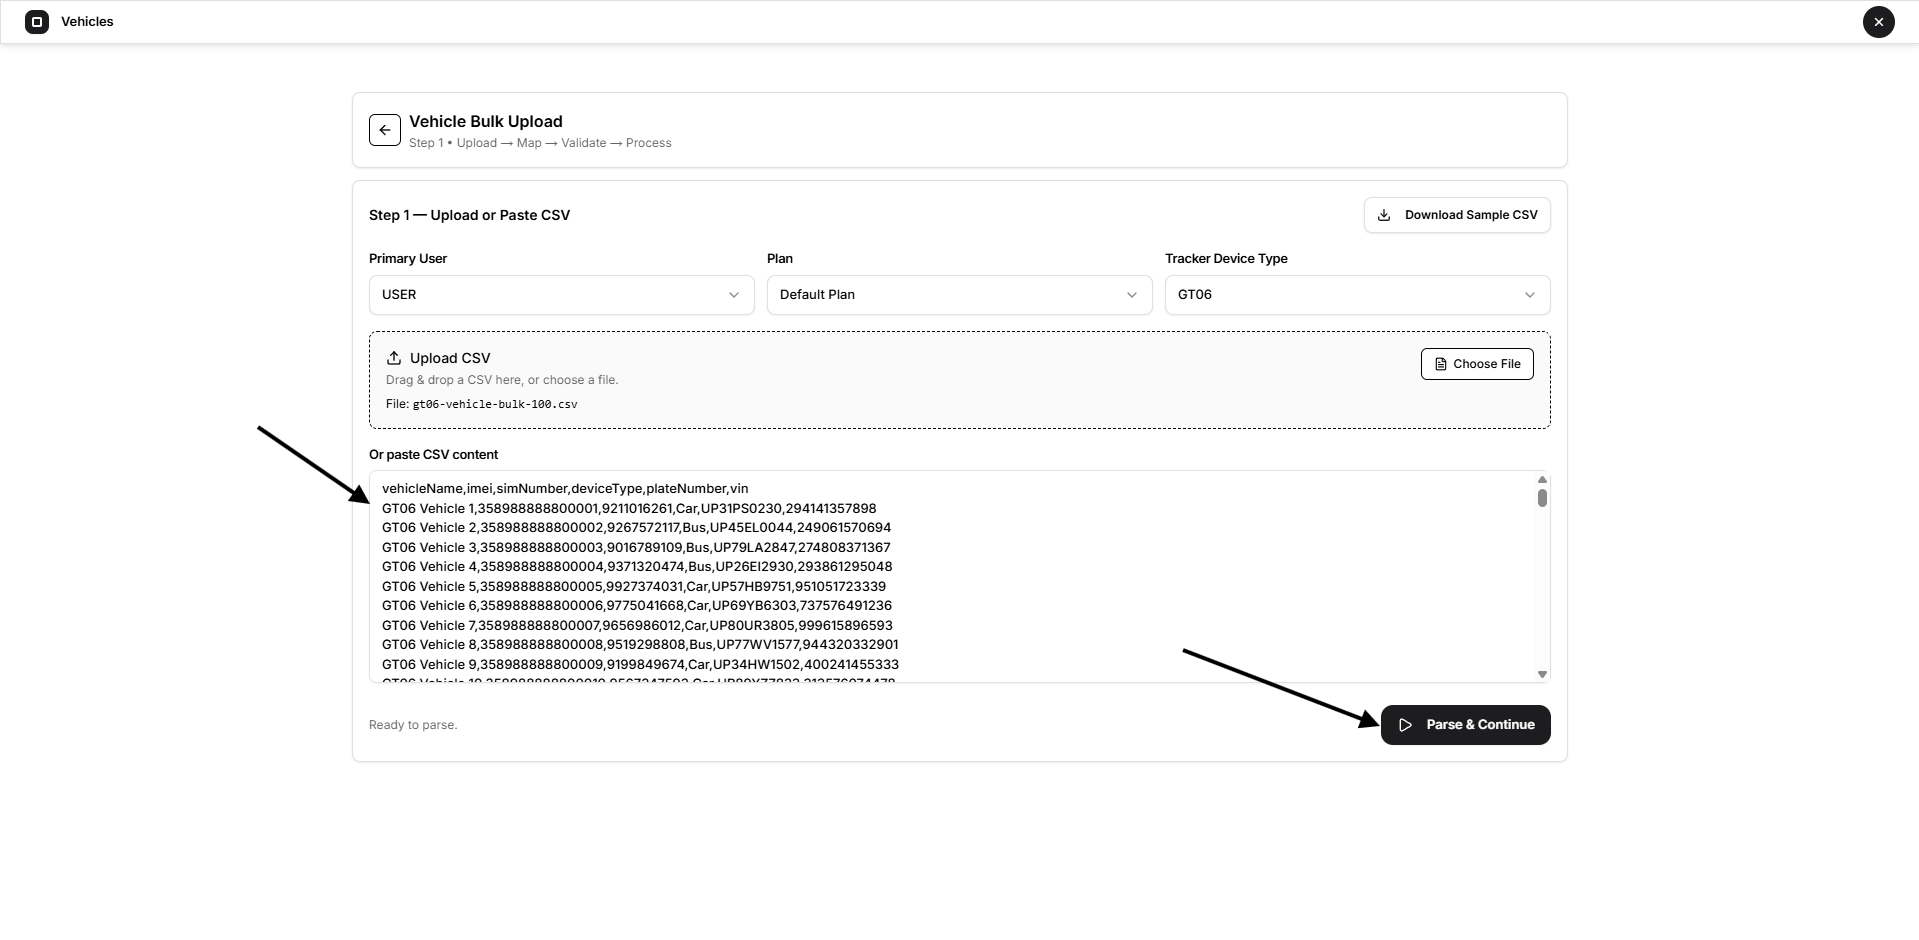
Select Parse & Continue after adding the data.
Step 2 — Preview and Column Mapping
Map each CSV column to the correct Open VTS field.
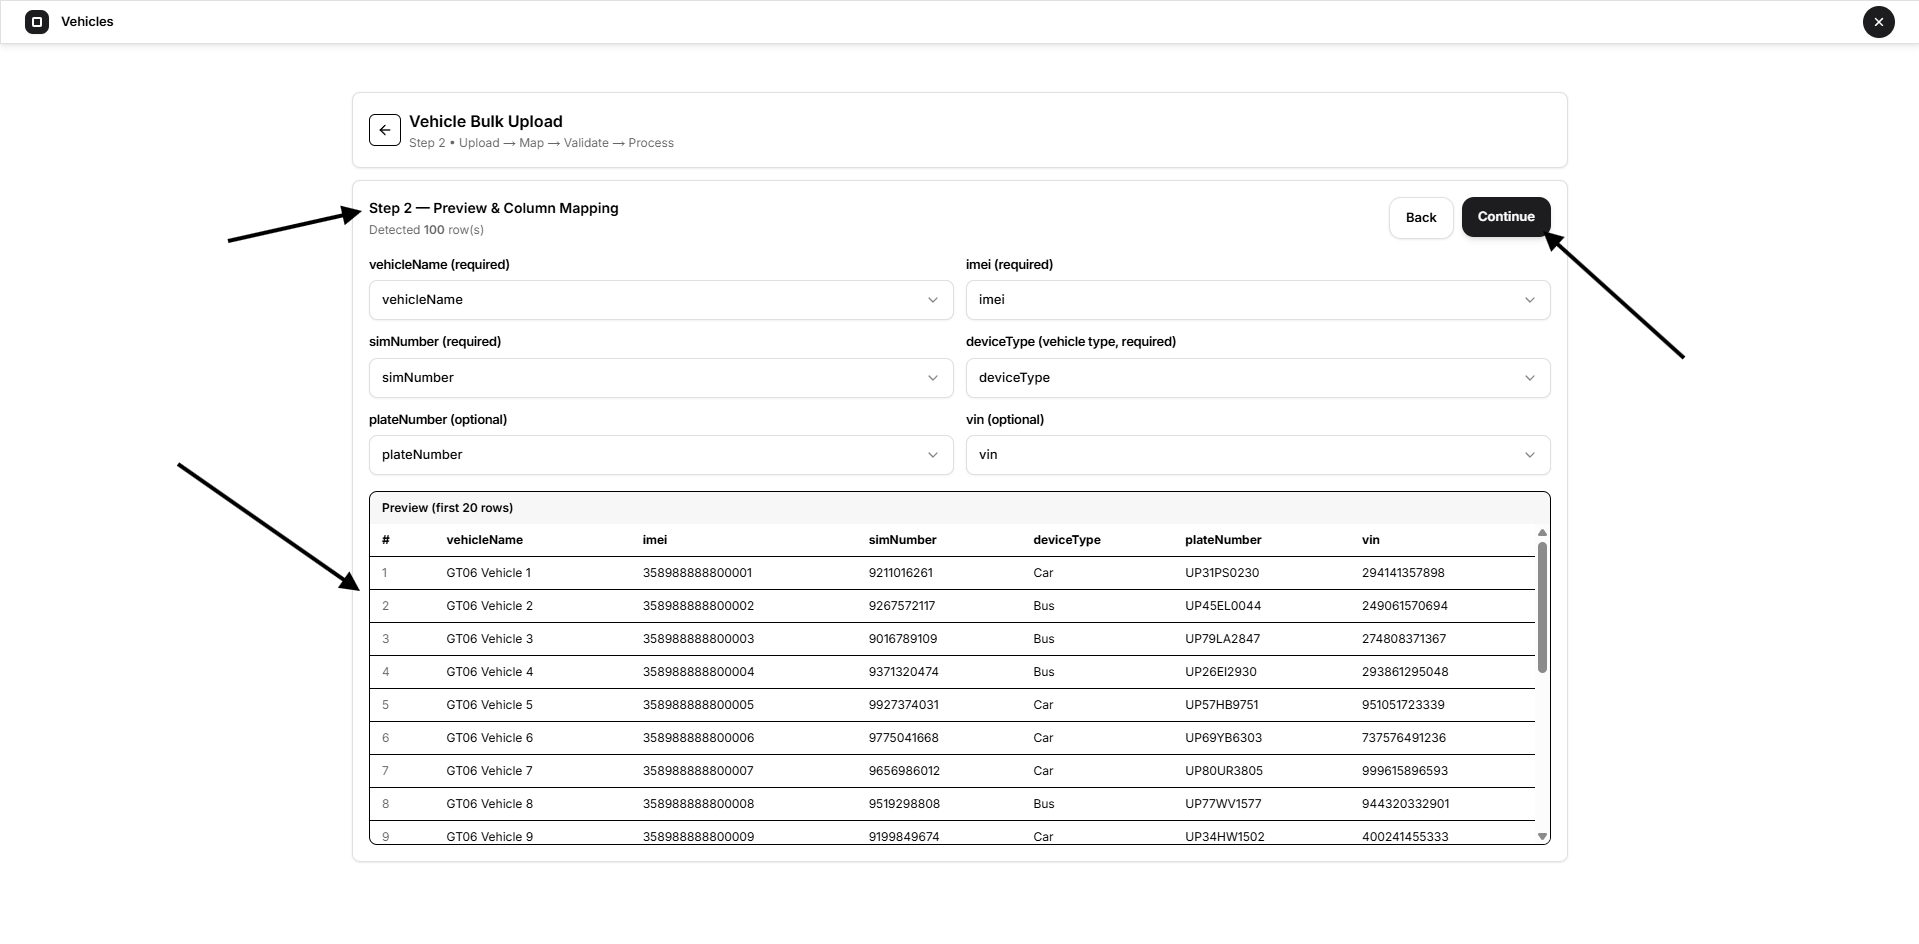
Required mappings are:
- vehicleName
- imei
- simNumber
- deviceType
Optional mappings are:
- plateNumber
- vin
Review the detected-row count and data preview before continuing.
Step 3 — Validation
Validation checks the uploaded data before processing.
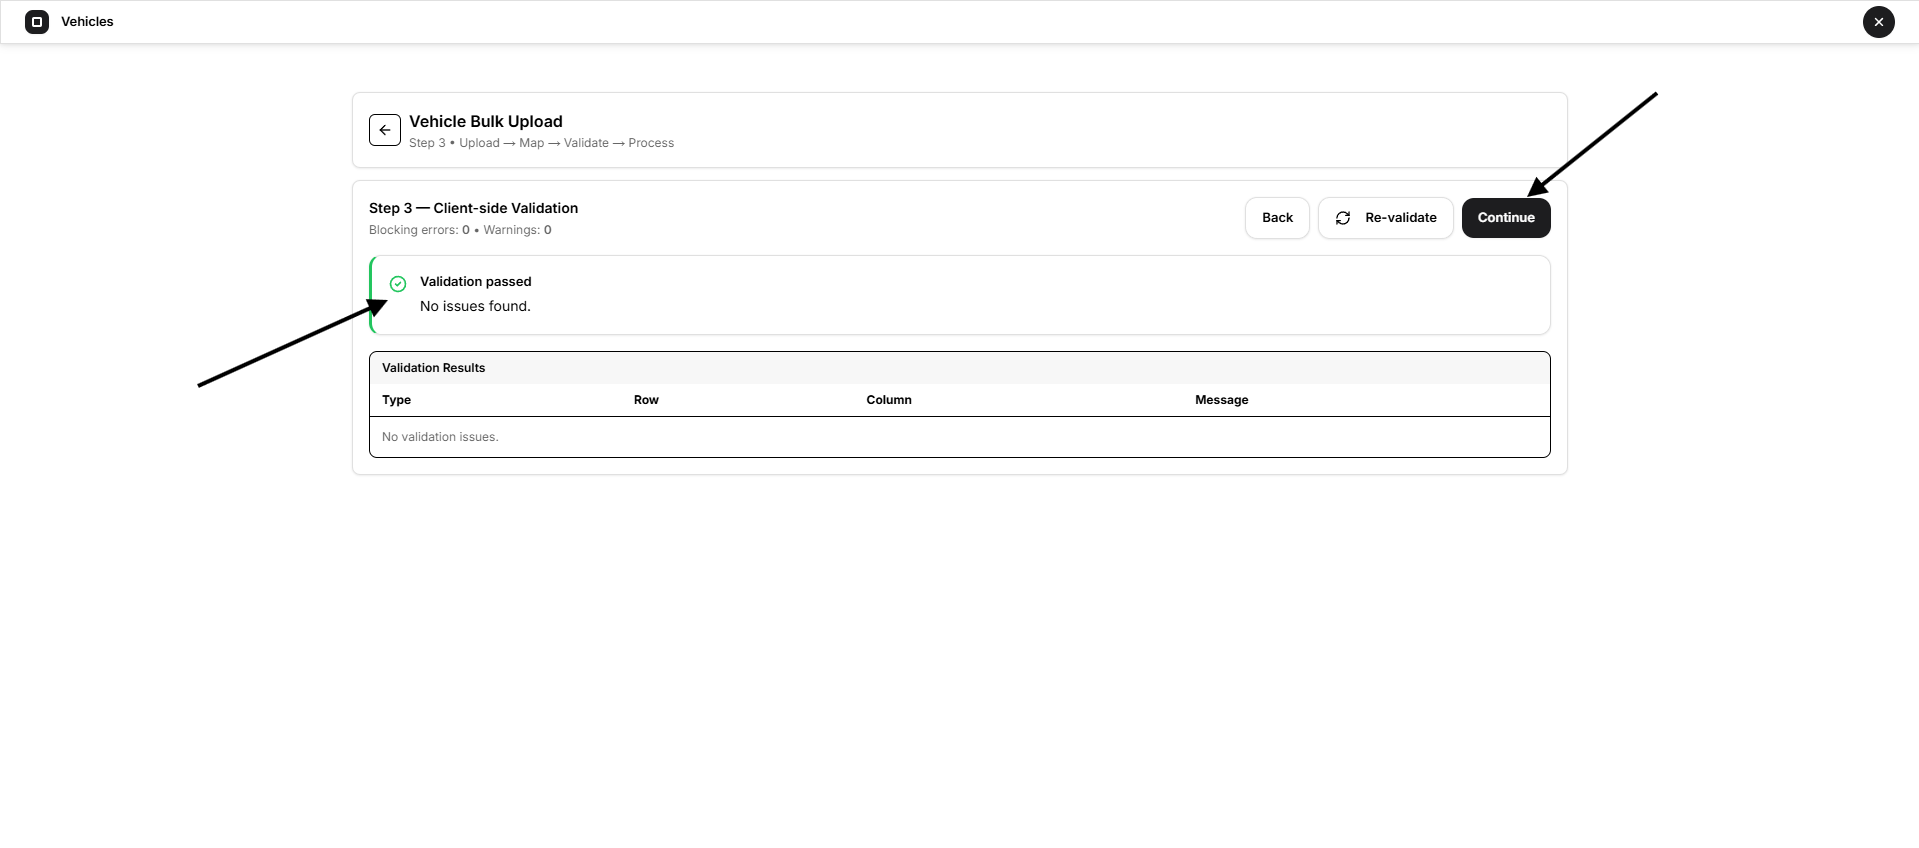
The page displays:
- Blocking errors.
- Warnings.
- Row and column involved.
- Validation message.
Select Re-validate after correcting the data. Continue only when no blocking errors remain.
Step 4 — Processing
The processing page displays:
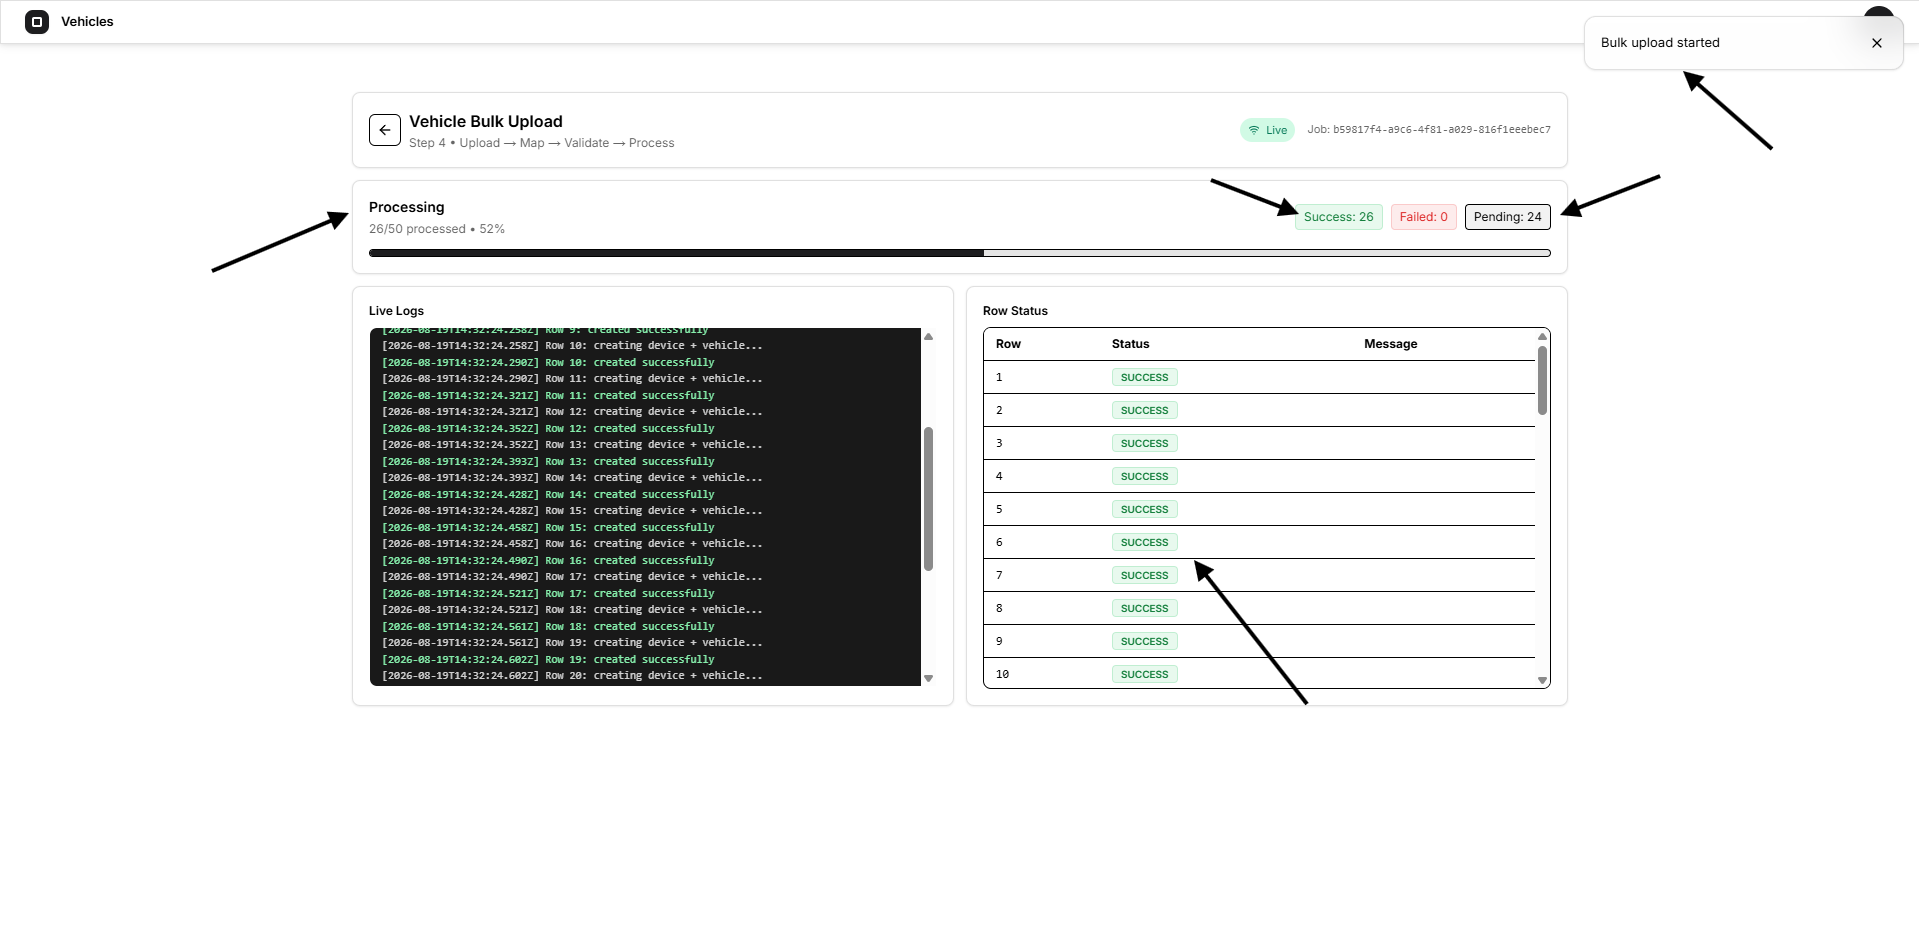
- Overall progress.
- Success, Failed, and Pending totals.
- Live processing logs.
- Row-level status and messages.
- The bulk-job identifier.
Possible row states include:
- Pending
- Processing
- Success
- Failed
Step 5 — Completed
The completion page displays:
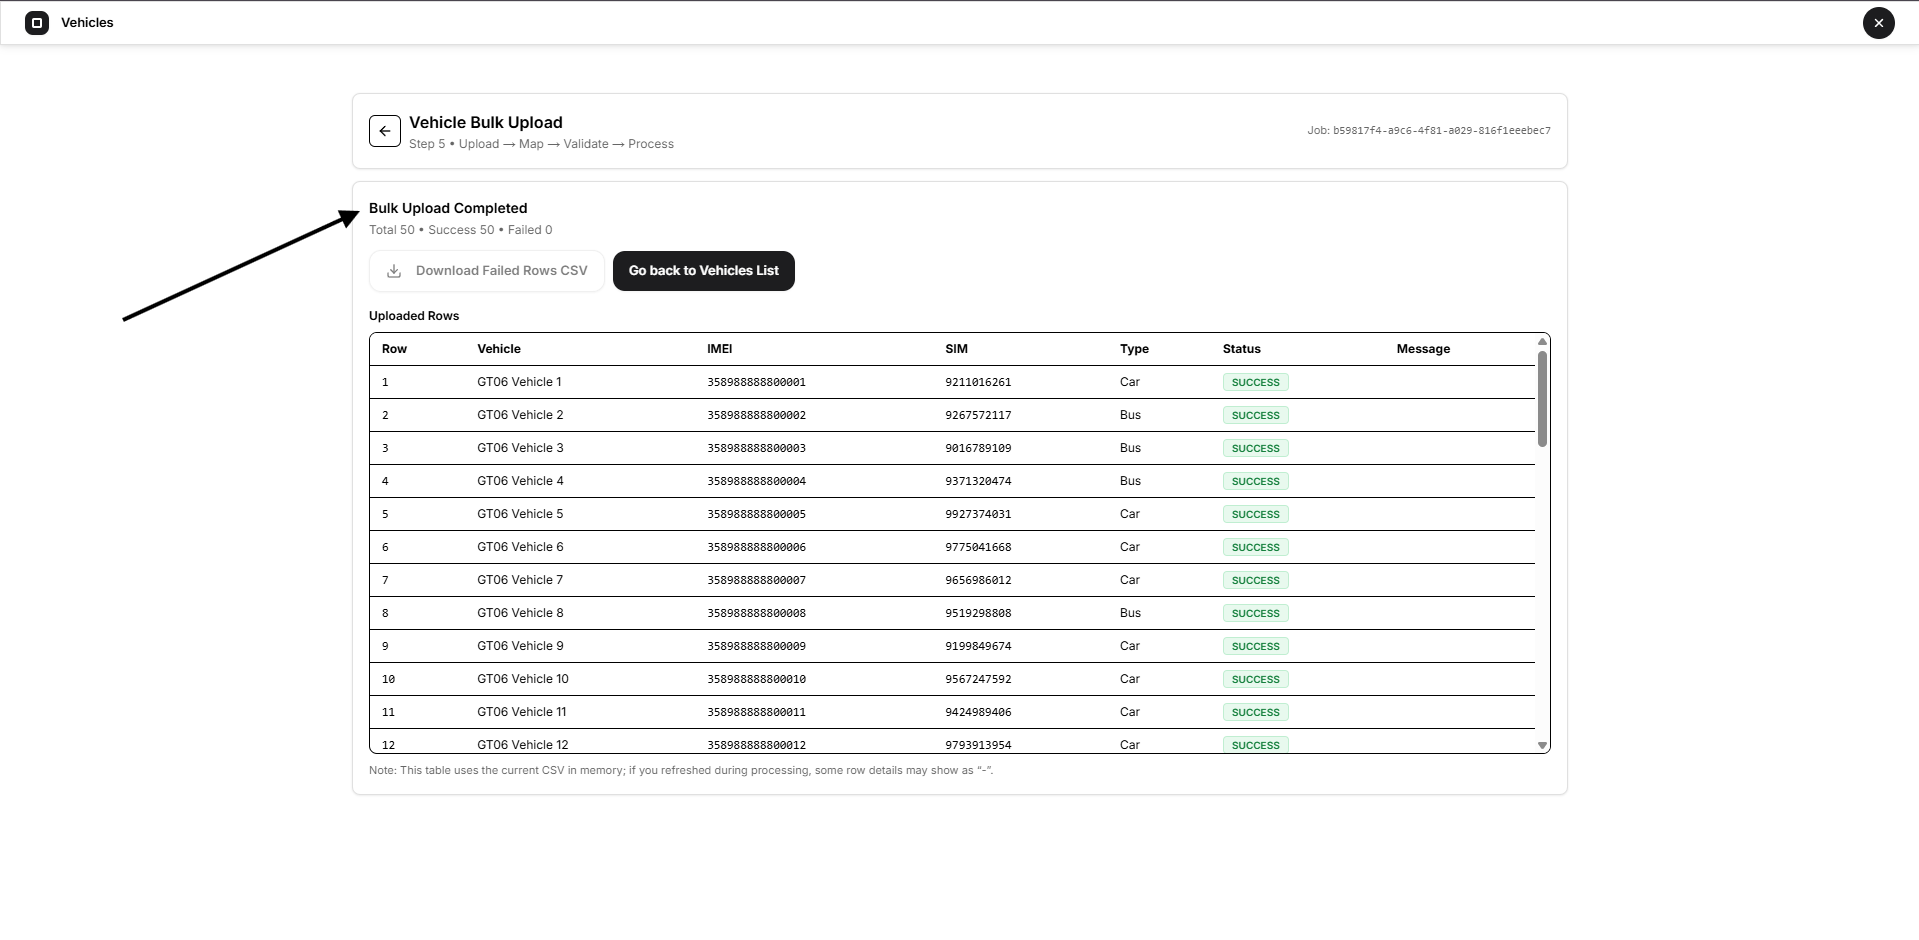
- Total rows.
- Successful rows.
- Failed rows.
- Vehicle name.
- IMEI.
- SIM number.
- Vehicle type.
- Result message.
Select Download Failed Rows CSV to download records that require correction.
Select Go back to Vehicles List when the upload is complete.
A CSV can pass initial validation and still contain server-side conflicts. For example, processing fails when an uploaded IMEI already exists.
Vehicle Profile
Select a vehicle from the list and click the vehicle name to open its profile.
The profile navigation contains:
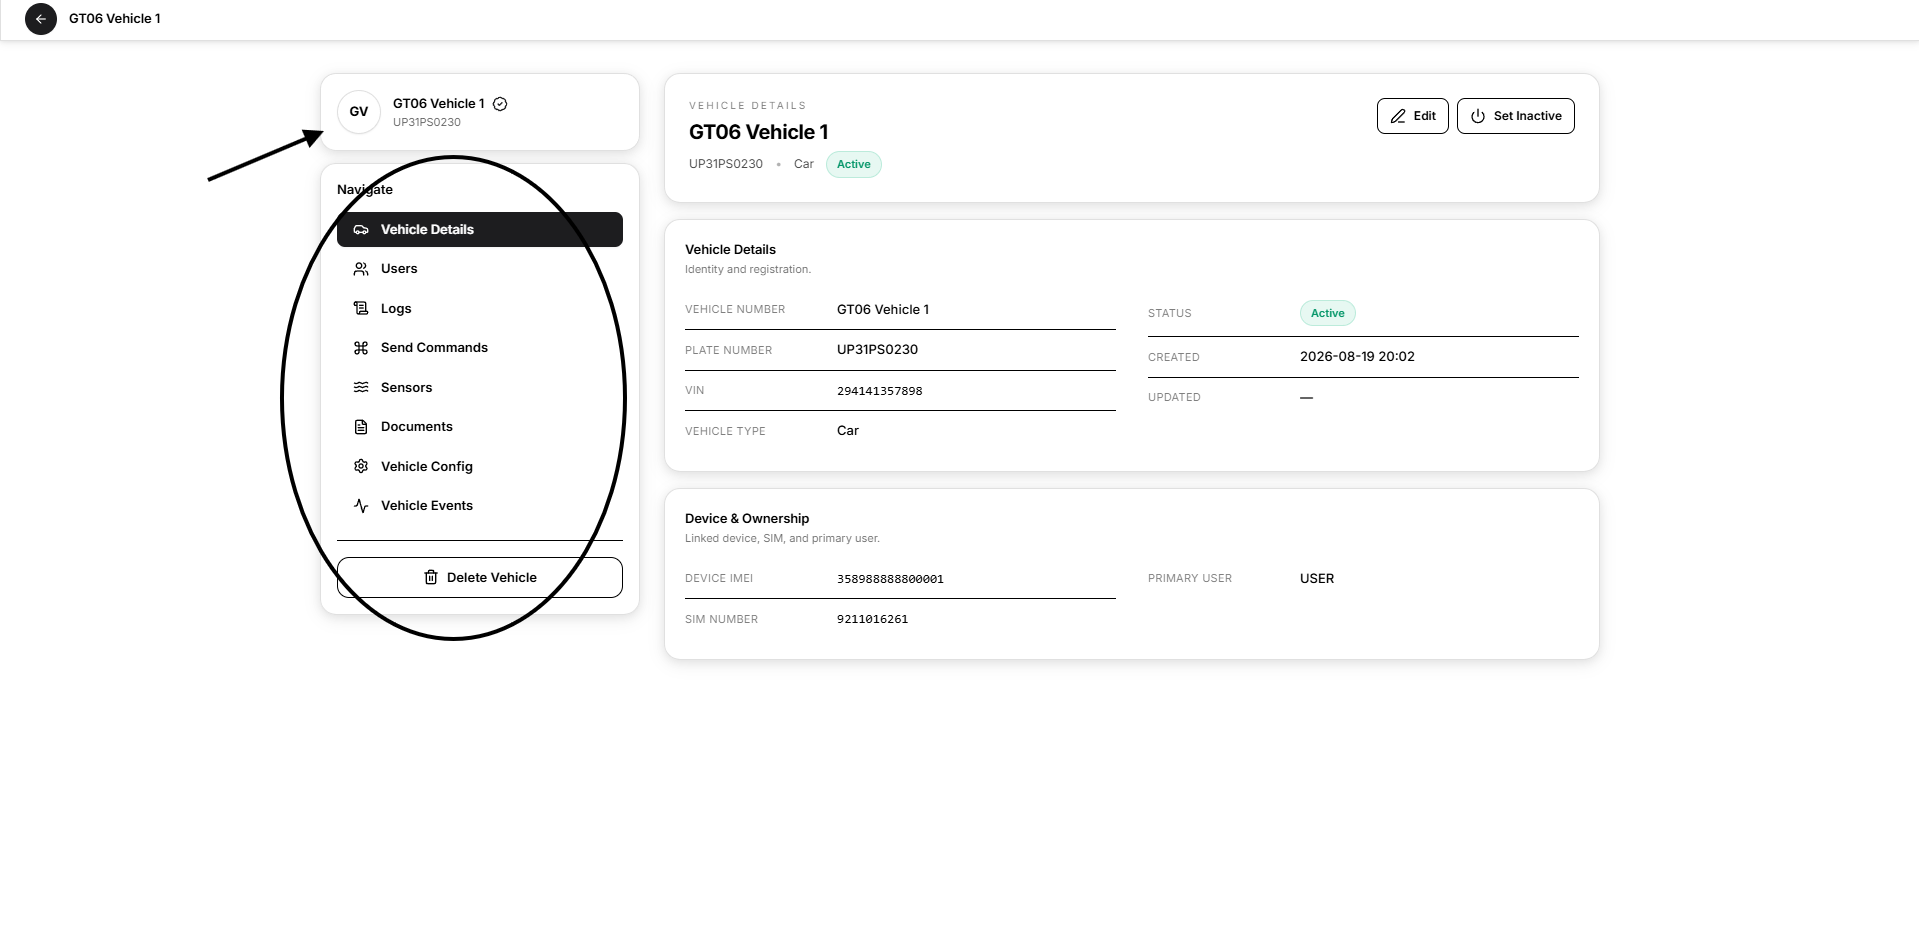
- Vehicle Details
- Users
- Logs
- Send Commands
- Sensors
- Documents
- Vehicle Config
- Vehicle Events
Use the back arrow in the upper-left corner to return to the Vehicles list.
Vehicle Details
The Vehicle Details tab provides the principal identity, status, device, and ownership information.
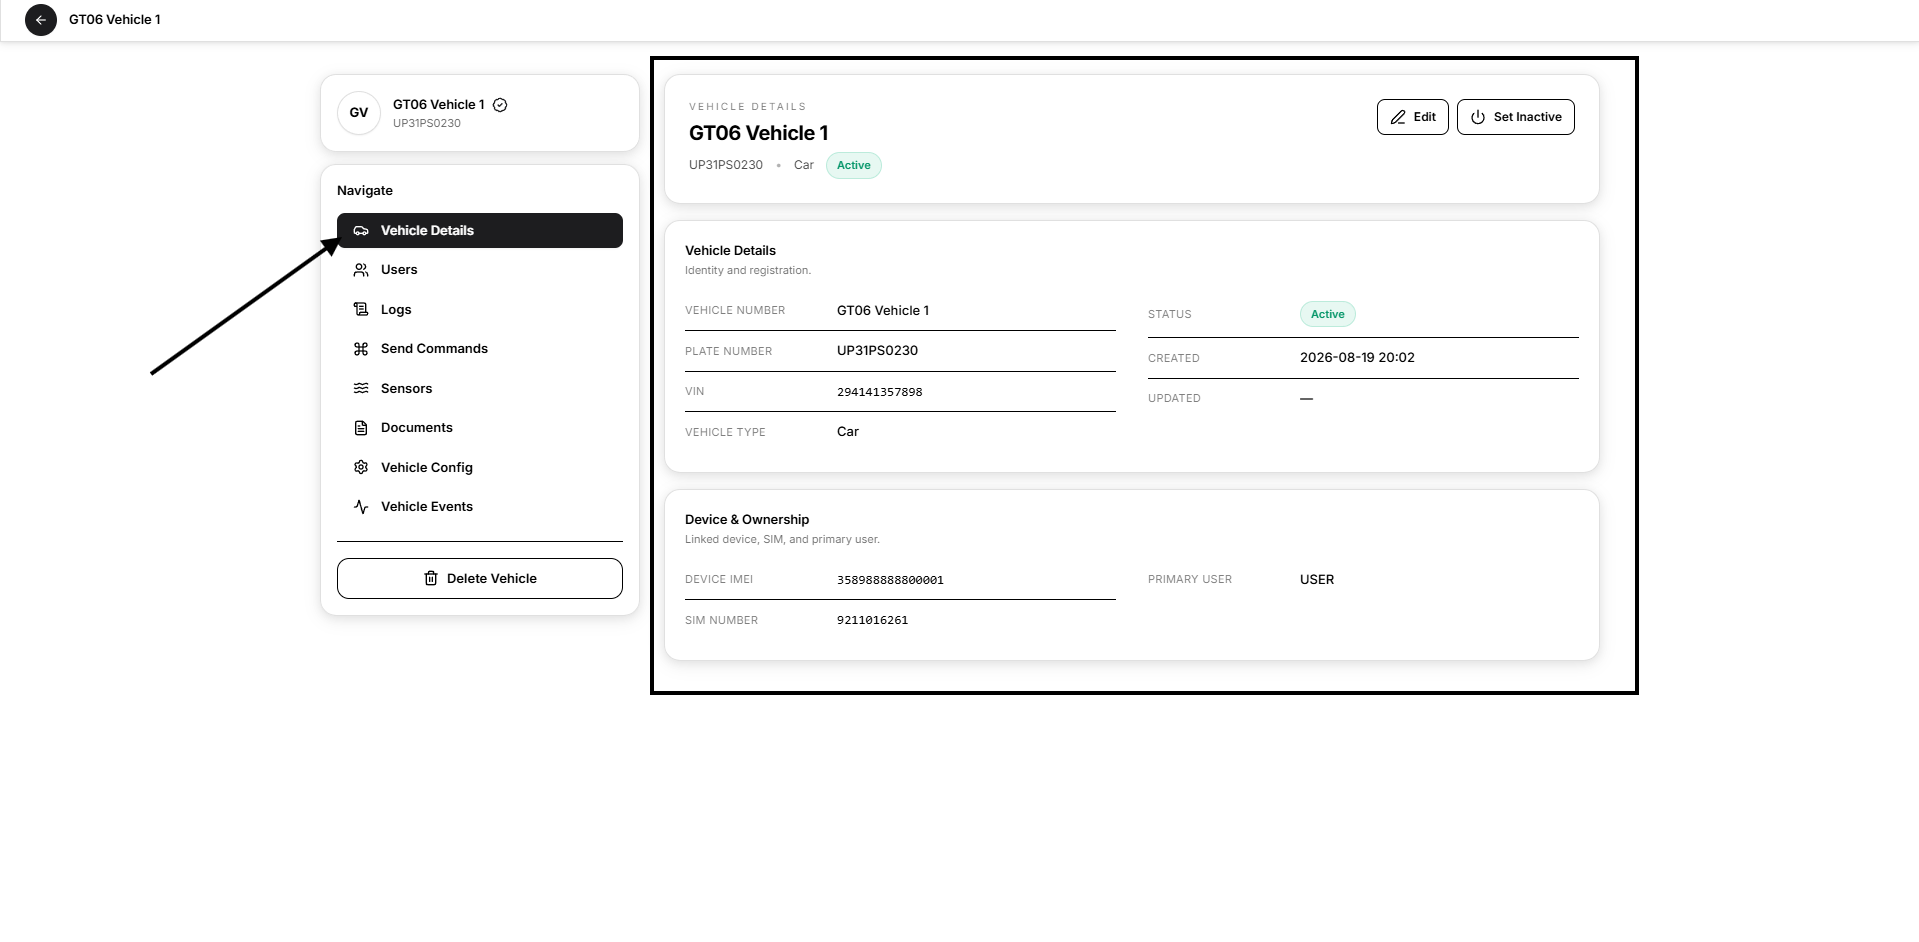
Identity and Registration
The page displays:
- Vehicle Number
- Plate Number
- VIN
- Vehicle Type
- Status
- Created date
- Updated date
Device and Ownership
The page displays:
- Device IMEI
- SIM Number
- Primary User
The Primary User is shown separately from other users linked through the Users tab.
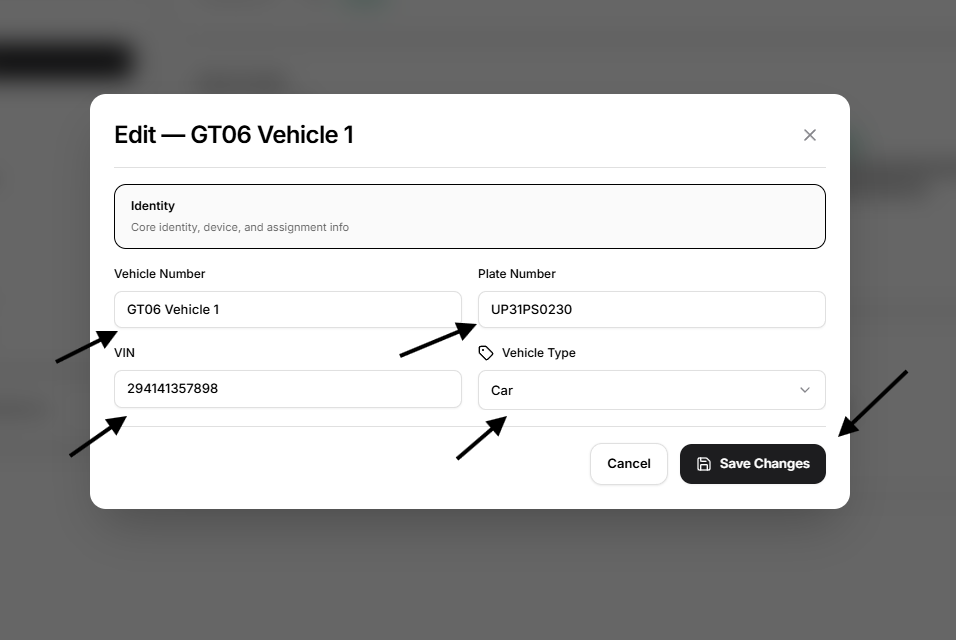
Edit Vehicle
Select Edit to update:
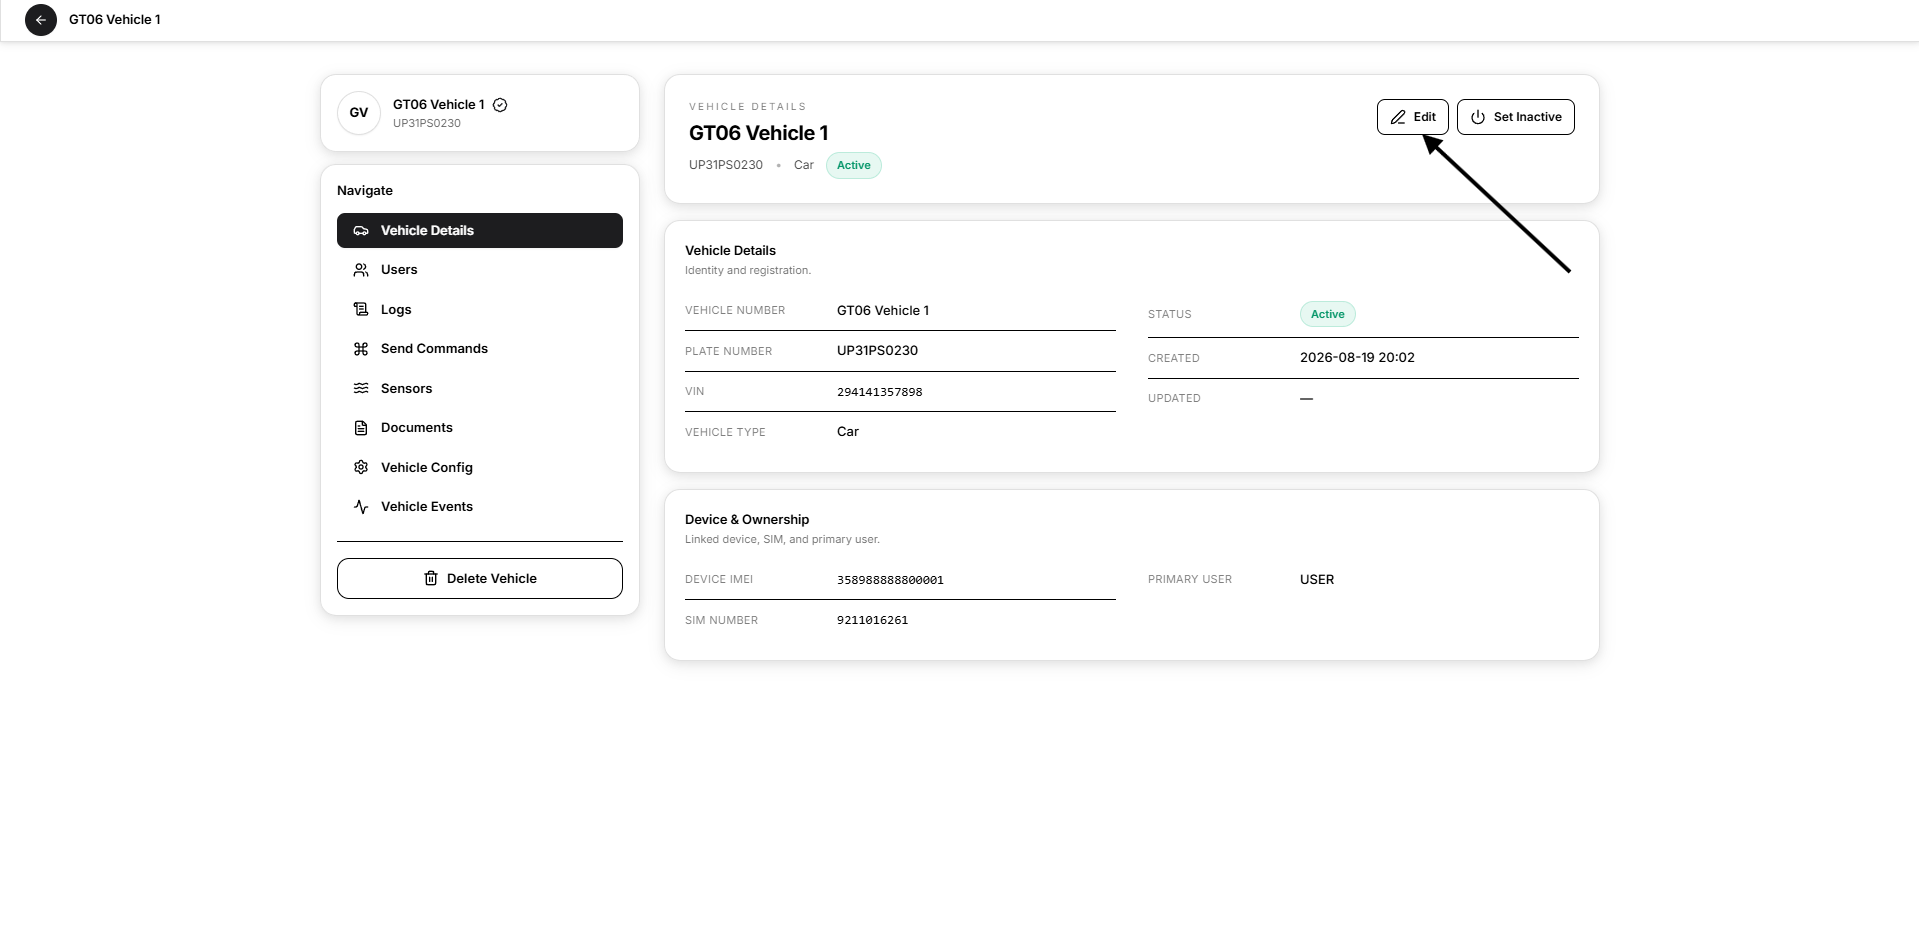
- Vehicle Number
- Plate Number
- VIN
- Vehicle Type
Select Save Changes to apply the update.
Activate or Deactivate a Vehicle
Select Set Inactive to deactivate an active vehicle.
An inactive vehicle remains in Open VTS, but its status is shown as Inactive.
Select Set Active to reactivate it.
A Status updated message confirms the change.
Deactivating a vehicle does not delete it or remove its device, users, documents, or historical data.
Linked Users
The Users tab shows all users linked to the selected vehicle.
Each record can display:
- User name.
- Email address.
- Mobile number.
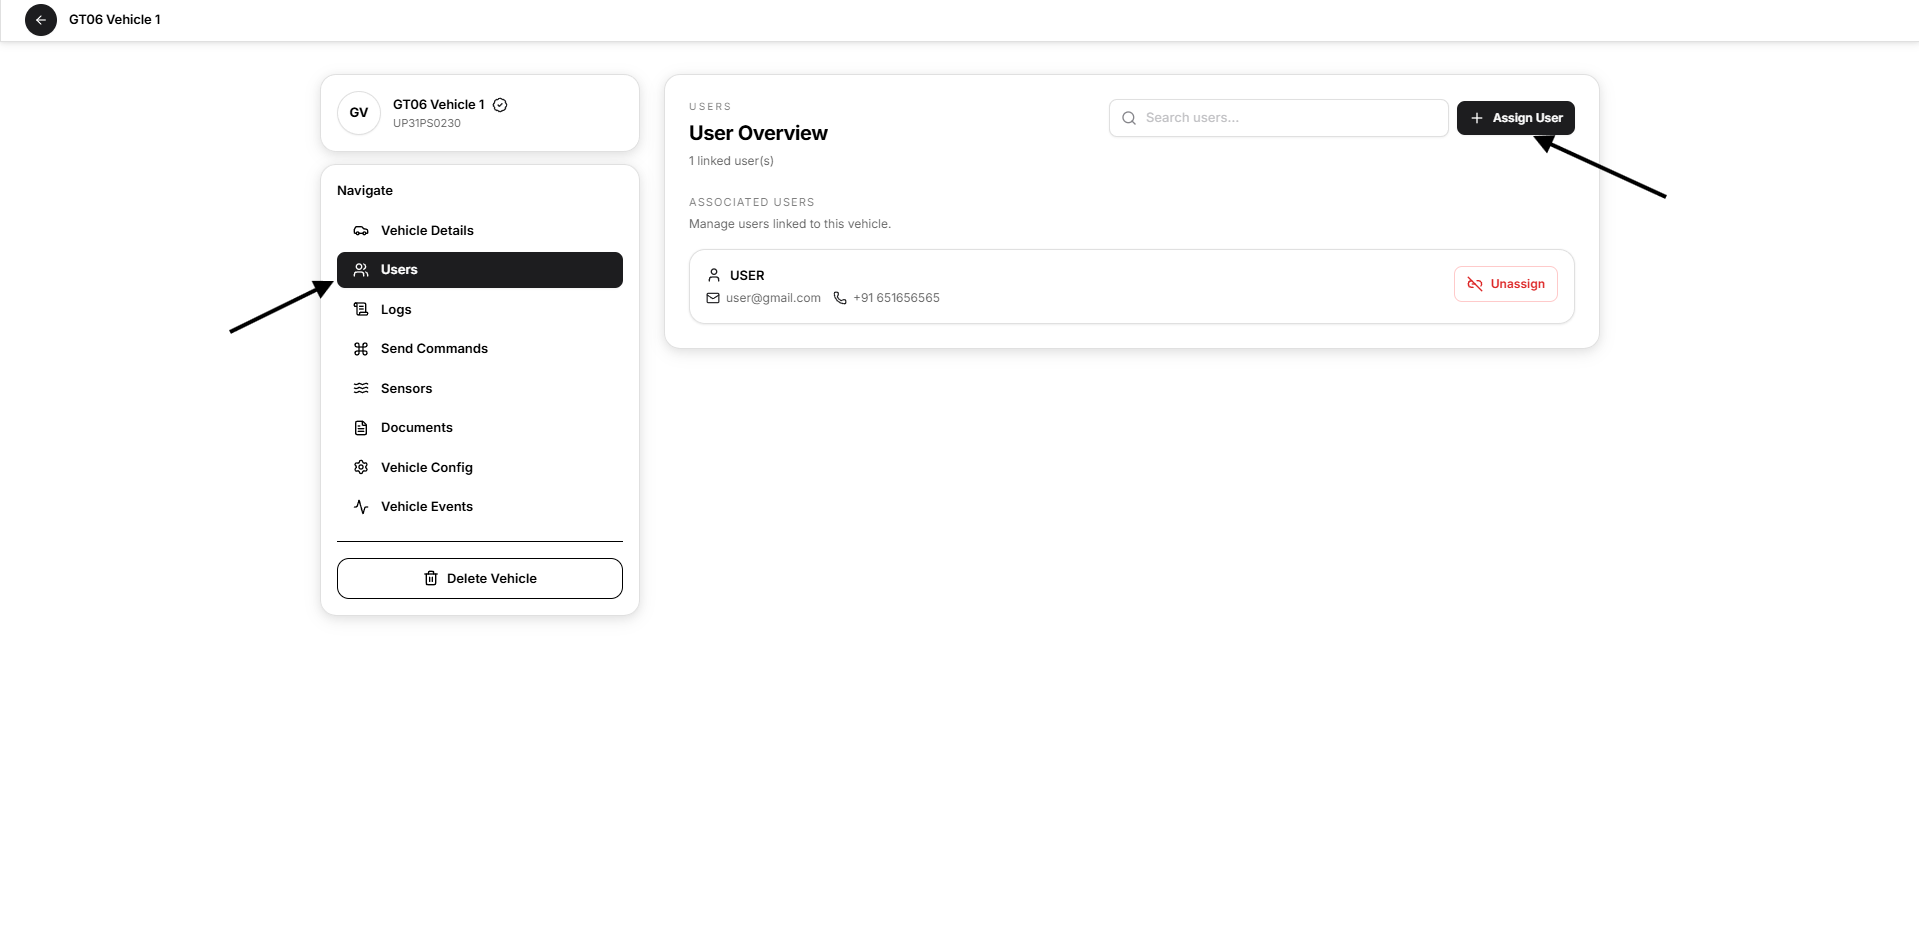
Use the search field to find a linked user.
Assign a User
- Select Assign User.
- Search or browse the available users.
- Select the required user.
- Complete the assignment.
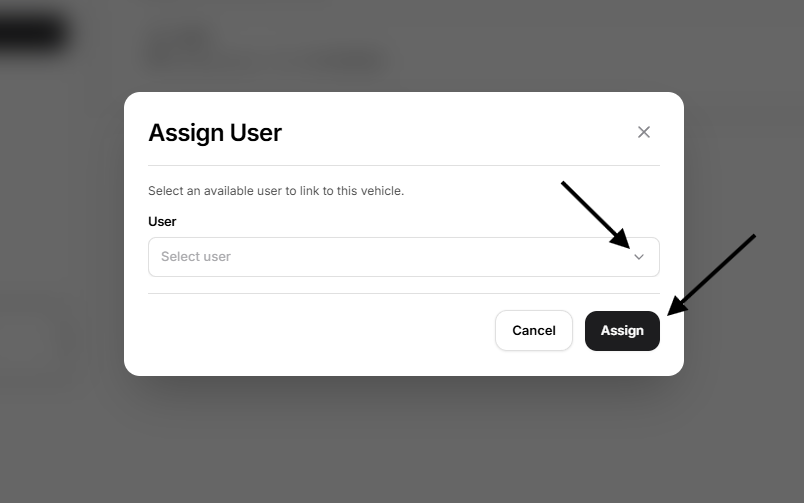
A Vehicle linked to user successfully message confirms the association.
Assigning another user does not automatically change the Primary User shown in Vehicle Details.
Unassign a User
Select Unassign beside a linked user.
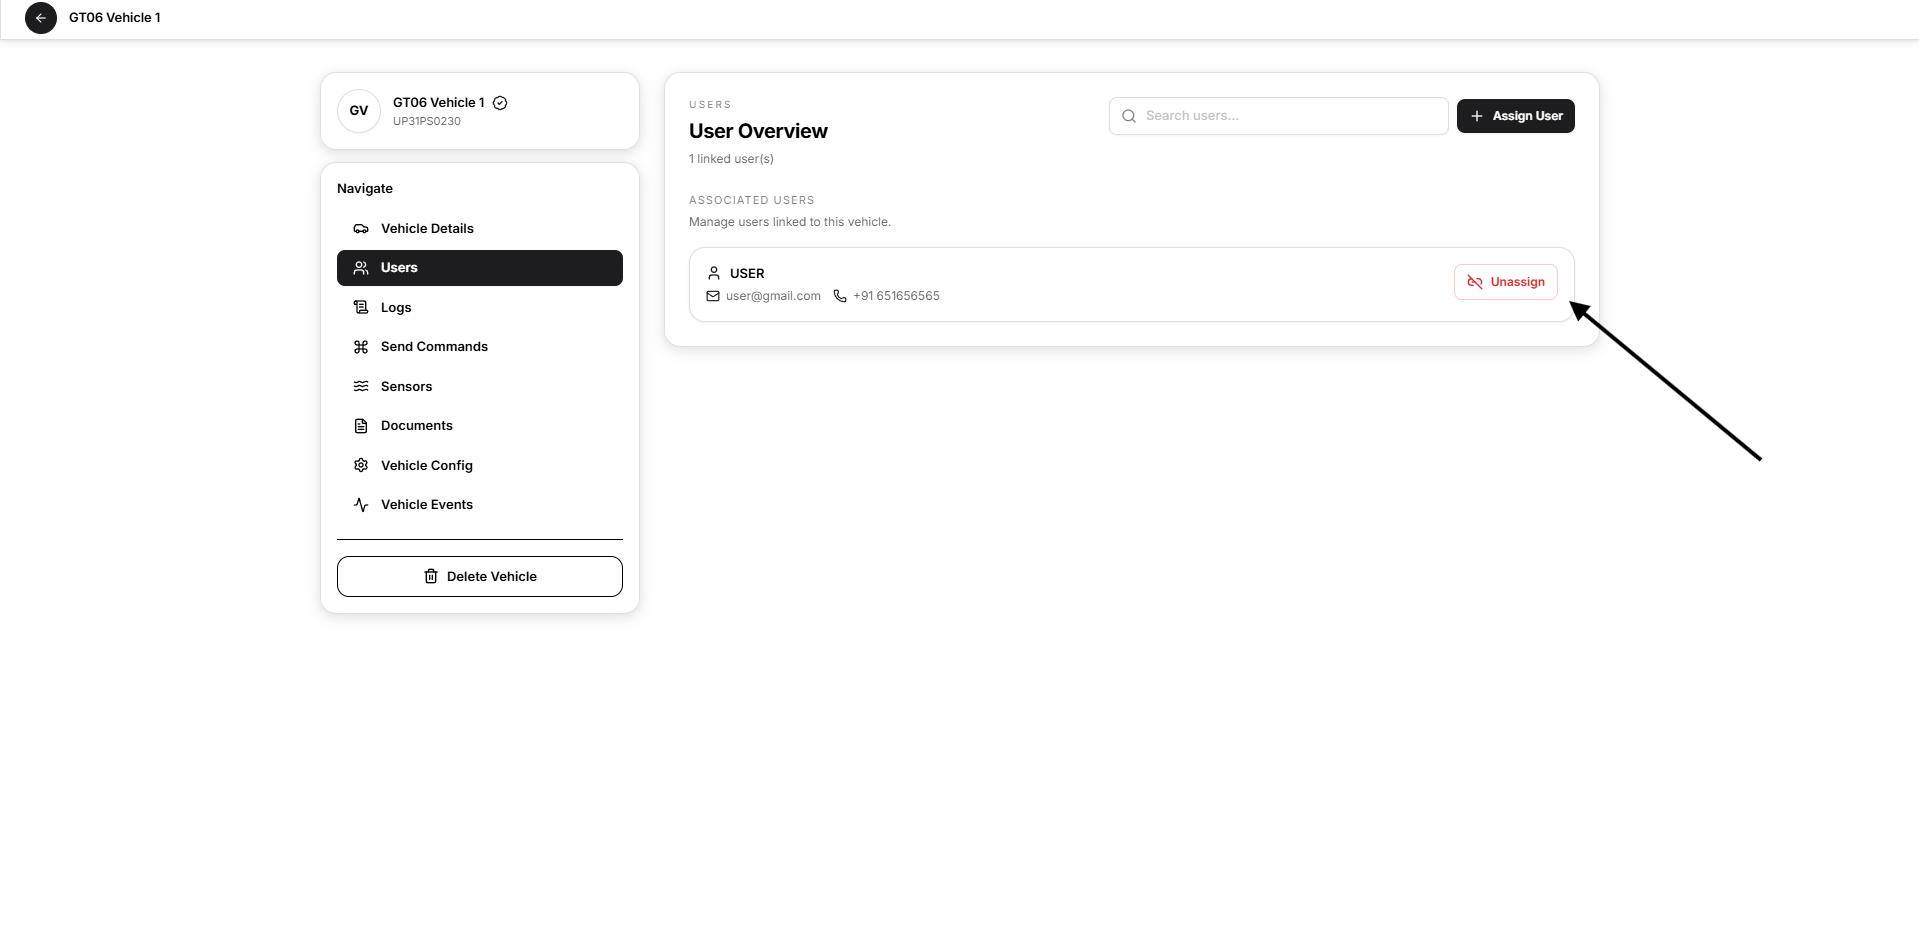
A Vehicle unlinked from user successfully message confirms removal.
Unassigning a user does not delete the user or vehicle.
Vehicle Logs
The Logs tab displays telemetry received from the selected vehicle.
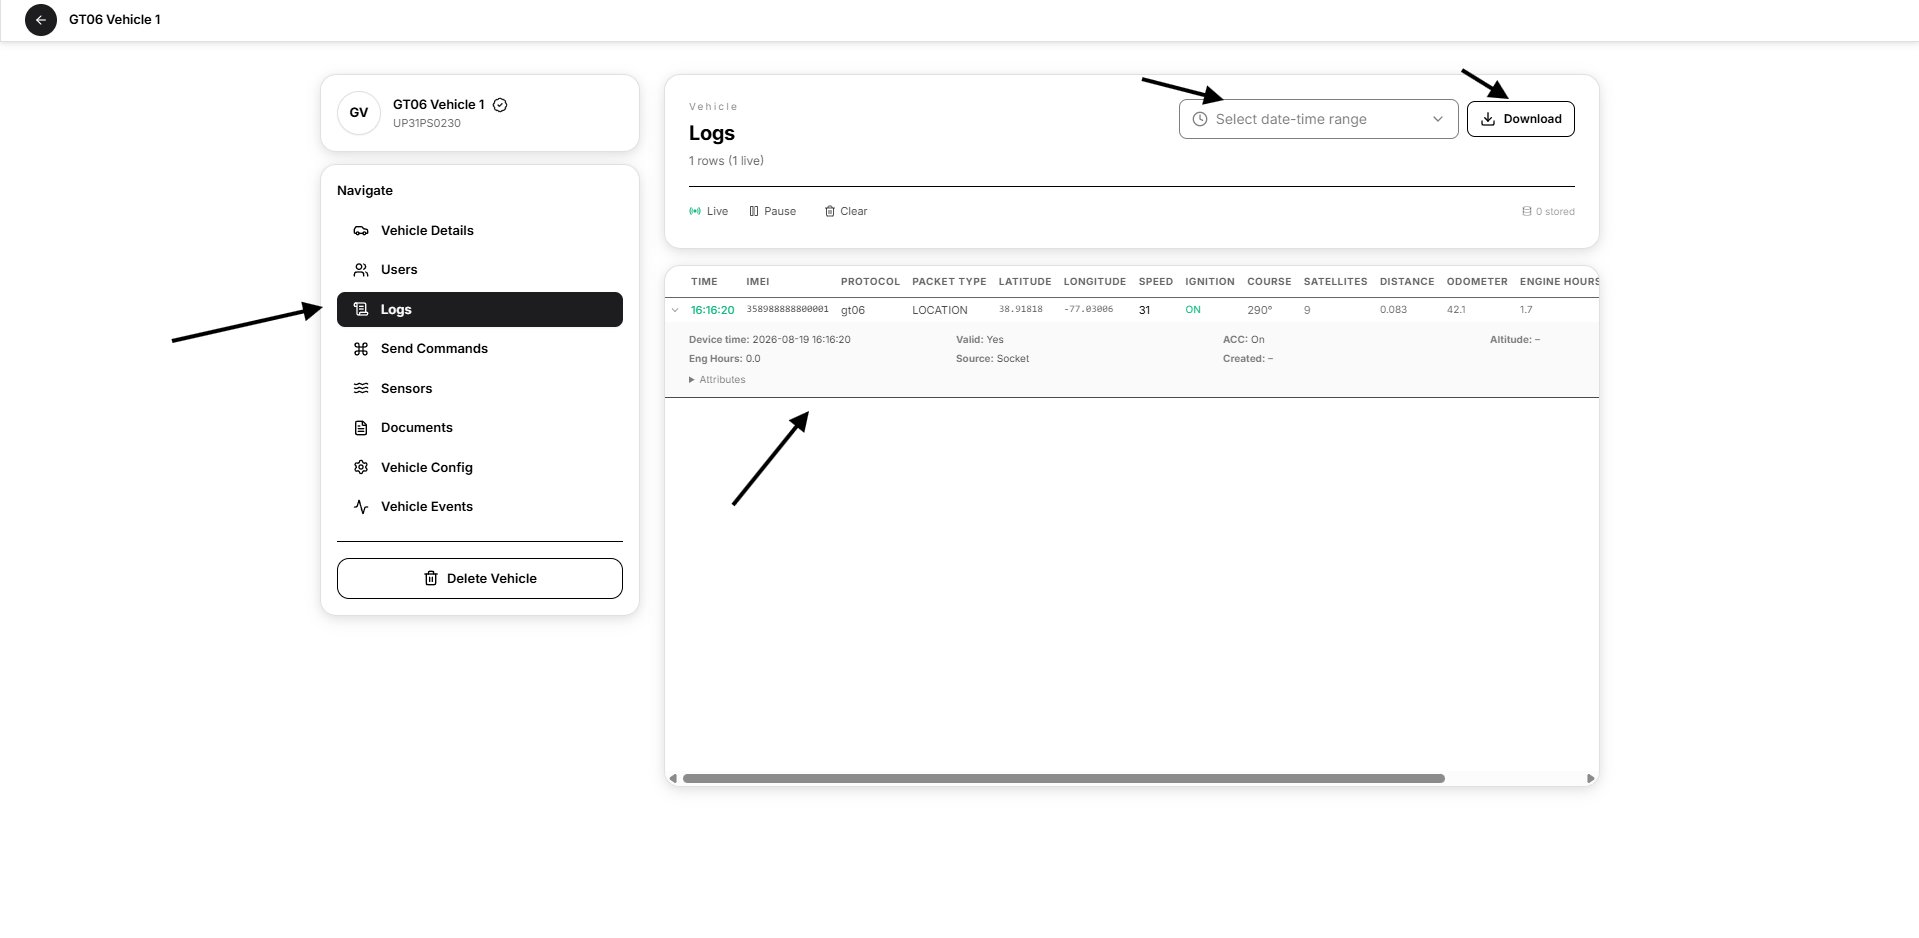
Log columns can include:
- Time
- IMEI
- Protocol
- Packet Type
- Latitude
- Longitude
- Speed
- Ignition
- Course
- Satellites
- Distance
- Odometer
- Engine Hours
Expanded rows may show additional information such as device time, validity, ACC status, altitude, source, and attributes.
Log Controls
Available controls include:
- Live
- Pause
- Clear
- Date-time range
- Download
The date-time selector provides preset periods and a custom start and end time.
Send Commands
The Send Commands tab allows an authorised Admin to send device-level commands to the selected GPS tracker.
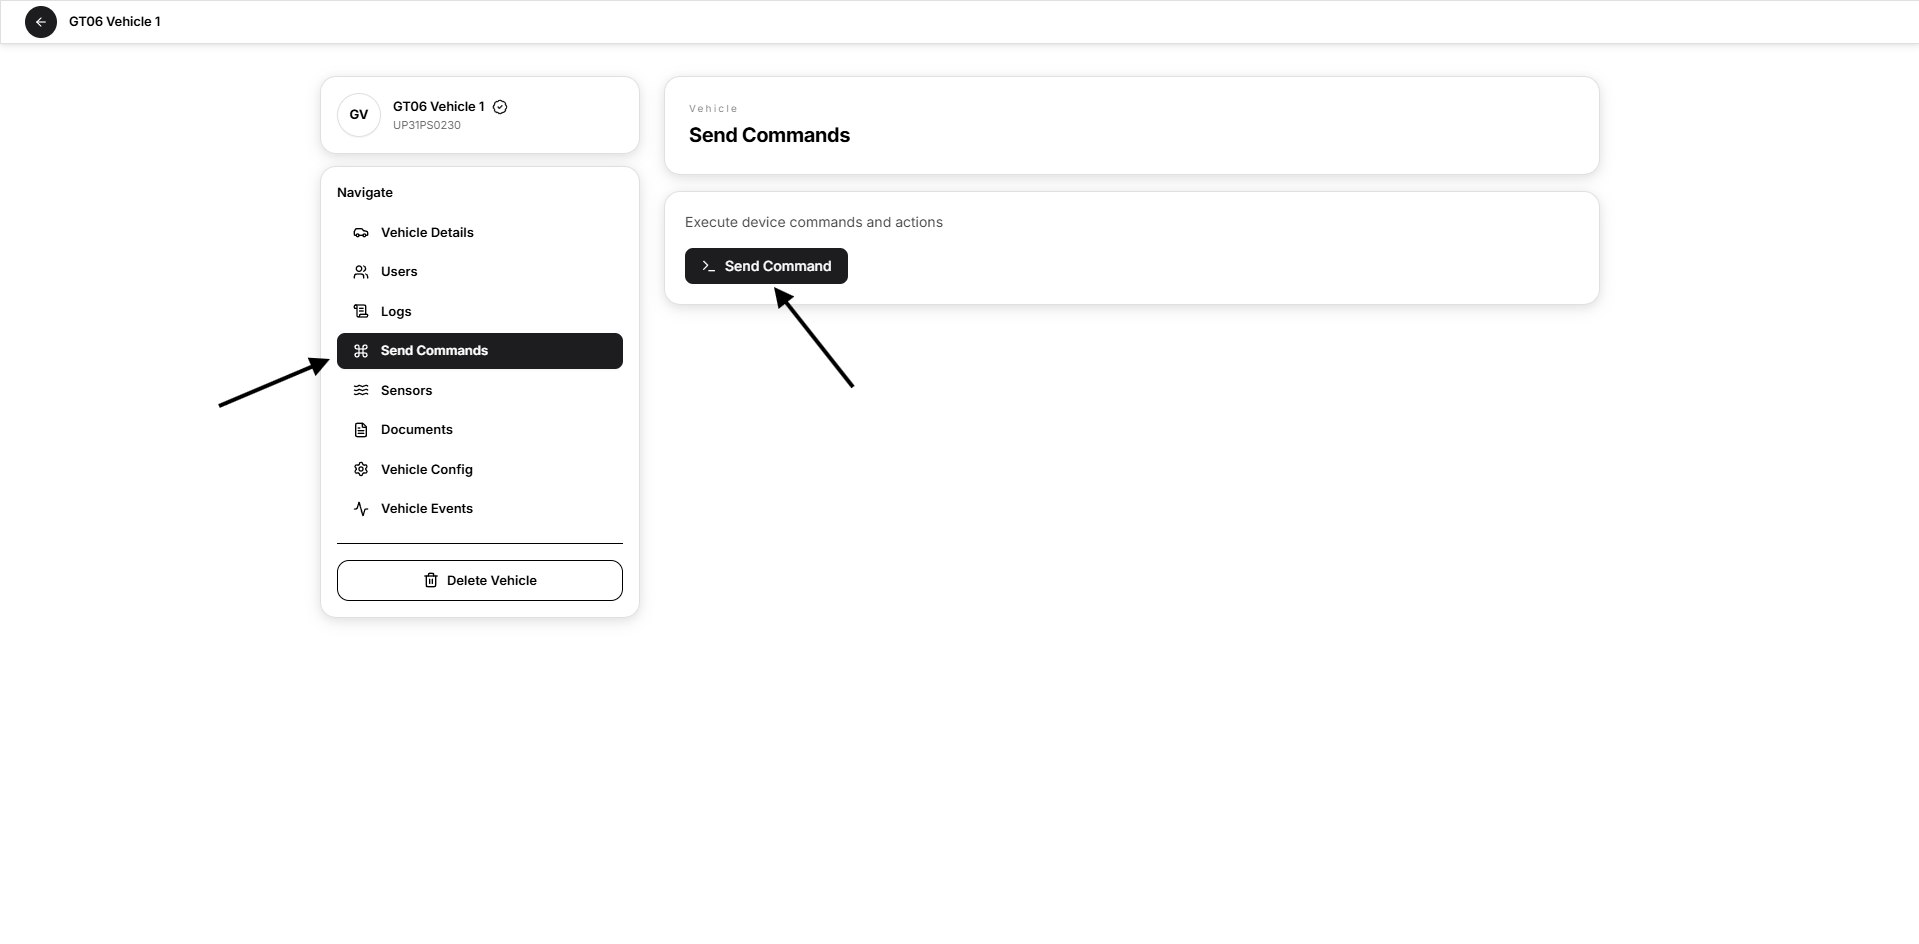
Select Send Command to open the command panel.
Command Panel
The panel contains:
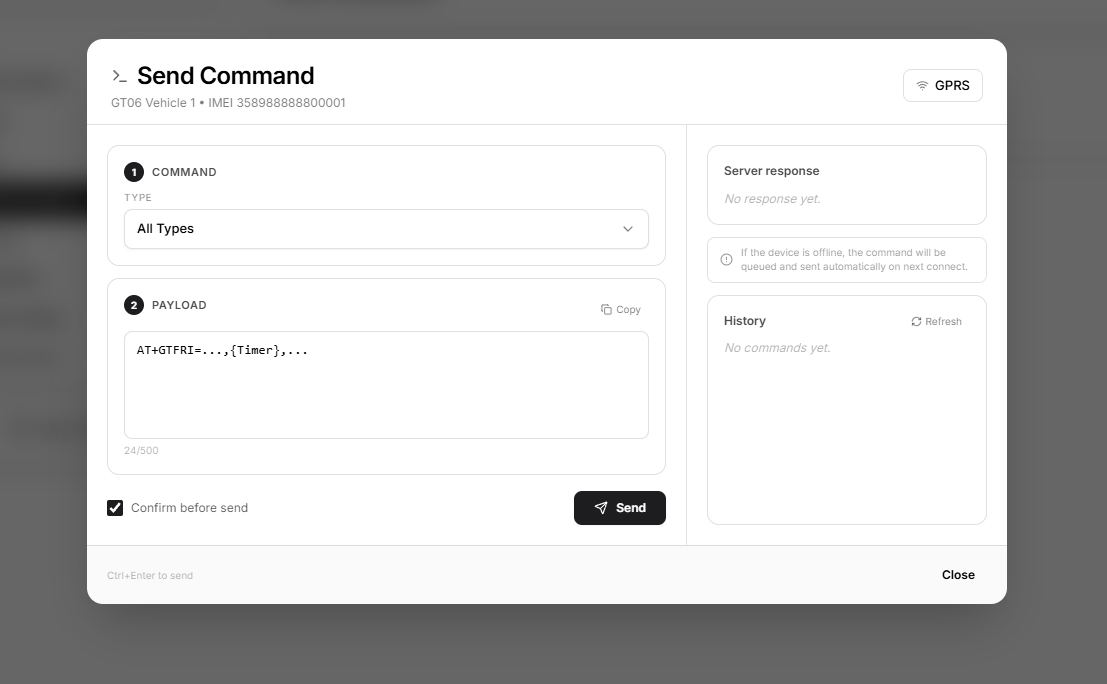
- Type
- Payload editor
- Copy
- Confirm before send
- Send
- Server response
- Command history
- History refresh
- Connection type indicator
When the device is offline, the interface indicates that the command will be queued and sent automatically when the device next connects.
Security guidance: Send only commands approved for the selected device protocol. Incorrect commands can change tracker behaviour or interrupt reporting.
Computed Sensors
The Sensors tab allows authorised users to create computed values from incoming telemetry.
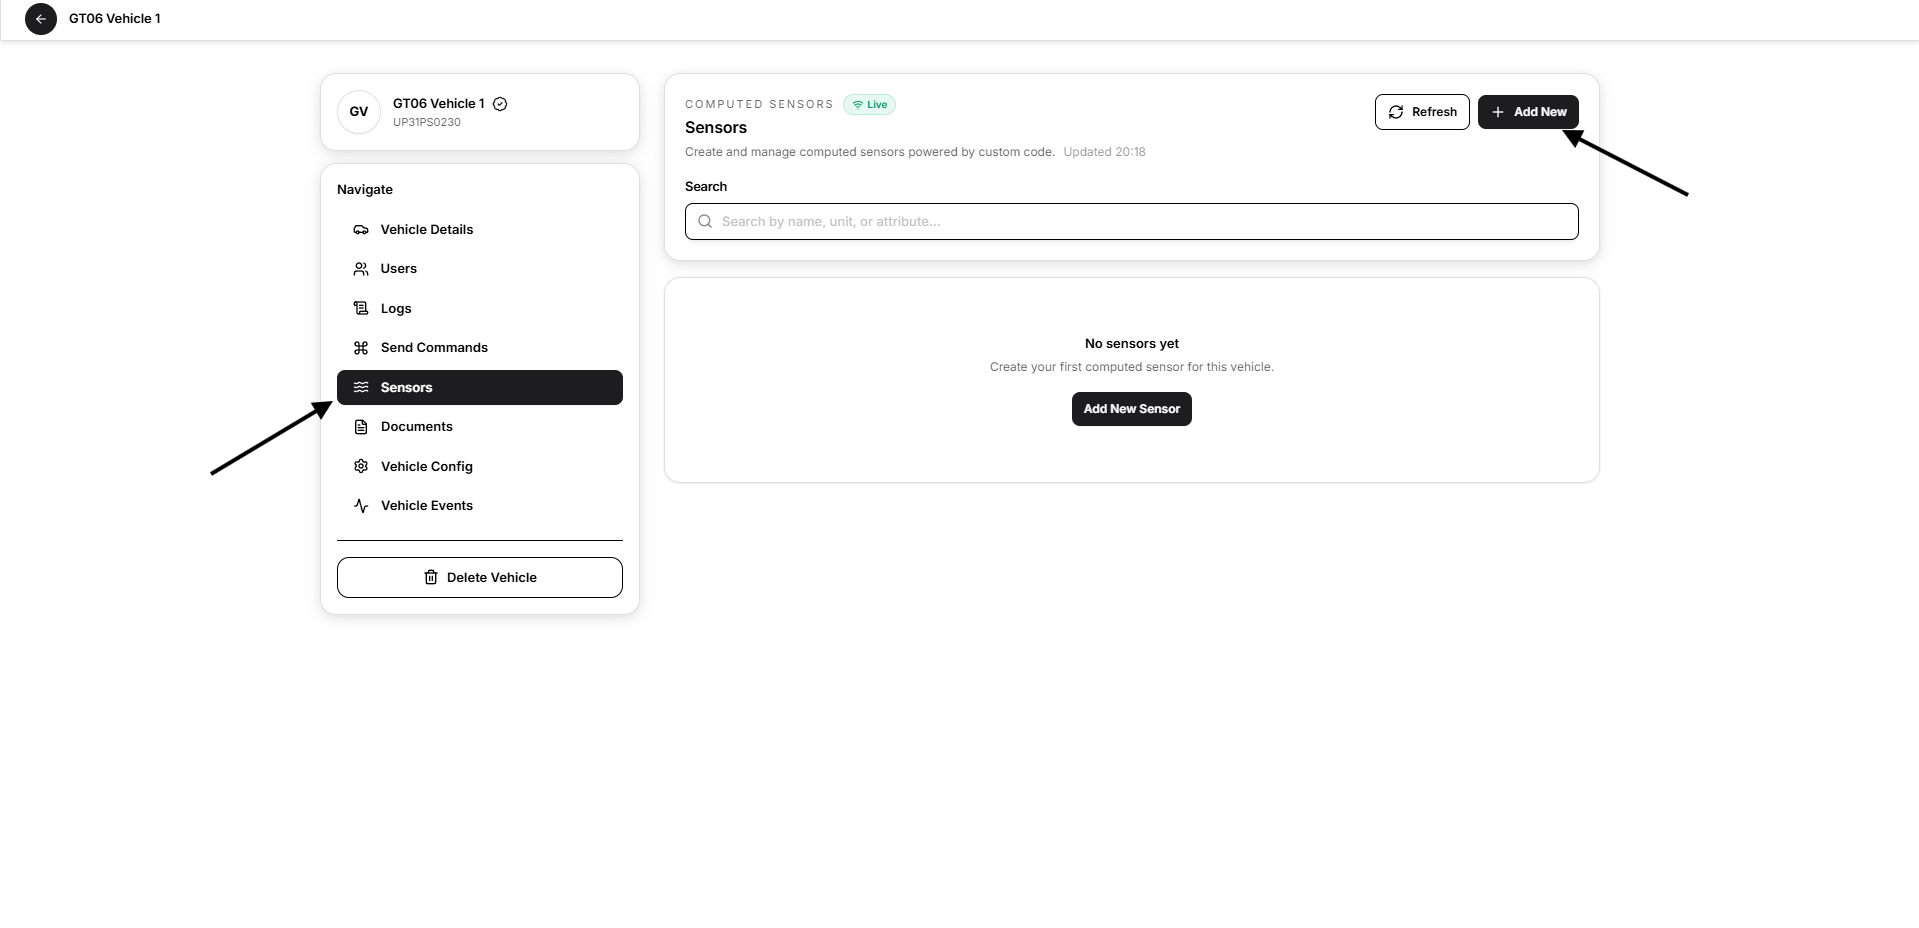
The list page contains:
- Search.
- Refresh.
- Add New.
- Sensor list or empty state.
Create a Sensor
Select Add New Sensor and provide:
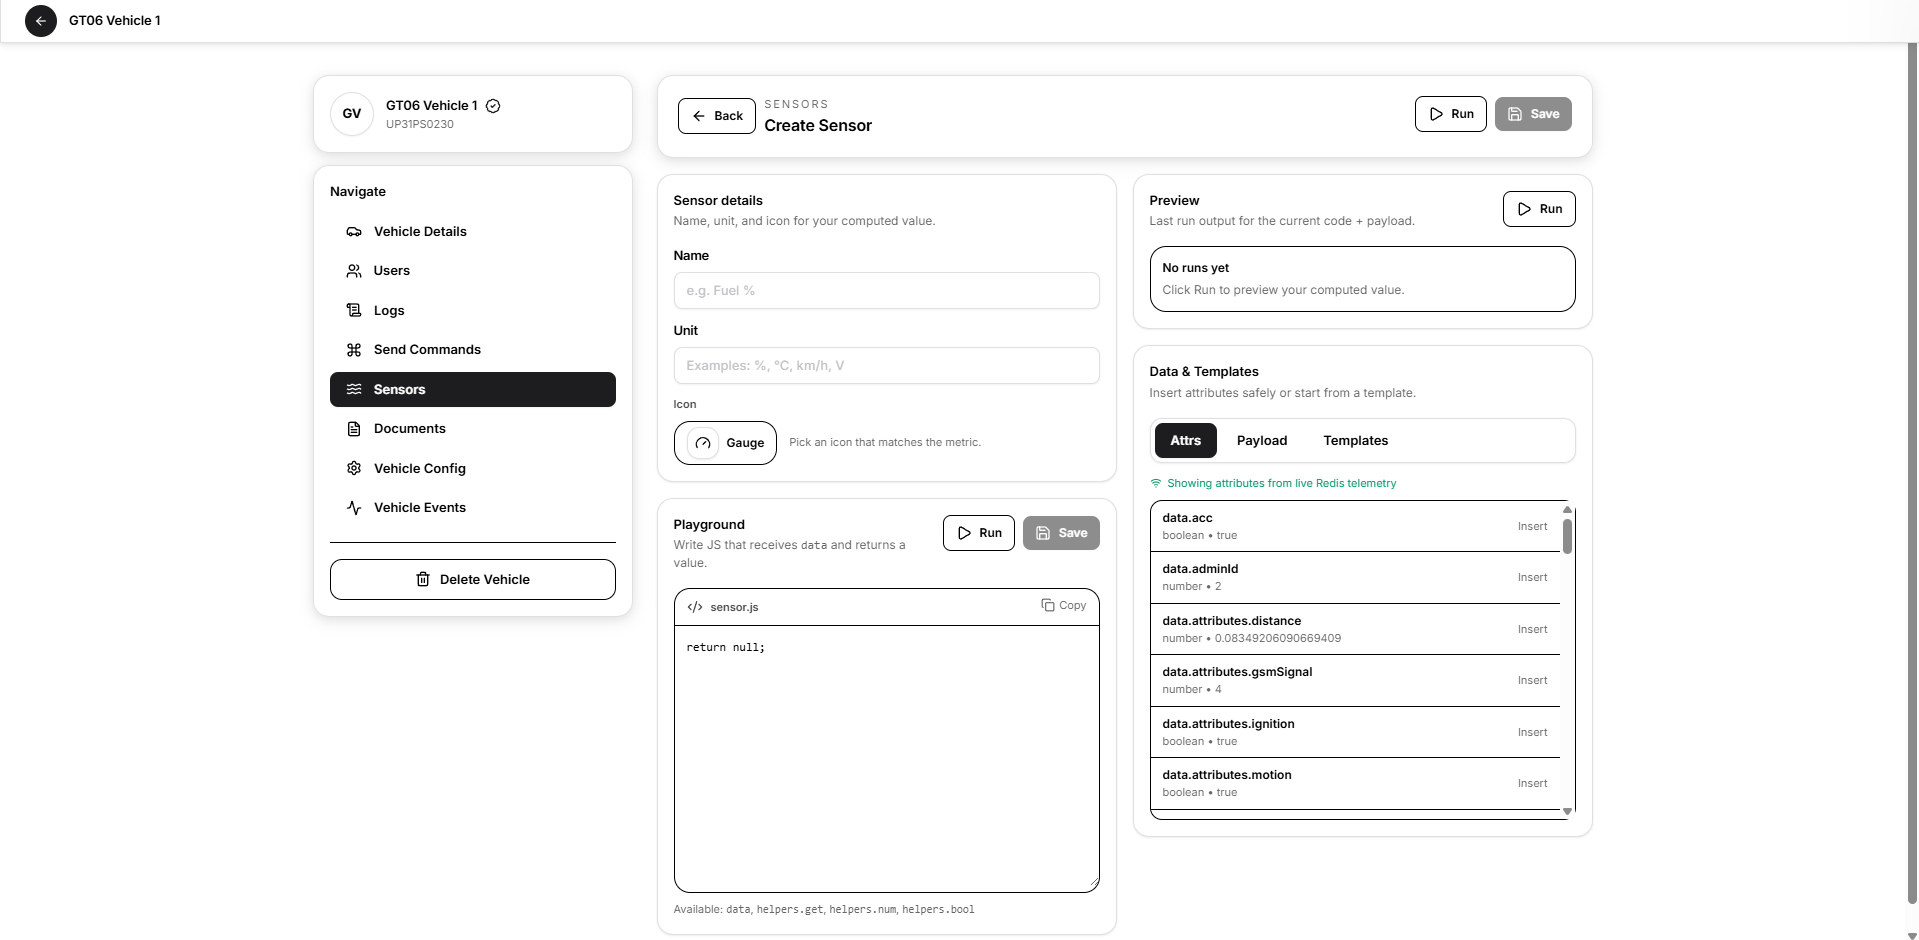
- Name
- Unit
- Icon
- Sensor code
The creation workspace also provides:
- Run
- Save
- Preview
- Live attributes
- Editable payload
- Templates
- Copy and insert actions
Templates
Available templates can include examples such as:
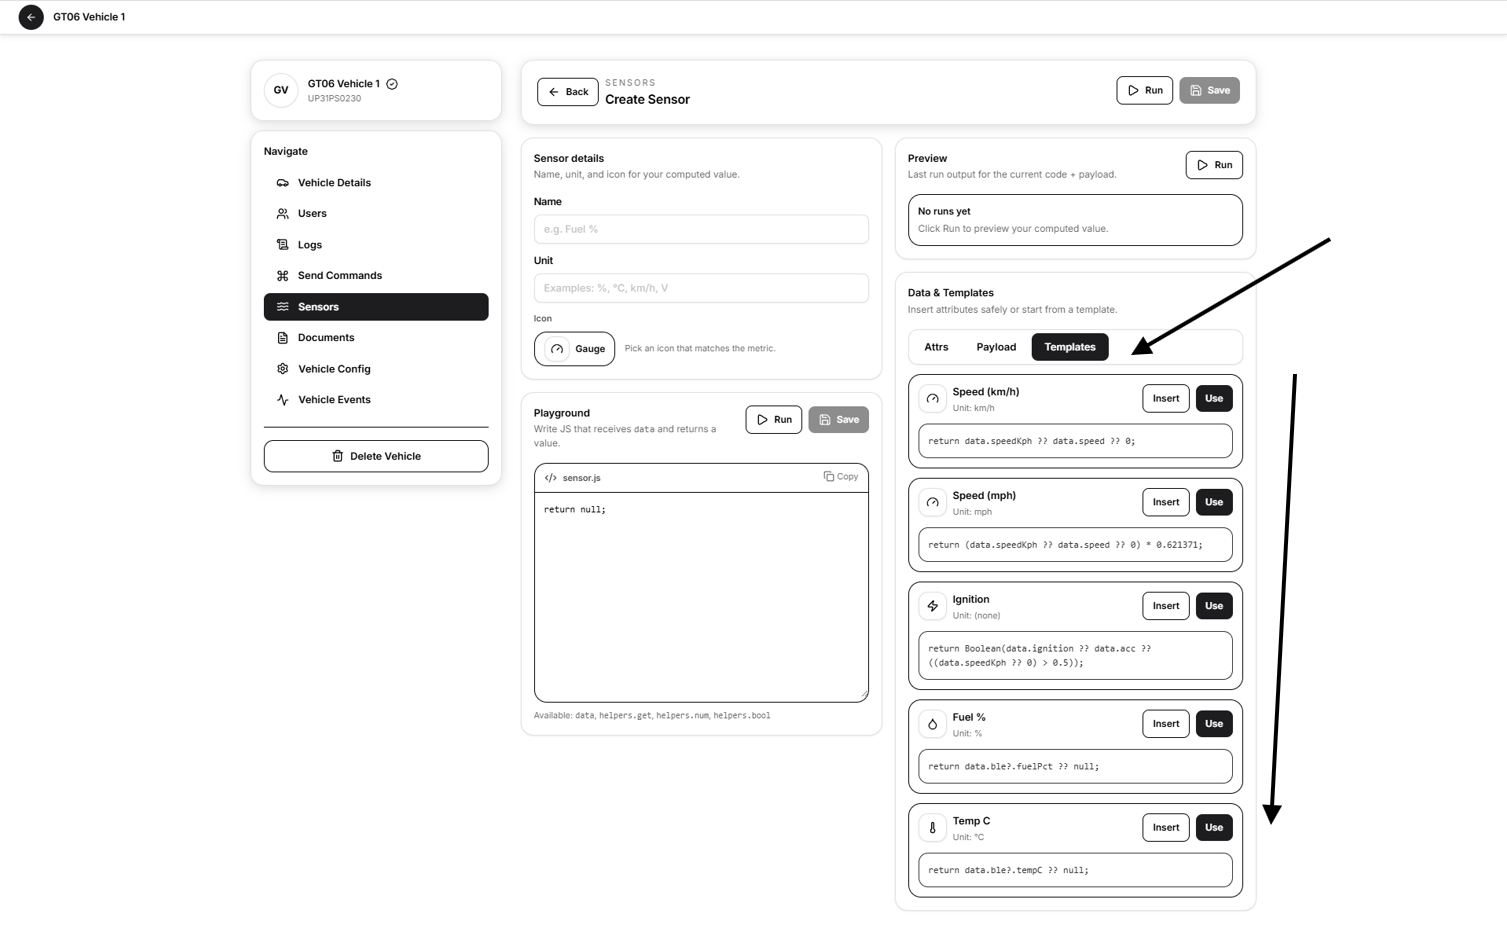
- Speed in km/h
- Speed in mph
- Ignition
- Fuel percentage
- Temperature
Use Insert to add template code or Use to apply the complete template.
Run and verify the sensor before saving it.
Computed sensor code should be created or reviewed by an authorised technical user.
Vehicle Documents
The Documents tab stores vehicle registration, insurance, compliance, and other files.
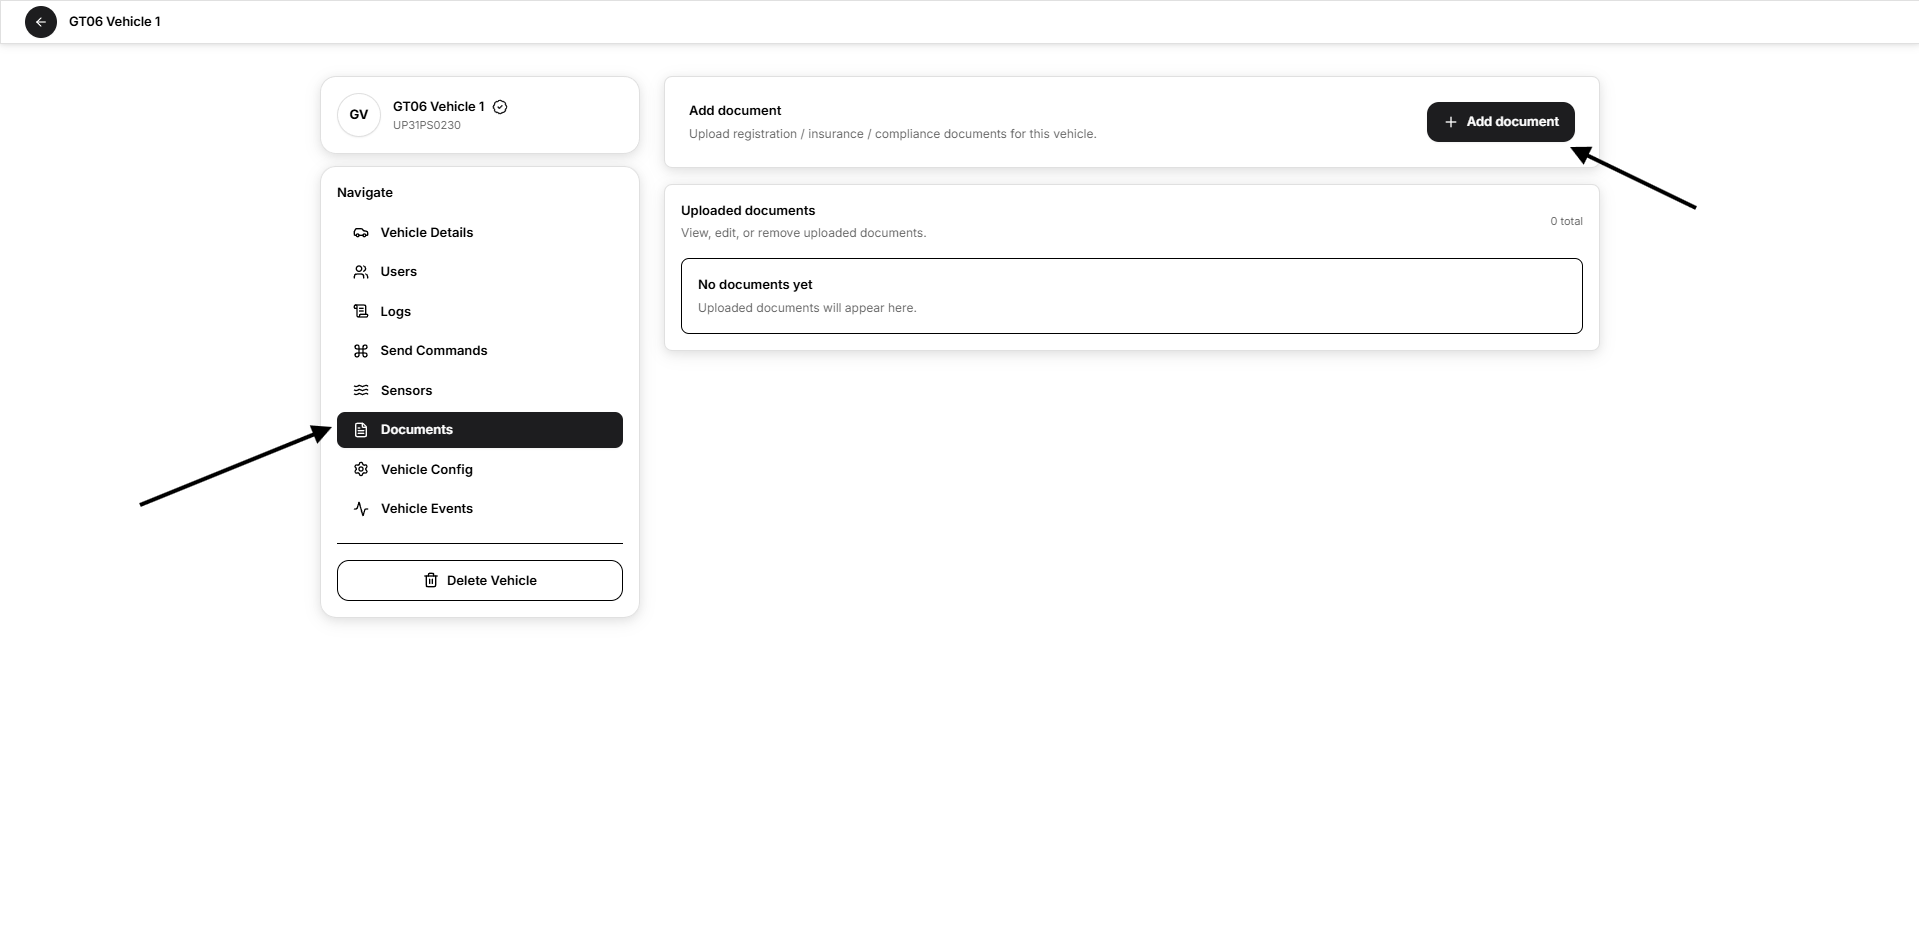
The document list can display:
- Title and description.
- Document type.
- Expiry date.
- Tags.
- Status.
- File name and format.
- Updated time.
- Actions.
Add a Document
Select Add document and provide:
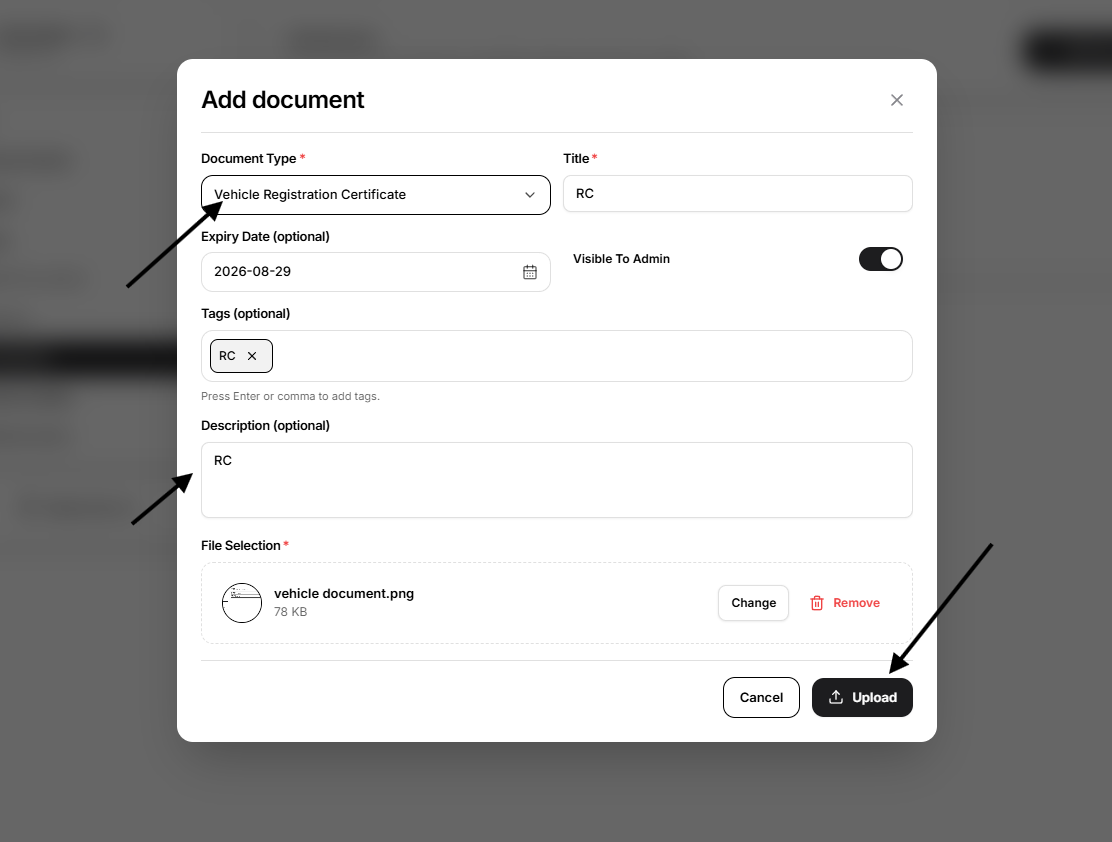
- Document Type
- Title
- Expiry Date, when applicable
- Visible To Admin
- Tags
- Description
- File Selection
Supported formats are:
- JPG
- JPEG
- PNG
- DOC
- DOCX
- WEBP
The maximum size shown in the interface is 5 MB per file.
Document Actions
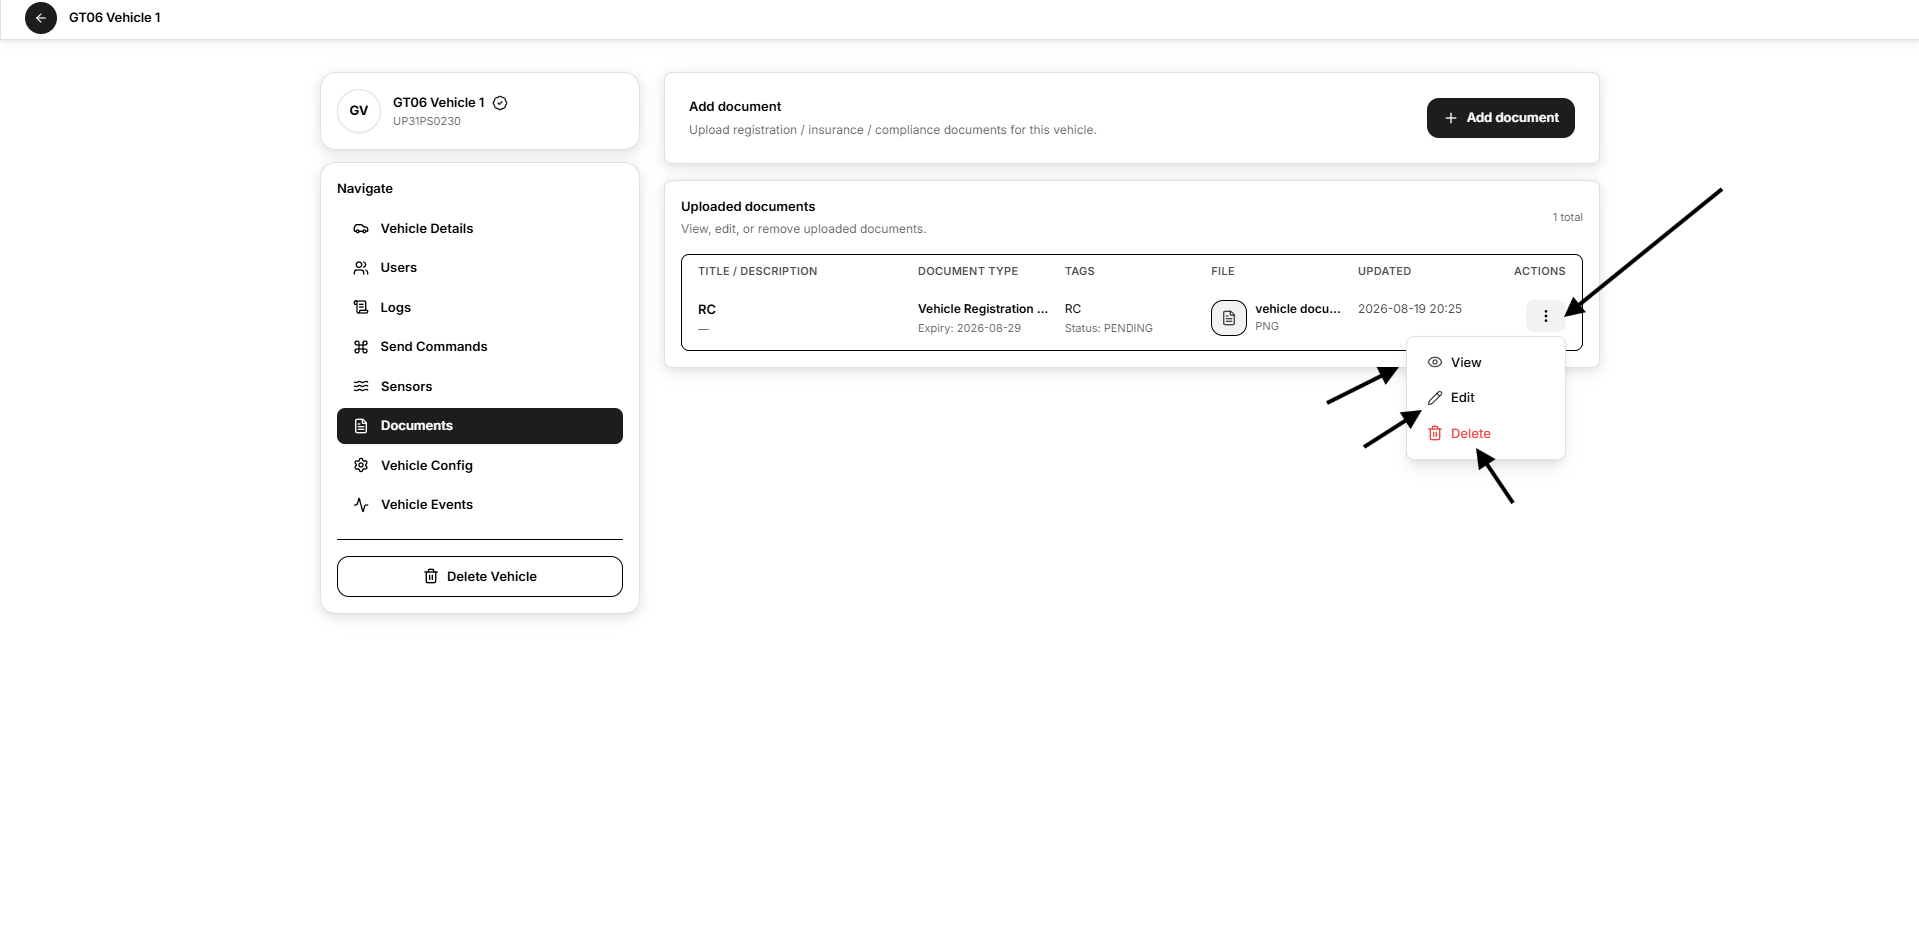
Open the actions menu to use:
- View
- Edit
- Delete
Edit Document
The Edit dialog allows you to change the document details and optionally replace the current file.
Delete Document
Deleting a document removes it from the vehicle profile. A Document deleted message confirms the action.
Deleting a document does not delete the vehicle.
Vehicle Config
The Vehicle Config tab adjusts how selected telemetry values are interpreted.
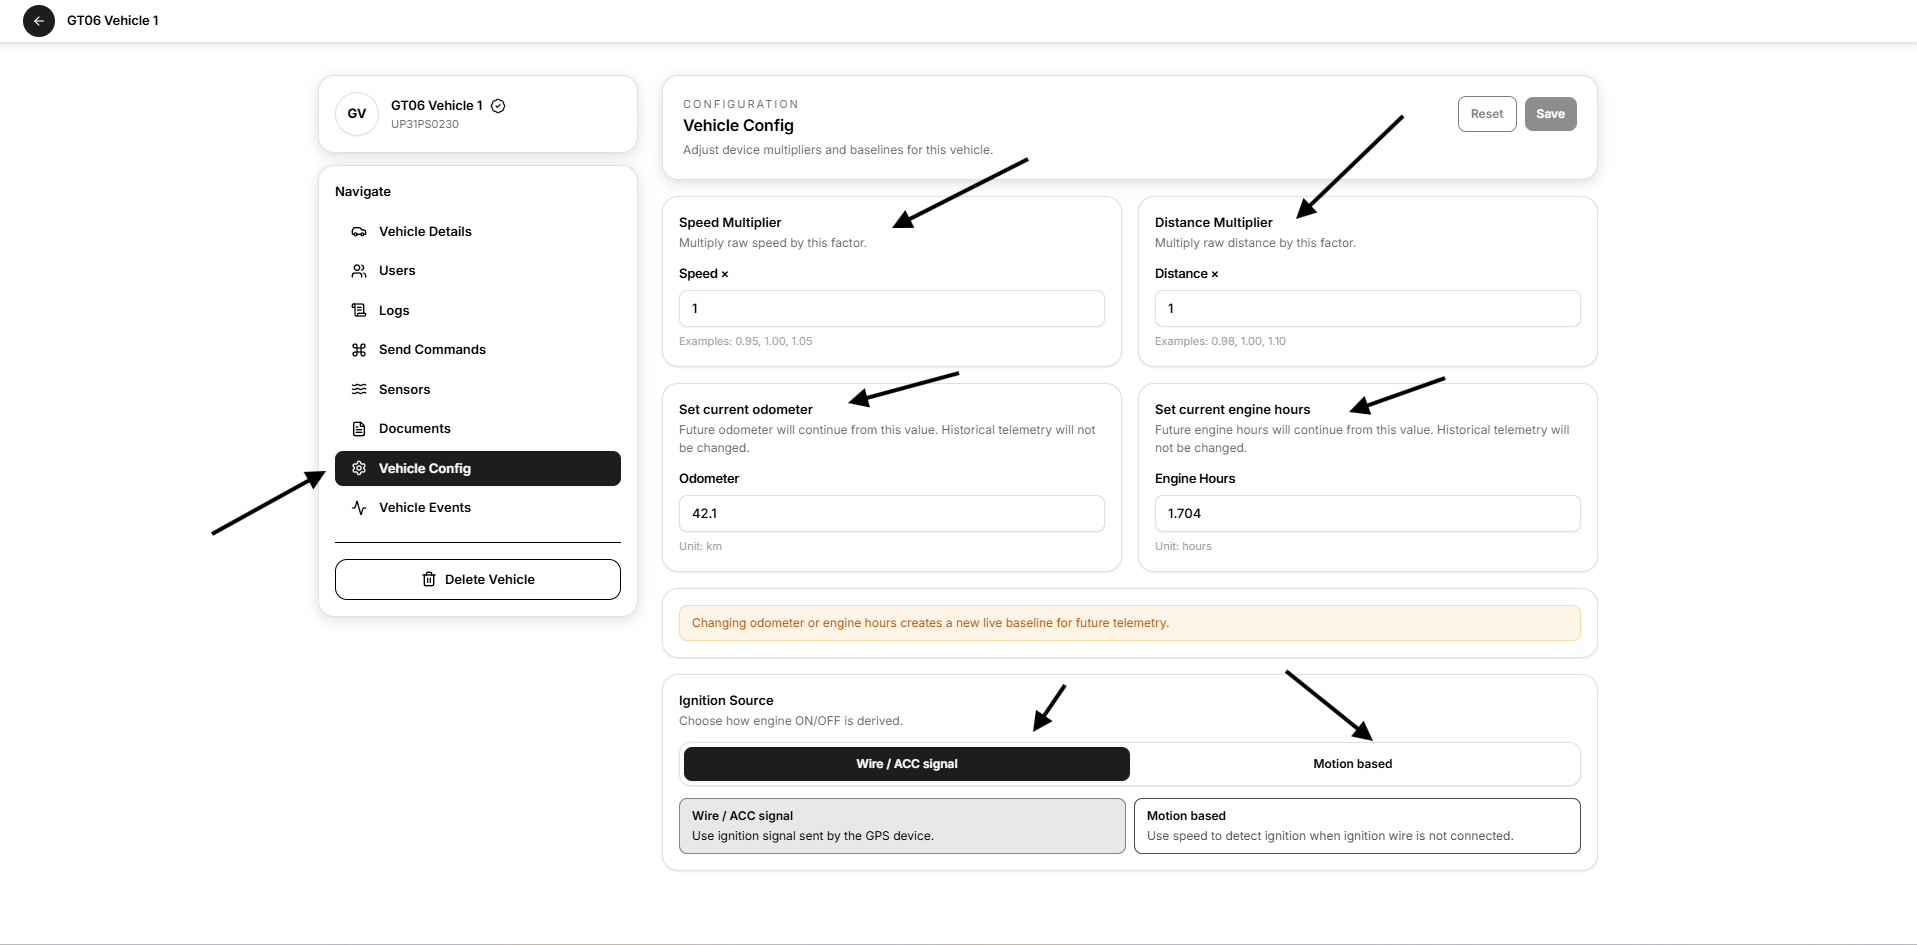
Configuration Fields
Speed Multiplier
Multiplies the raw speed value by the entered factor.
Distance Multiplier
Multiplies the raw distance value by the entered factor.
Set Current Odometer
Sets the live odometer baseline used for future telemetry.
Historical telemetry is not changed.
Set Current Engine Hours
Sets the live engine-hours baseline used for future telemetry.
Historical telemetry is not changed.
Ignition Source
Choose how engine ON/OFF status is derived:
- Wire / ACC signal — uses the ignition signal sent by the GPS device.
- Motion based — uses vehicle movement when an ignition wire is not connected.
Select Save to apply the configuration or Reset to discard the current changes.
Vehicle Events
The Vehicle Events tab displays operational events generated for the selected vehicle.
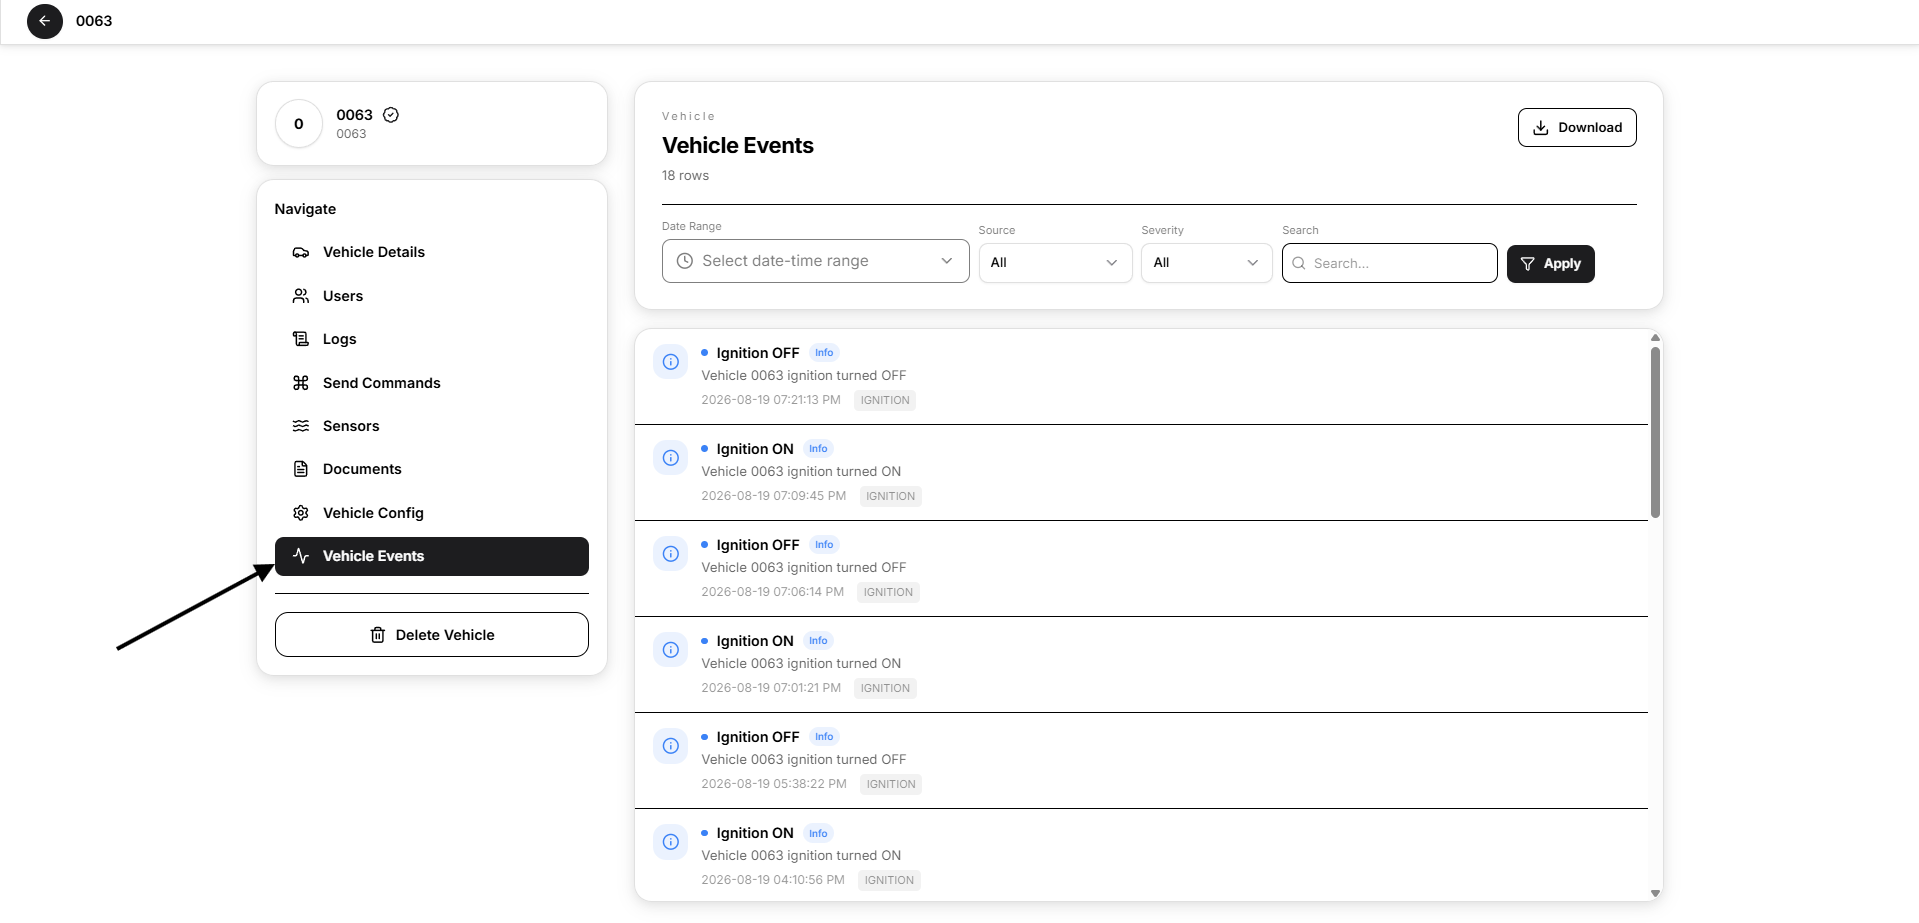
Visible event information can include:
- Event title.
- Severity.
- Description.
- Date and time.
- Event source.
Event examples include:
- Route Deviation
- Geofence Entry
- Overspeed detected
- Route Return
The available events depend on incoming telemetry and configured rules.
Event Filters
Available filters include:
- Date Range
- Source
- Severity
- Search
Severity options are:
- All
- Info
- Warning
- Critical
Select Apply to use the selected filters.
Select Download to export the available event information.
Delete a Vehicle
Select Delete Vehicle from the vehicle profile navigation.
A confirmation dialog explains that deletion is permanent.
Deleting a vehicle cannot be undone.
Loading, Empty, Validation, and Error States
Empty States
A profile section can display an empty state when:
- No users are linked.
- No logs are available for the selected period.
- No computed sensors exist.
- No documents have been uploaded.
- No vehicle events match the selected filters.
Form Validation
Required fields must be completed before a vehicle, document, or sensor can be saved.
Partial Bulk Upload
A bulk upload can contain both successful and failed rows.
Successfully processed vehicles remain created. Failed rows can be downloaded, corrected, and uploaded again.
Duplicate Device IMEI
A row fails when its IMEI is already assigned or already exists in Open VTS.
Recommended Workflow
- Search for the IMEI before creating a new vehicle.
- Use Add Vehicle for individual records.
- Use Bulk Upload for larger imports.
- Verify the primary user, device, type, and plan.
- Review Vehicle Details after creation.
- Link only the users who require access.
- Confirm that telemetry appears under Logs.
- Use Send Commands only when necessary and authorised.
- Configure multipliers and baselines only after confirming device behaviour.
- Review events and expiring documents regularly.
- Deactivate a vehicle when temporary access removal is sufficient.
- Delete a vehicle only when permanent removal is required.
Important Notes
- Deactivating a vehicle is different from deleting it.
- A linked user is not automatically the vehicle’s Primary User.
- Assigning a user does not change the device or subscription plan.
- Unassigning a user does not delete the user or vehicle.
- Creating a vehicle does not create a new GPS device; it assigns an available IMEI.
- A successful CSV validation does not guarantee that every row will process successfully.
- Changing the odometer or engine-hours value creates a new future telemetry baseline.
- Sending commands to an offline device may queue them until the next connection.
- Vehicle events depend on configured rules and incoming telemetry.
Final Verification Checklist
Confirm that:
- The vehicle appears in the correct Admin scope.
- Vehicle number, plate, VIN, and type are correct.
- The intended IMEI and SIM number are assigned.
- The correct Primary User is shown.
- The subscription plan is correct.
- Linked users have the expected access.
- Logs are received from the correct IMEI.
- Device commands use the correct protocol.
- Sensor calculations return the expected result.
- Document expiry dates and files are correct.
- Speed and distance multipliers are valid.
- Odometer and engine-hours baselines are correct.
- Ignition source matches the installation method.
- Event filters return the expected records.
- Deletion confirmations refer to the correct vehicle.
Next Step
Continue to the next Driver Managemnt.