
Superadmin Administrators: Create and Manage Admin Accounts
Understand the Administrator role in Open VTS, create and organize Admin accounts, and manage each Administrator’s profile, password, status, credits, payments, documents, vehicles, settings, and activity history.
Last updated August 18, 2026
Administrators: Create and Manage Admin Accounts
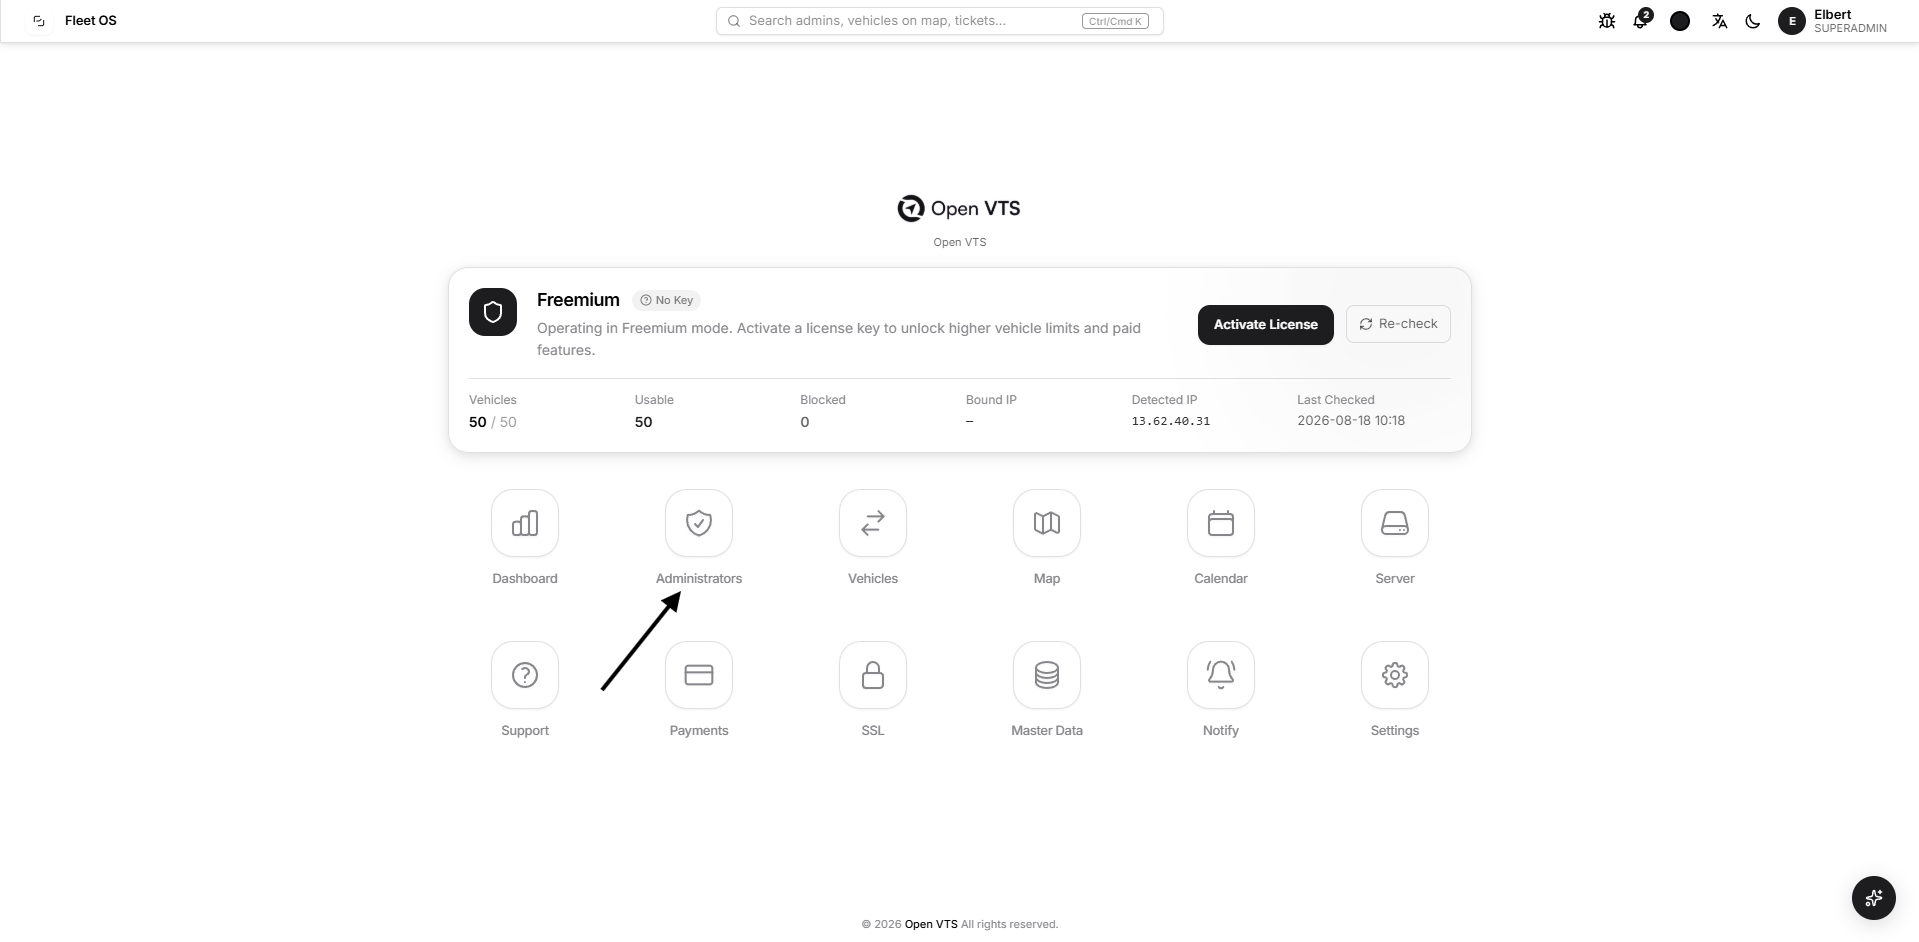
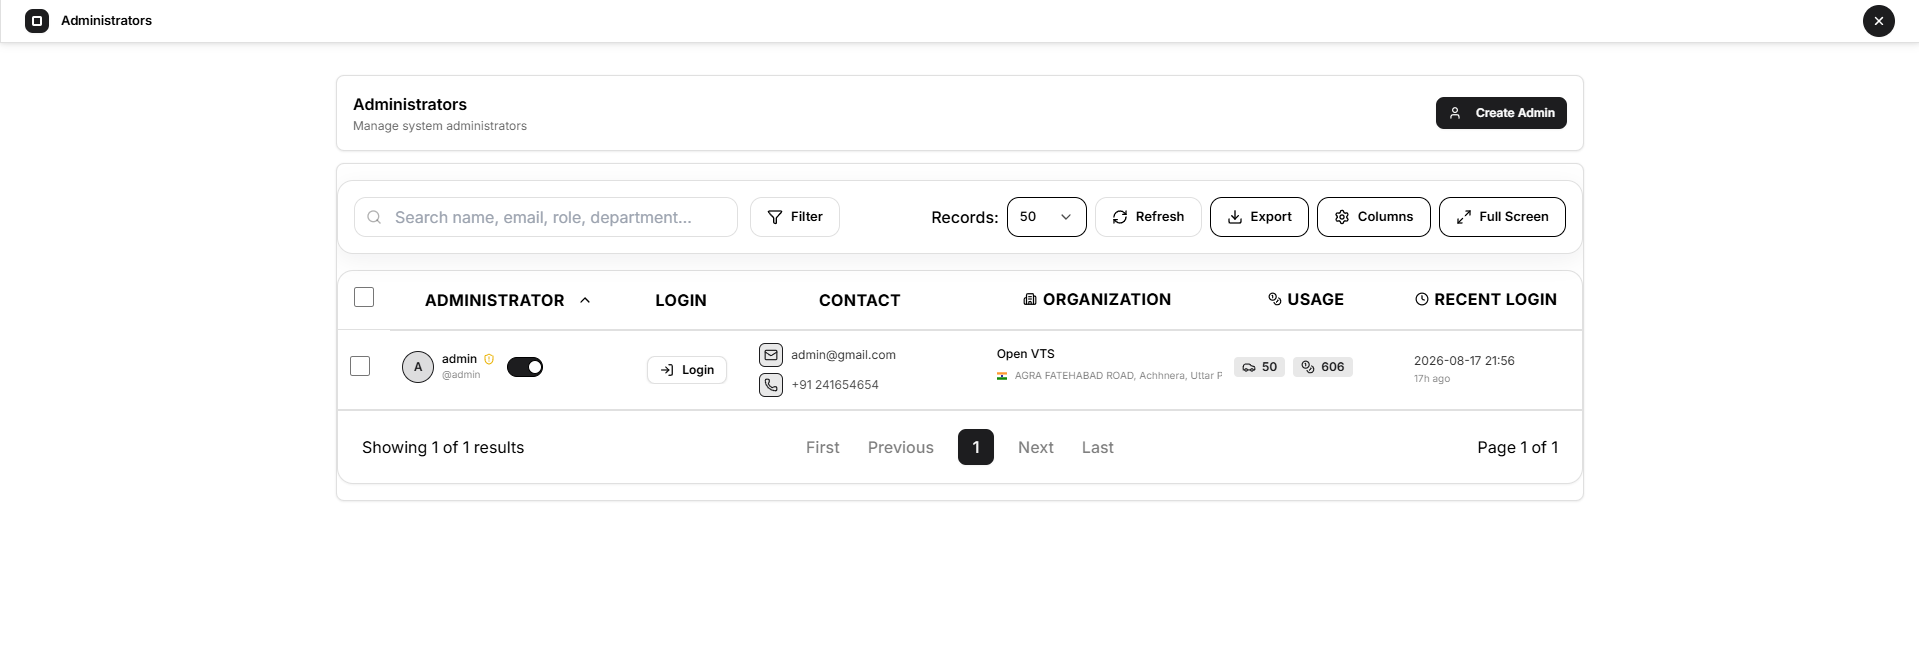
The Administrators module allows the Superadmin to create and manage the business-level accounts operating under the Open VTS platform.
An Administrator is different from the Superadmin:
- The Superadmin controls the complete Open VTS platform.
- An Administrator operates a business, branch, reseller account, or fleet operation within the platform.
- The Administrator can manage its own Users, Vehicles, Drivers, Team Members, Inventory, Plans, Payments, Notifications, and other authorized operations.
The relationship is:
Superadmin
↓
Administrator
↓
Users, Vehicles, Drivers, Team and Inventory
Creating separate Administrator accounts keeps each business operation organized under the correct owner, permissions, credit balance, vehicles, payments, and activity history.
[Image Reference: Add the complete Administrators directory screenshot here. Show the search, toolbar, table, usage information, recent login, pagination, and Create Admin button. Replace all real names, emails, phone numbers, companies, and addresses with demonstration data.]
Understanding the Administrator Role
An Administrator may represent:
- A GPS tracking company
- A reseller
- A regional branch
- A fleet-management company
- A large customer organization
- A separate operational business unit
Each Administrator receives an individual login and operates only within its assigned scope.
This structure provides:
- Separation between different businesses
- Controlled access to platform data
- Independent customer and vehicle management
- Separate credits and payment records
- Traceable Administrator activity
- Easier support and account management
The Superadmin retains platform-level oversight while each Administrator manages its daily business operation.
Administrators Directory
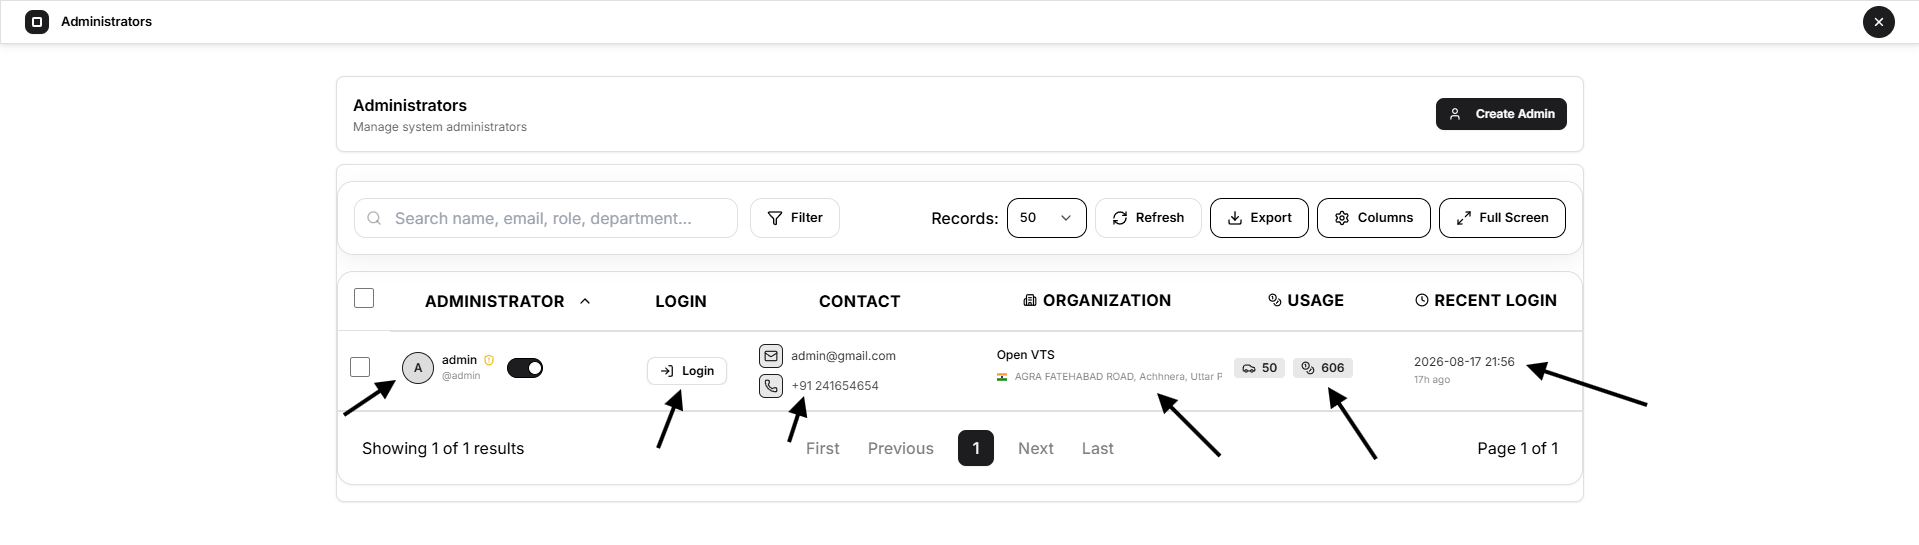
The Administrators directory displays every Admin account created under the signed-in Superadmin.
Administrator
The Administrator column displays:
- Profile initials
- Full name
- Username
- Email-verification indicator
- Active or inactive status switch
Select the Administrator record to open its complete management page.
Login
The Login button opens Open VTS as the selected Administrator without requiring that Administrator’s password.
Use this function when the Superadmin needs to:
- Verify the Administrator workspace
- Review account configuration
- Investigate a reported problem
- Provide authorized operational support
Use this access only for legitimate platform-management and support purposes.
Contact
The Contact column displays:
- Email address
- Mobile number
Organization
The Organization column displays:
- Company name
- Country
- Registered location or address
Usage
The Usage column shows:
- Number of vehicles registered under the Administrator
- Current Administrator credit balance
Vehicle count and credit balance represent different things. Vehicles are account records, while credits are the internal balance used by supported licensing or renewal workflows.
Recent Login
Recent Login shows the Administrator’s latest successful login.
If the account has never been used, it displays Never.
Find and Organize Administrators
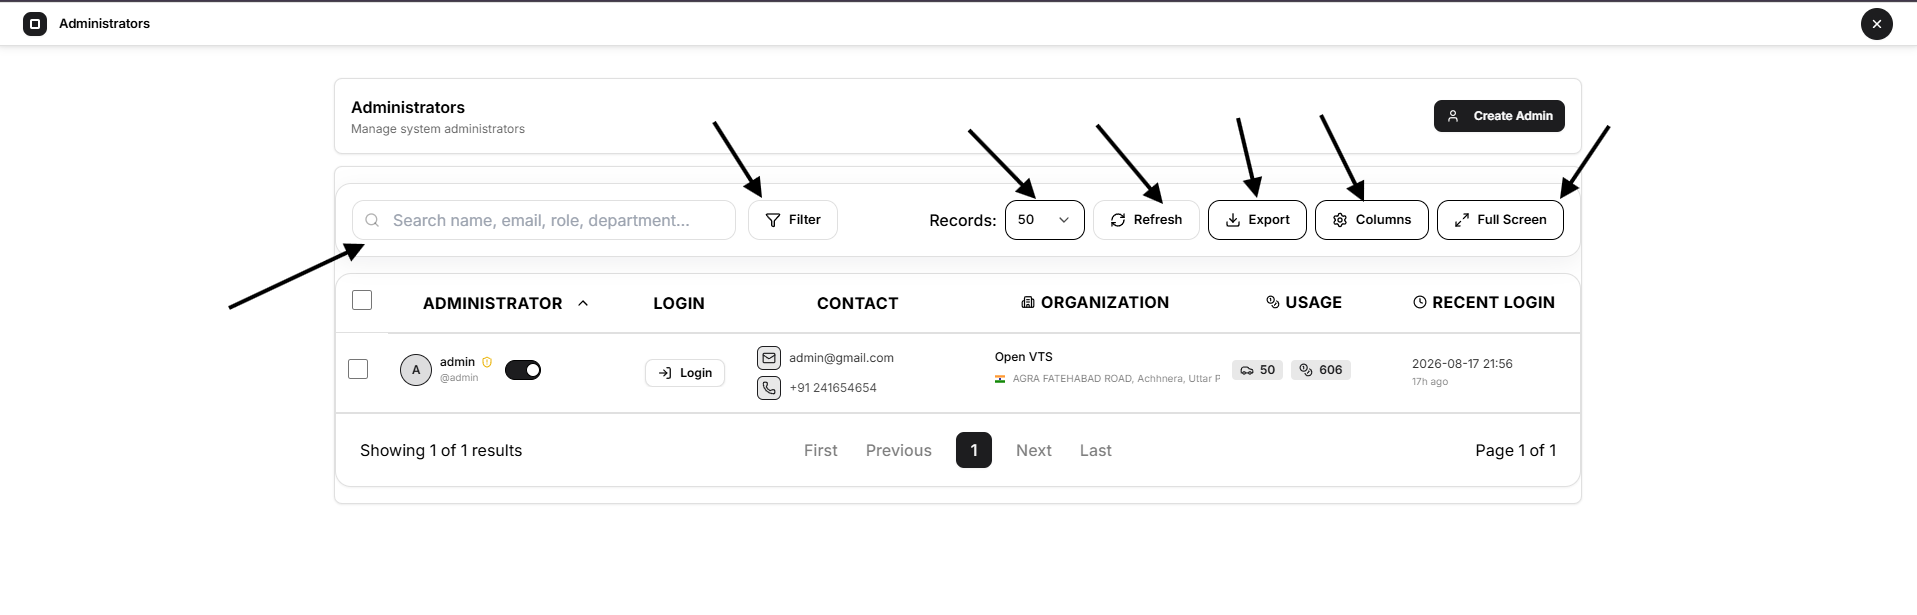
The directory toolbar provides the following controls:
- Search: Find Administrators using matching account or organization information.
- Filter: Apply the available account filters.
- Records: Choose how many records appear on one page.
- Refresh: Retrieve the latest Administrator data.
- Export: Download the directory in an available export format.
- Columns: Show, hide, or reorder table columns.
- Full Screen: Expand the directory for a larger working area.
Use the row checkboxes to select one or more Administrators when bulk actions are available.
Pagination controls at the bottom allow movement between result pages.
Create an Administrator
Select Create Admin in the upper-right corner of the Administrators page.
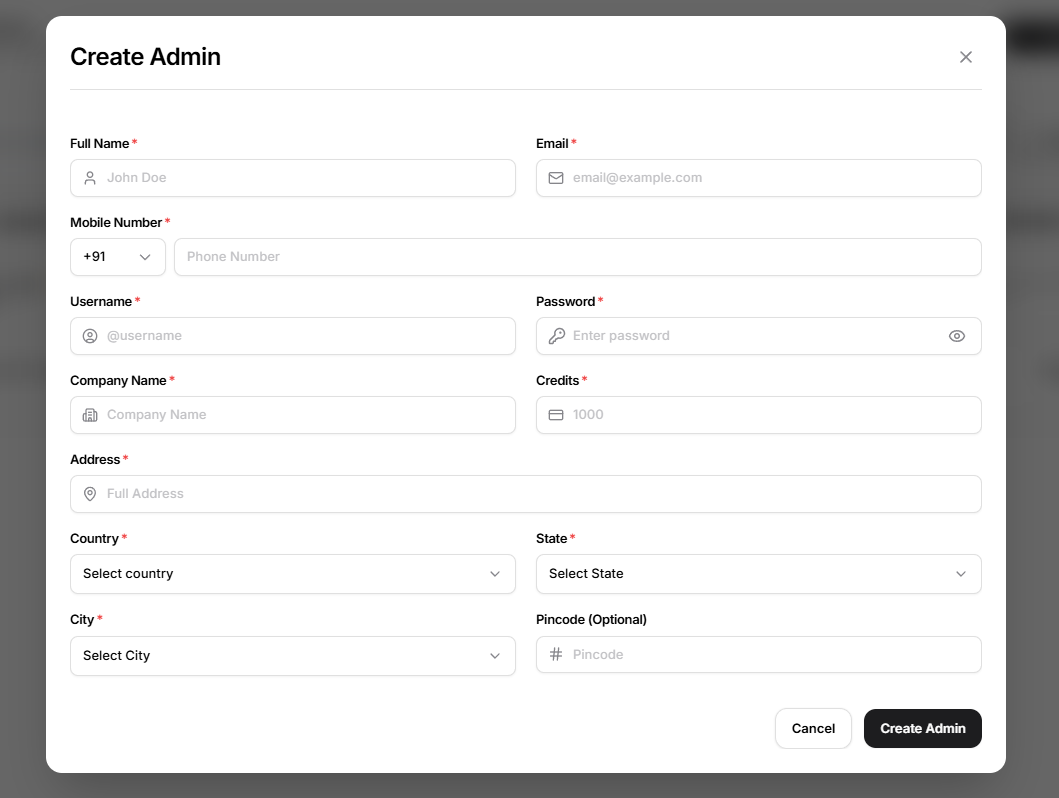
Complete the form with the Administrator’s login, business, credit, and location information.
Account Information
Full Name
Enter the name of the person responsible for the Administrator account.
Example: John Doe
Enter a valid email address that is not already used by another Open VTS account.
Example: admin@example.com
Mobile Number
Select the correct calling code and enter the mobile number.
Username
Create a unique username for signing in.
Example: john.admin
Password
Create the initial Administrator password.
The password must contain between 6 and 35 characters. Share it with the Administrator through a secure communication method.
Business Information
Company Name
Enter the business or organization represented by the Administrator.
Example: Example Fleet Solutions
Credits
Enter the initial credit balance to assign to the account.
The assigned amount becomes part of the Administrator’s credit history.
Address
Enter the complete business address.
Country, State and City
Select the business location in order:
- Country
- State
- City
Changing the Country clears the selected State and City. Changing the State clears the selected City.
Pincode
Enter the six-digit postal code when applicable. This field is optional.
Create and Verify the Account
After completing the form:
- Review the account and business details.
- Confirm the initial credit balance.
- Select Create Admin.
- Wait for the success confirmation.
- Confirm that the Administrator appears in the directory.
Verify that:
- The name and username are correct
- The company and location are correct
- The assigned credit balance is correct
- The account is active
- The recent-login value shows Never until the first sign-in
Administrator Details and Management
Select an admin and click on the name to open its complete management page.
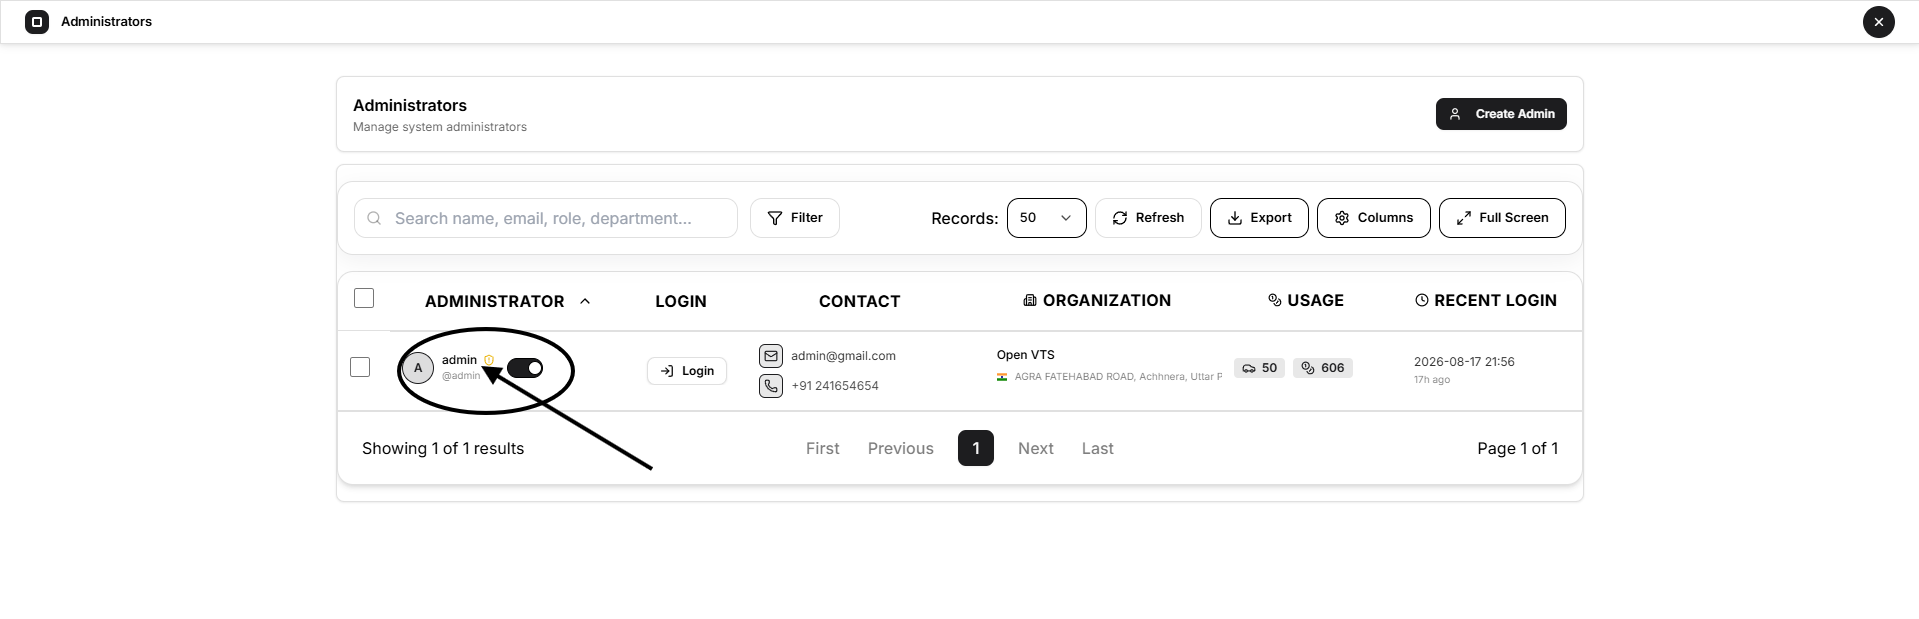
The page contains a persistent left navigation panel and a main content area for the selected section.
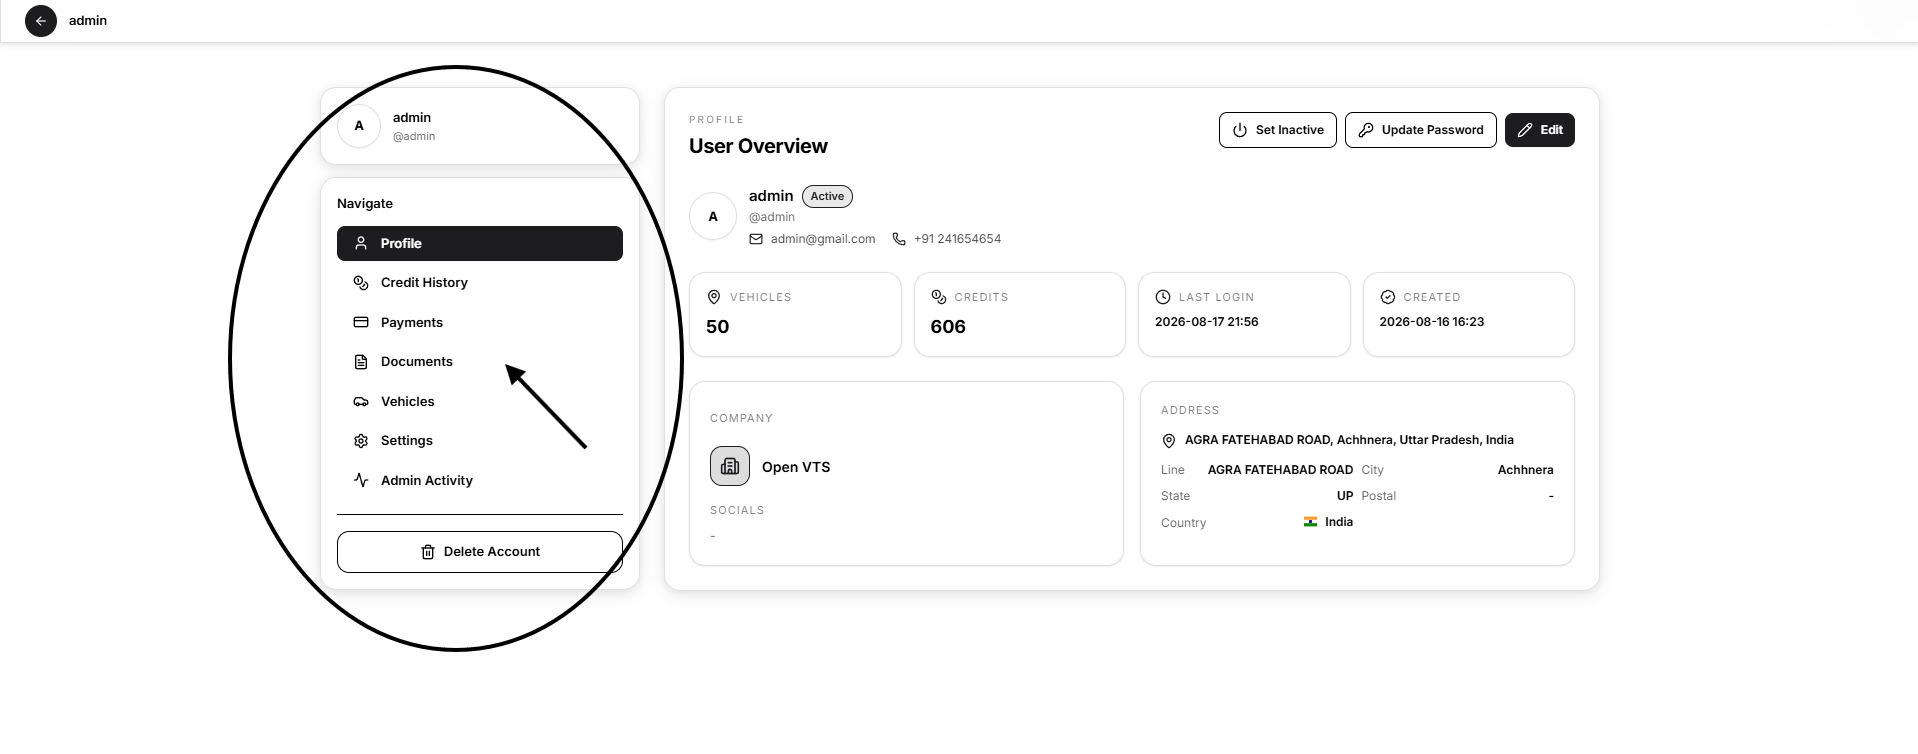
Available sections are:
- Profile
- Credit History
- Payments
- Documents
- Vehicles
- Settings
- Admin Activity
The left panel also contains the permanent Delete Account action.
Profile
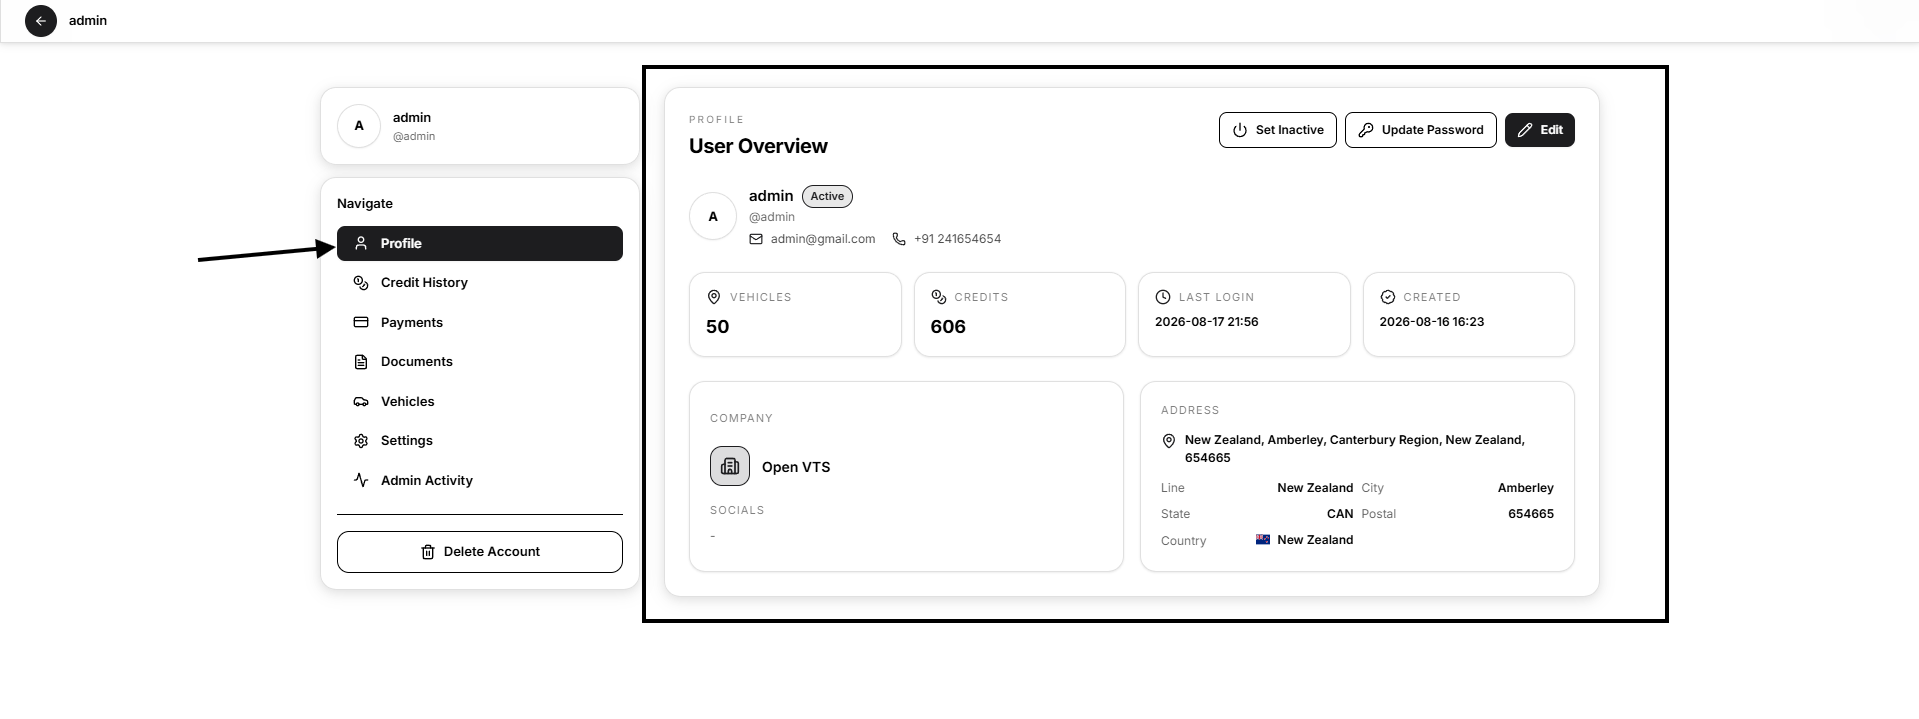
The Profile section provides the primary overview of the Administrator account.
It displays:
- Full name
- Username
- Active or inactive status
- Email address
- Mobile number
- Registered vehicle count
- Current credit balance
- Last login
- Account creation date
- Company name
- Website
- Available social links
- Registered business address
The top-right actions are:
- Set Inactive or Set Active
- Update Password
- Edit
Set the Administrator Inactive
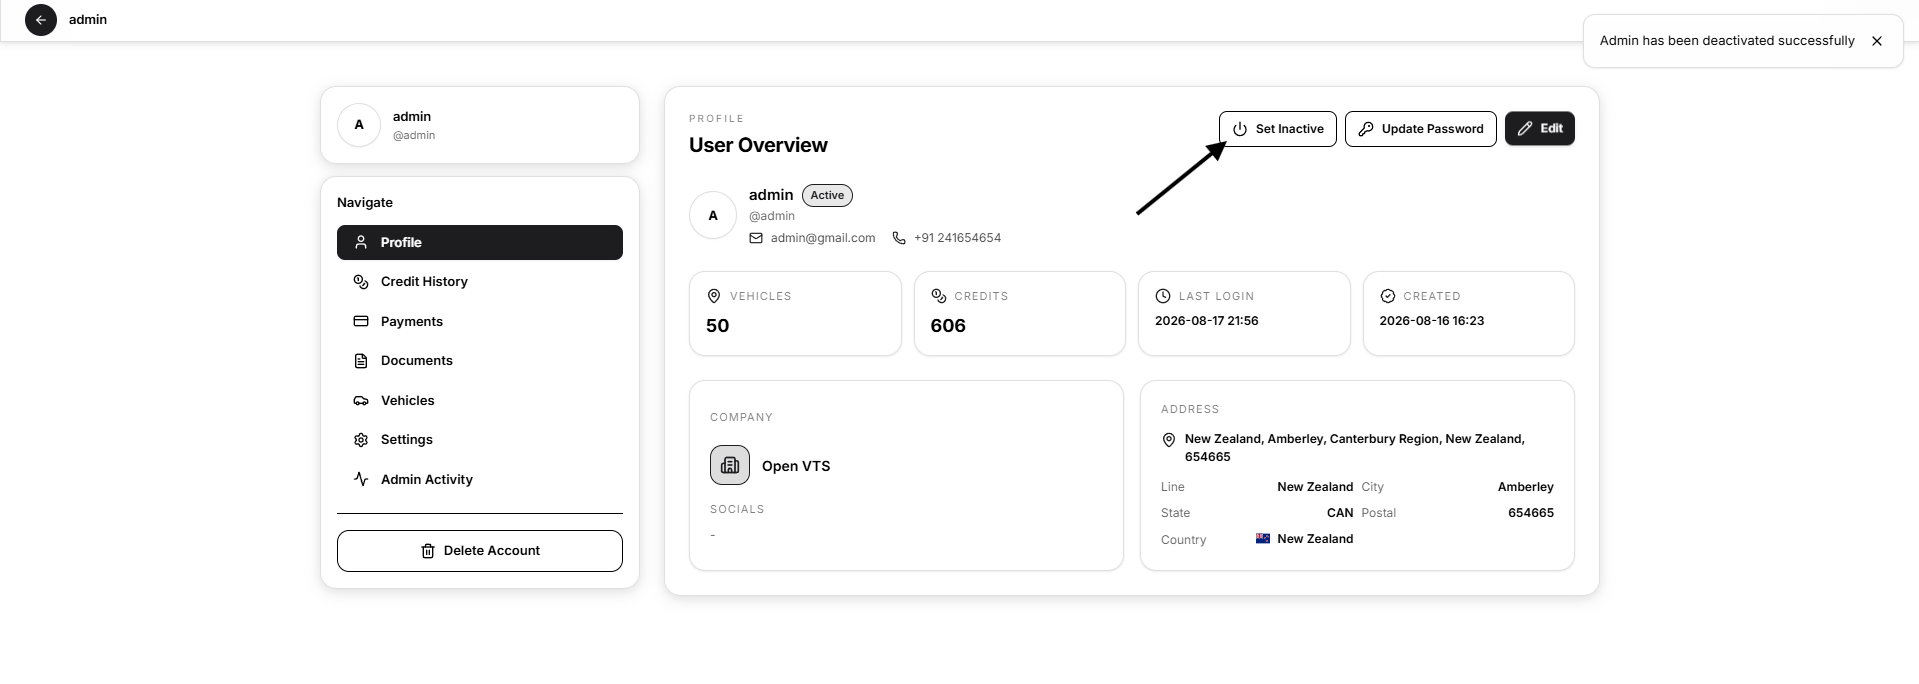
Select Set Inactive to deactivate the Administrator account.
An inactive Administrator cannot sign in to Open VTS. The account and its associated records remain stored and can be restored later by selecting Set Active.
Use this action when access must be suspended without permanently deleting the Administrator or its business information.
Deactivation is different from deletion:
- Inactive: Access is suspended, but the account and related data remain.
- Deleted: The account is permanently removed when deletion is allowed.
Update the Administrator Password
Select Update Password when the Administrator needs a new sign-in password.
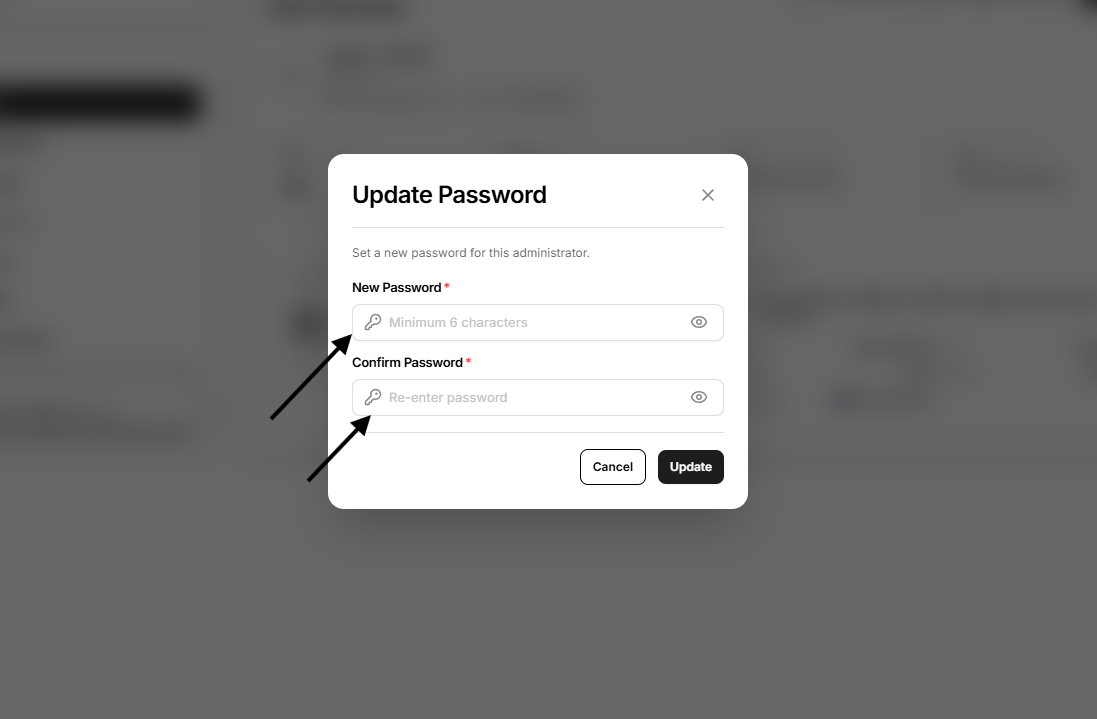
Complete the following fields:
New Password
Enter a password containing between 6 and 35 characters.
Confirm Password
Enter the same password again.
The two entries must match.
Use the visibility icon when you need to check the entered value before submission.
Select Update to save the new password. The Administrator must use the new password for future sign-ins.
Share the password only through a secure communication method.
Edit the Administrator Profile
Select Edit to update the Administrator’s contact and location information.
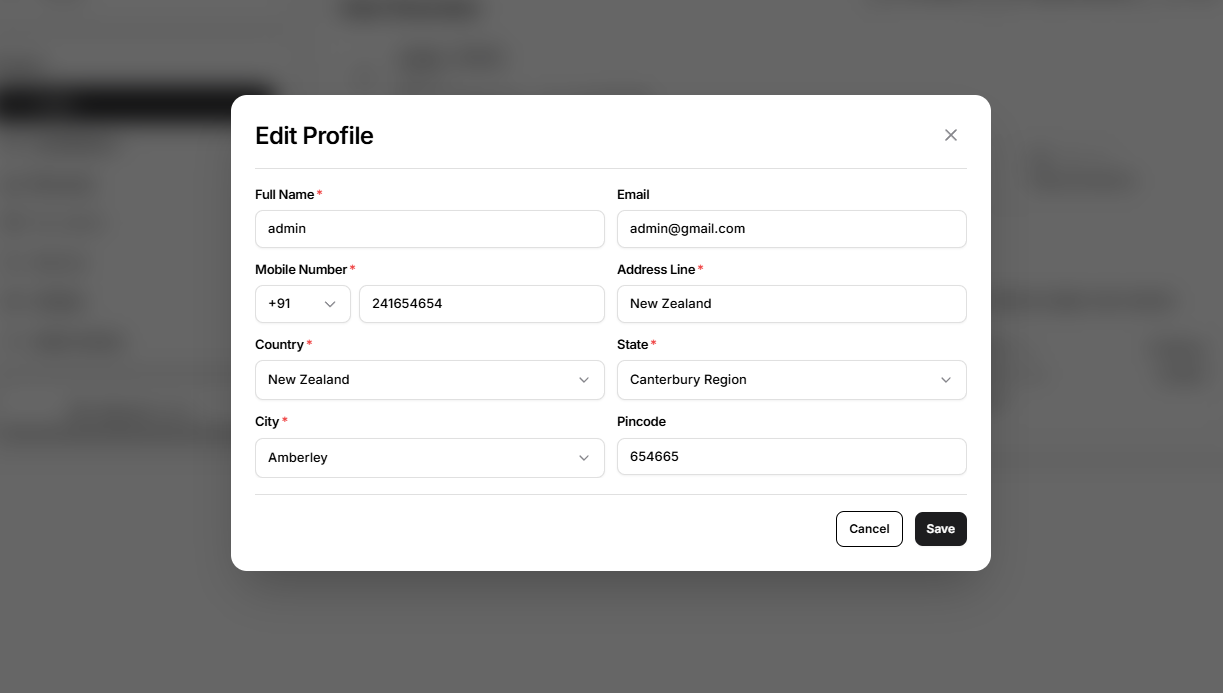
The Edit Profile form includes:
- Full Name
- Mobile Number
- Address Line
- Country
- State
- City
- Pincode
Full Name, Mobile Number, Address Line, Country, State, and City are required.
Email may be updated when necessary, but it must have a valid format and cannot already belong to another Open VTS account.
Pincode is optional. When entered, it must contain no more than six numeric digits.
Select Save to apply the changes.
Credit History
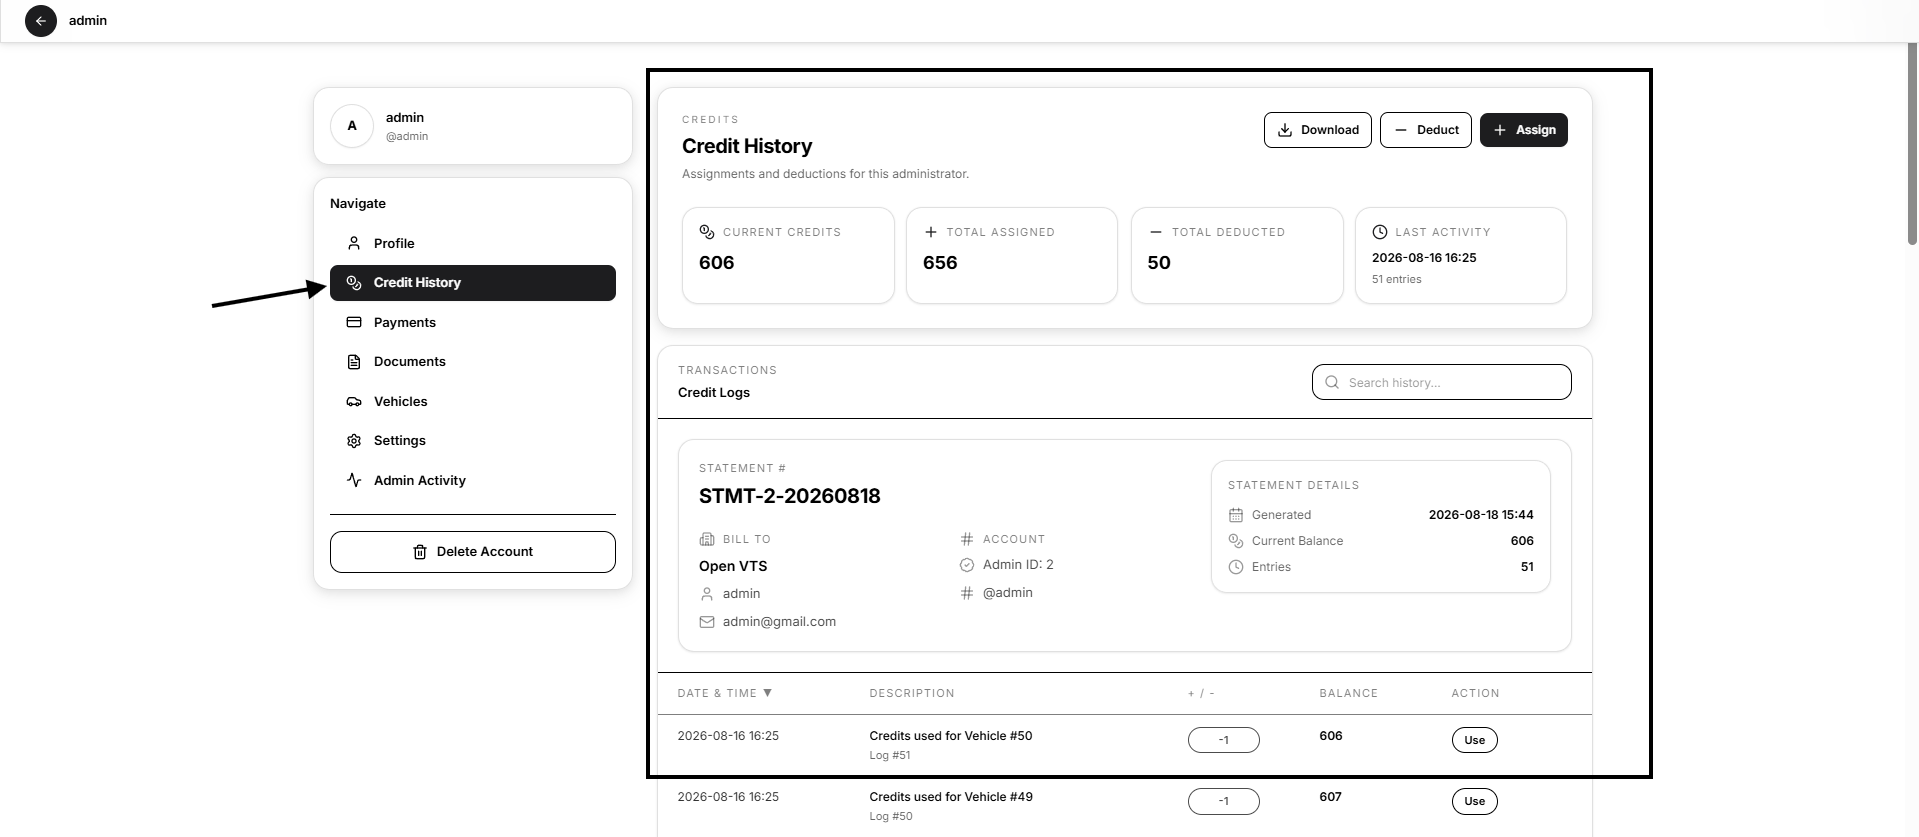
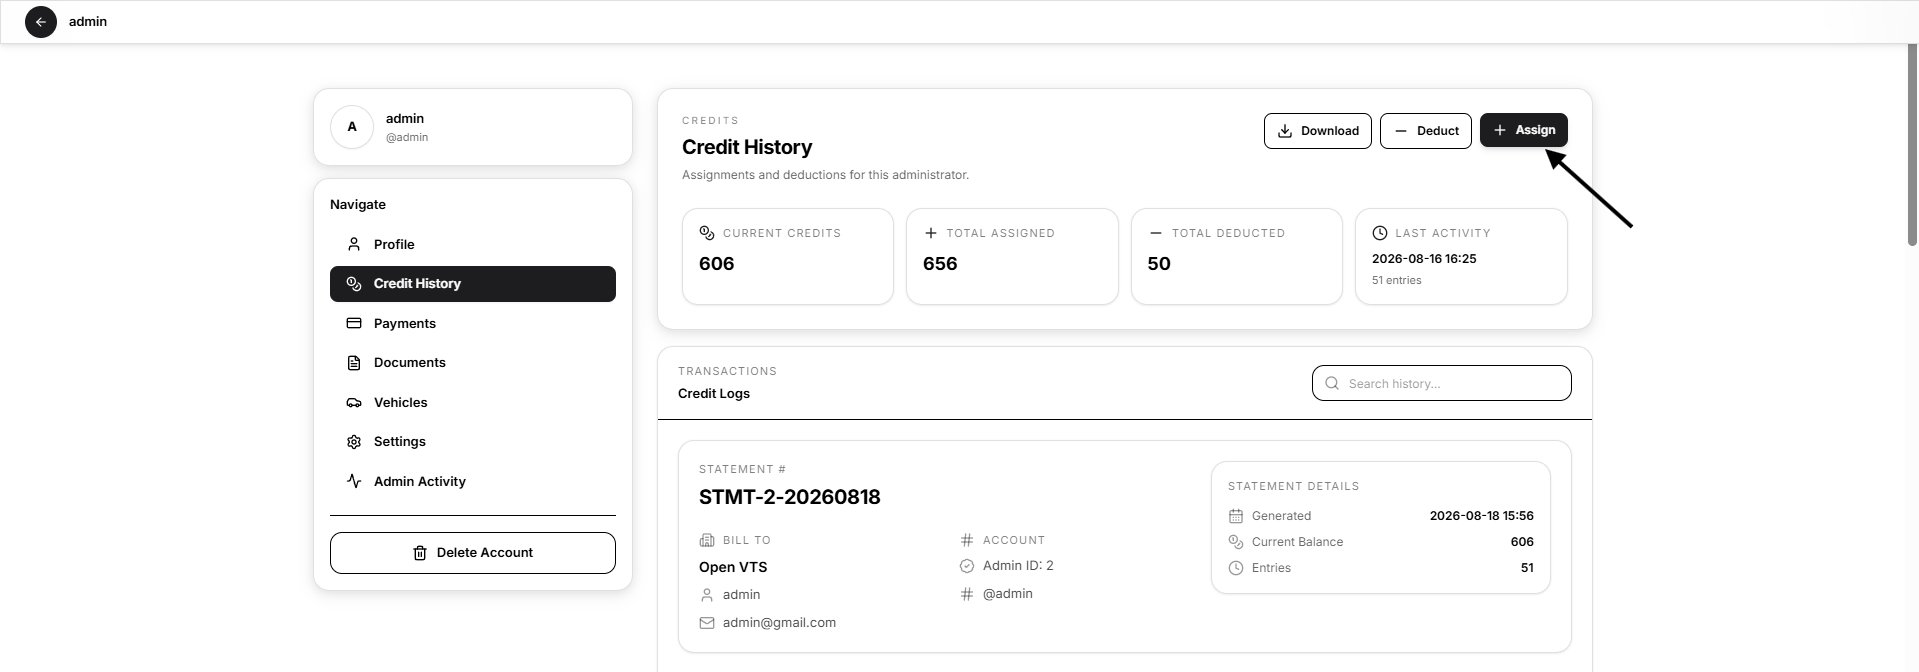
The Credit History section shows the Administrator’s current credit position and every recorded assignment or deduction.
The summary cards show:
- Current Credits: Credits currently available
- Total Assigned: Total credits added to the account
- Total Deducted: Total credits removed or used
- Last Activity: Date and time of the latest credit entry and total number of entries
The statement section displays:
- Statement number
- Company and Administrator information
- Administrator ID and username
- Generated date
- Current balance
- Number of entries
The Credit Logs table shows:
- Date and time
- Description
- Credit increase or decrease
- Balance after the entry
- Action type
Use the search field to find matching credit records.
Select Download to export the available history as CSV or PDF.
Assign Credits
Select Assign to add credits to the Administrator’s current balance.
Enter the number of credits to add, then select Assign.
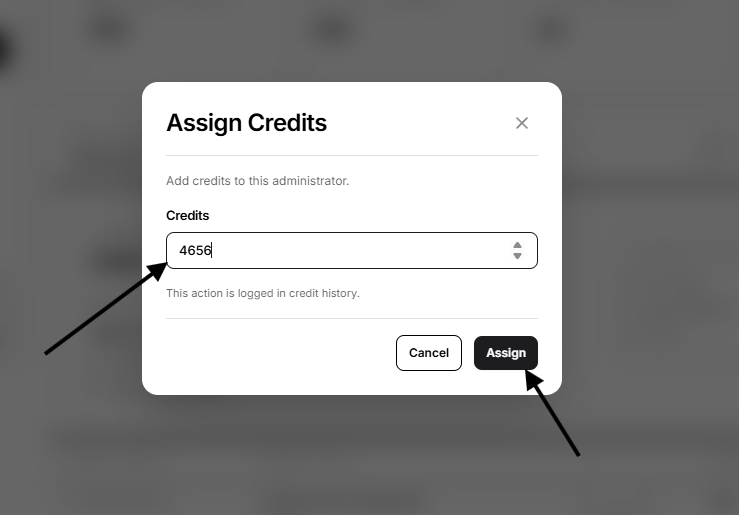
The amount must be a positive whole number.
After successful assignment:
- The current credit balance increases
- A new assignment entry is created
- The action appears in Credit History
The form confirms that every assignment is logged for future review.
Deduct Credits
Select Deduct to remove credits from the Administrator’s balance.
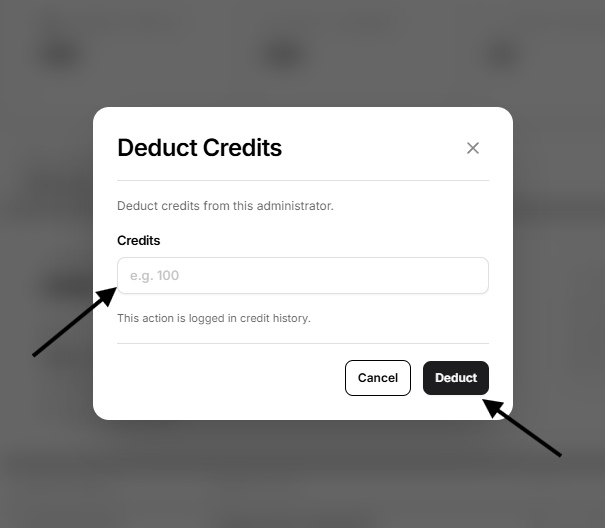
Enter the number of credits to remove, then select Deduct.
The amount must be a positive whole number. Open VTS does not allow a deduction that would reduce the balance below zero.
After successful deduction:
- The current credit balance decreases
- A new deduction entry is created
- The action appears in Credit History
Credit changes and payments are separate records. Assigning or deducting credits changes the internal credit balance; recording a payment creates a financial transaction.
Payments
The Payments section records payments associated with the selected Administrator.
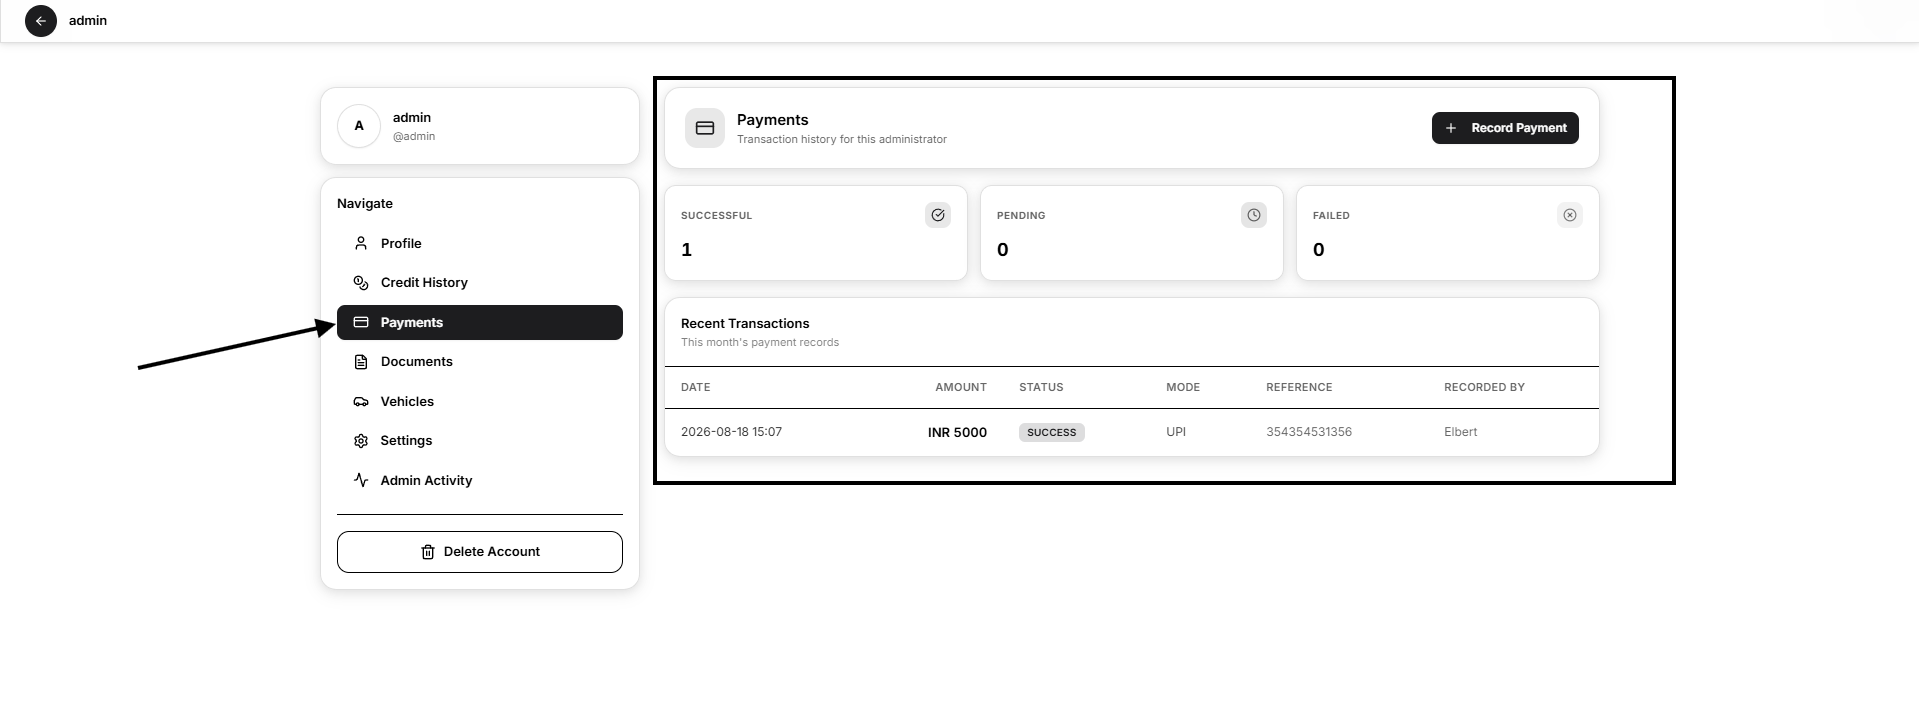
The summary cards show the number of payments with these statuses:
- Successful
- Pending
- Failed
The Recent Transactions table displays payment records for the current month, including:
- Date
- Amount
- Status
- Payment mode
- Reference
- Recorded by
Record a Manual Payment
Select Record Payment to add a payment received outside an automated payment gateway.
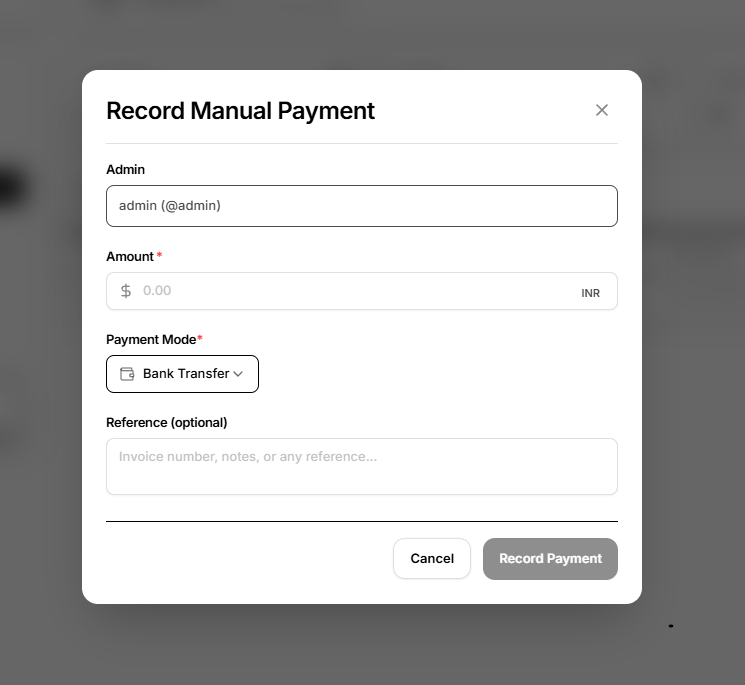
Complete the form as follows:
Admin
The selected Administrator is filled automatically.
Amount
Enter the amount received. The displayed currency comes from the Administrator’s account configuration.
Payment Mode
Select the payment method. Available options can include:
- Bank Transfer
- Cash
- UPI
- Card
- Wallet
- Razorpay
- Stripe
- Other
Reference
Enter optional supporting information such as invoice number, transaction reference, or internal payment note.
Select Record Payment to create the transaction.
Recording a payment does not automatically assign credits. Use Assign Credits separately when the Administrator’s credit balance must be increased.
Documents
The Documents section stores verification, KYC, and business-related files for the Administrator.
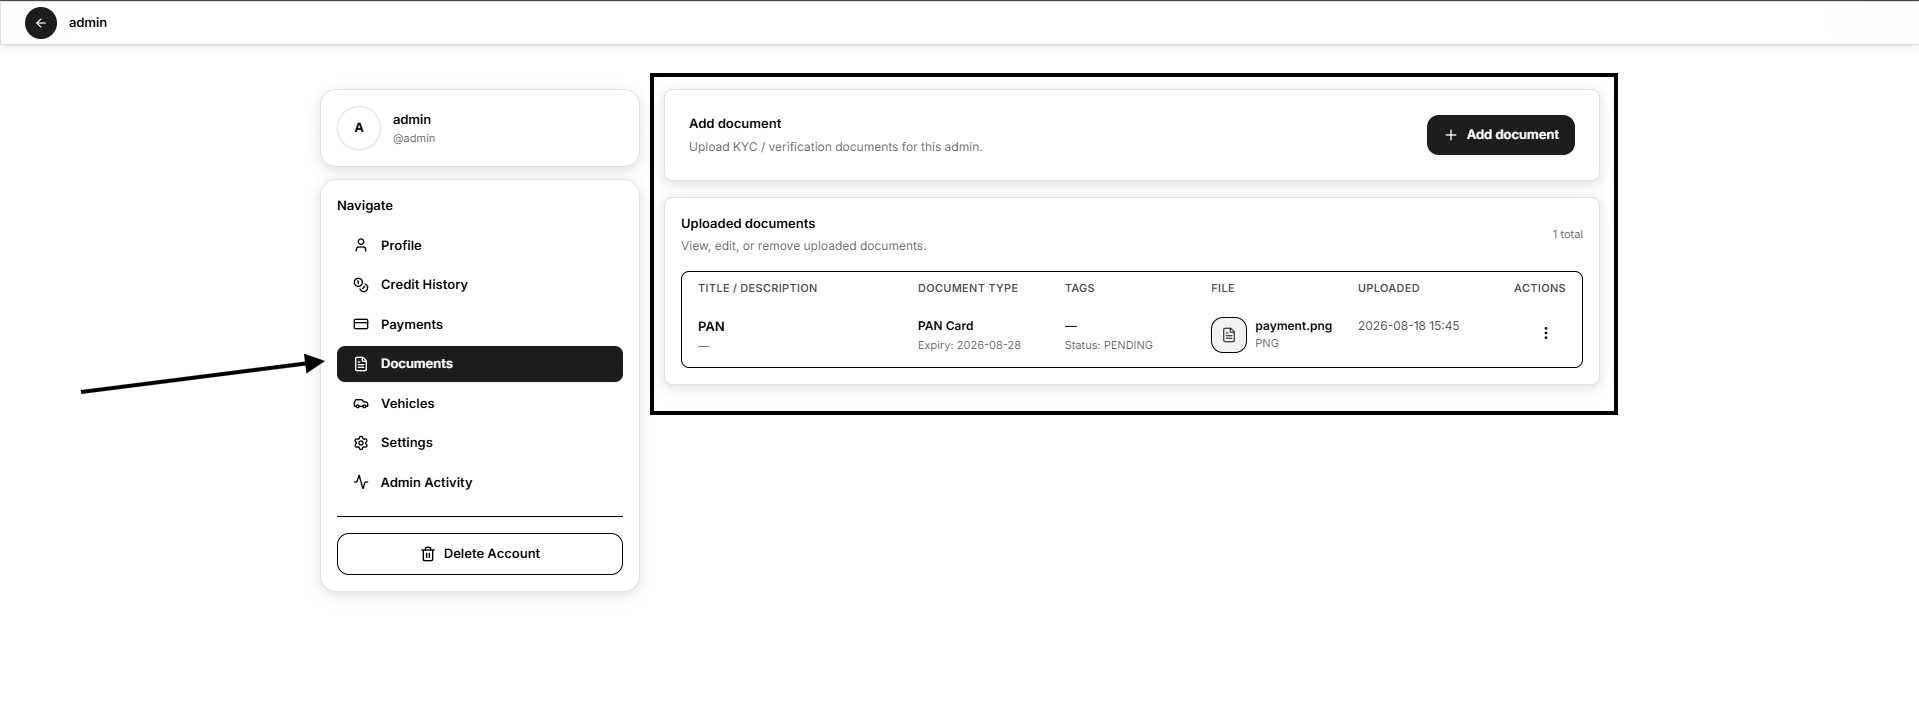
Uploaded records can be viewed, edited, or removed from this section.
Available document types are loaded from the platform’s configured Master Data.
Add a Document
Select Add document to open the upload form.
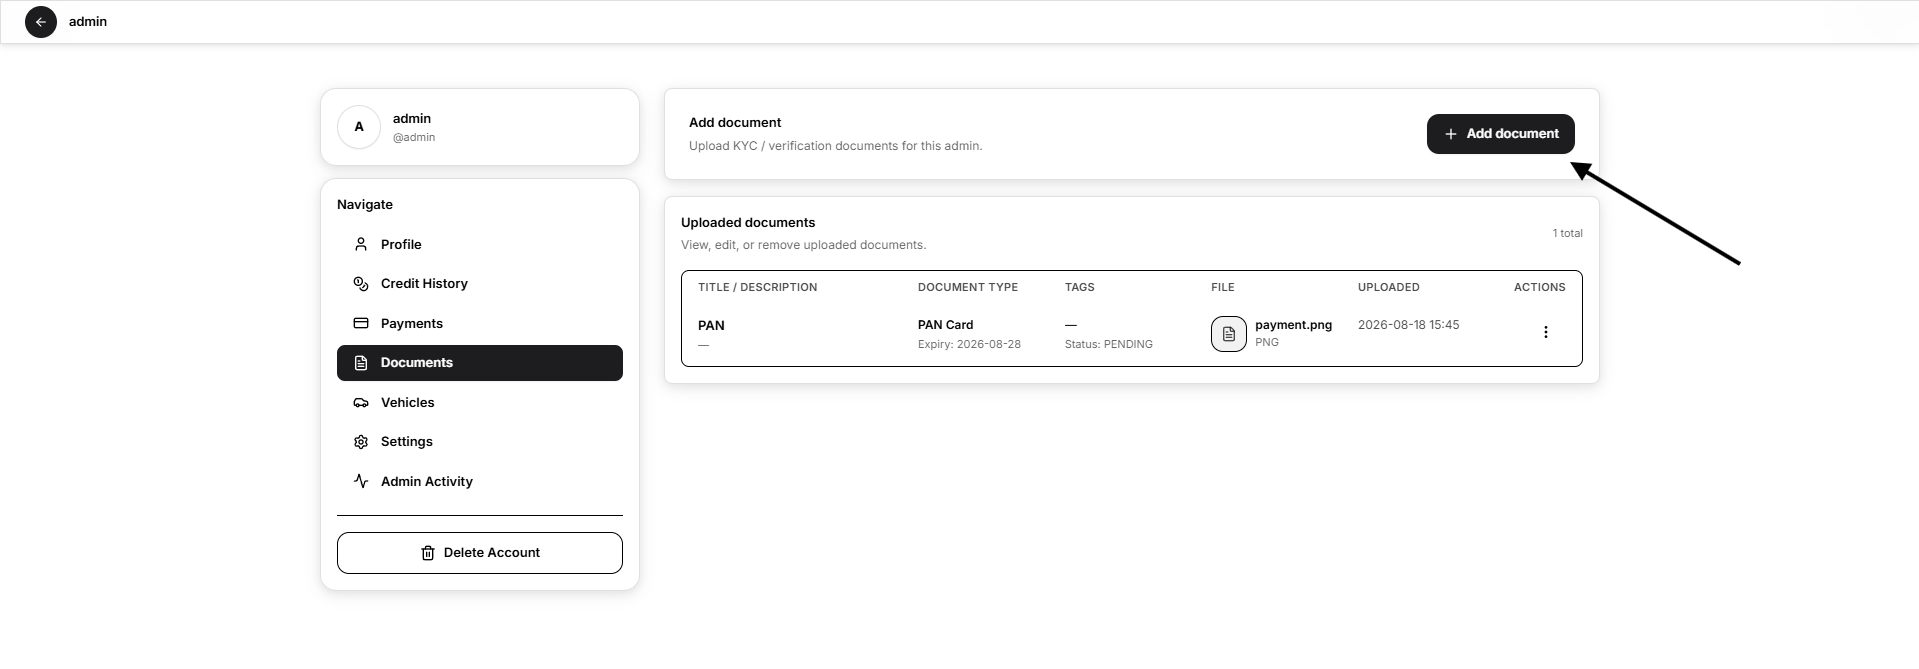
Complete the following fields:
Document Type
Select the relevant document type.
Title
Enter a clear title for the file.
Example: Business Registration Certificate
Expiry Date
Select the expiry date when the document has one. This field is optional.
Visible To Admin
Enable this option when the Administrator should be able to view the document.
Tags
Add optional tags to make the document easier to identify. Press Enter or use a comma to add each tag.
Description
Enter optional supporting information about the document.
File Selection
Select the file to upload.
Supported formats are:
- JPG
- JPEG
- PNG
- DOC
- DOCX
- WEBP
Maximum file size:
- 5 MB per file
Select Upload to save the document.
Vehicles
The Vehicles section displays every vehicle registered under the selected Administrator.
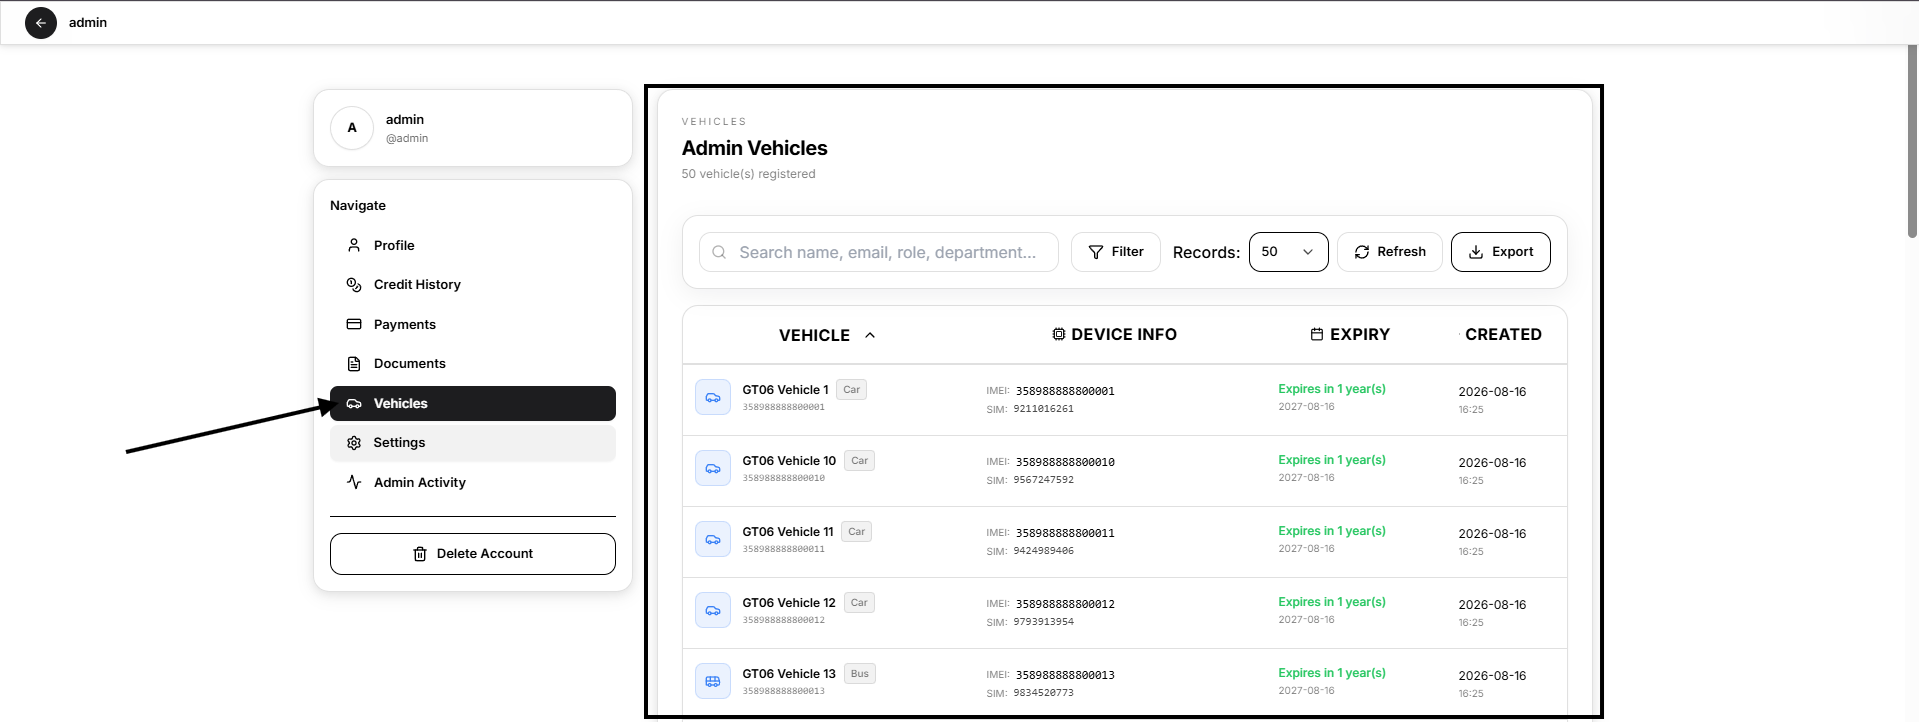
The table includes:
- Vehicle name and type
- IMEI
- SIM number
- Subscription expiry
- Creation date and time
The toolbar provides:
- Search
- Filter
- Records per page
- Refresh
- Export
Use this section to review account usage, check device assignments, confirm expiry dates, and investigate vehicle-related support issues.
Settings
The Settings section controls the Administrator’s interface and regional preferences.
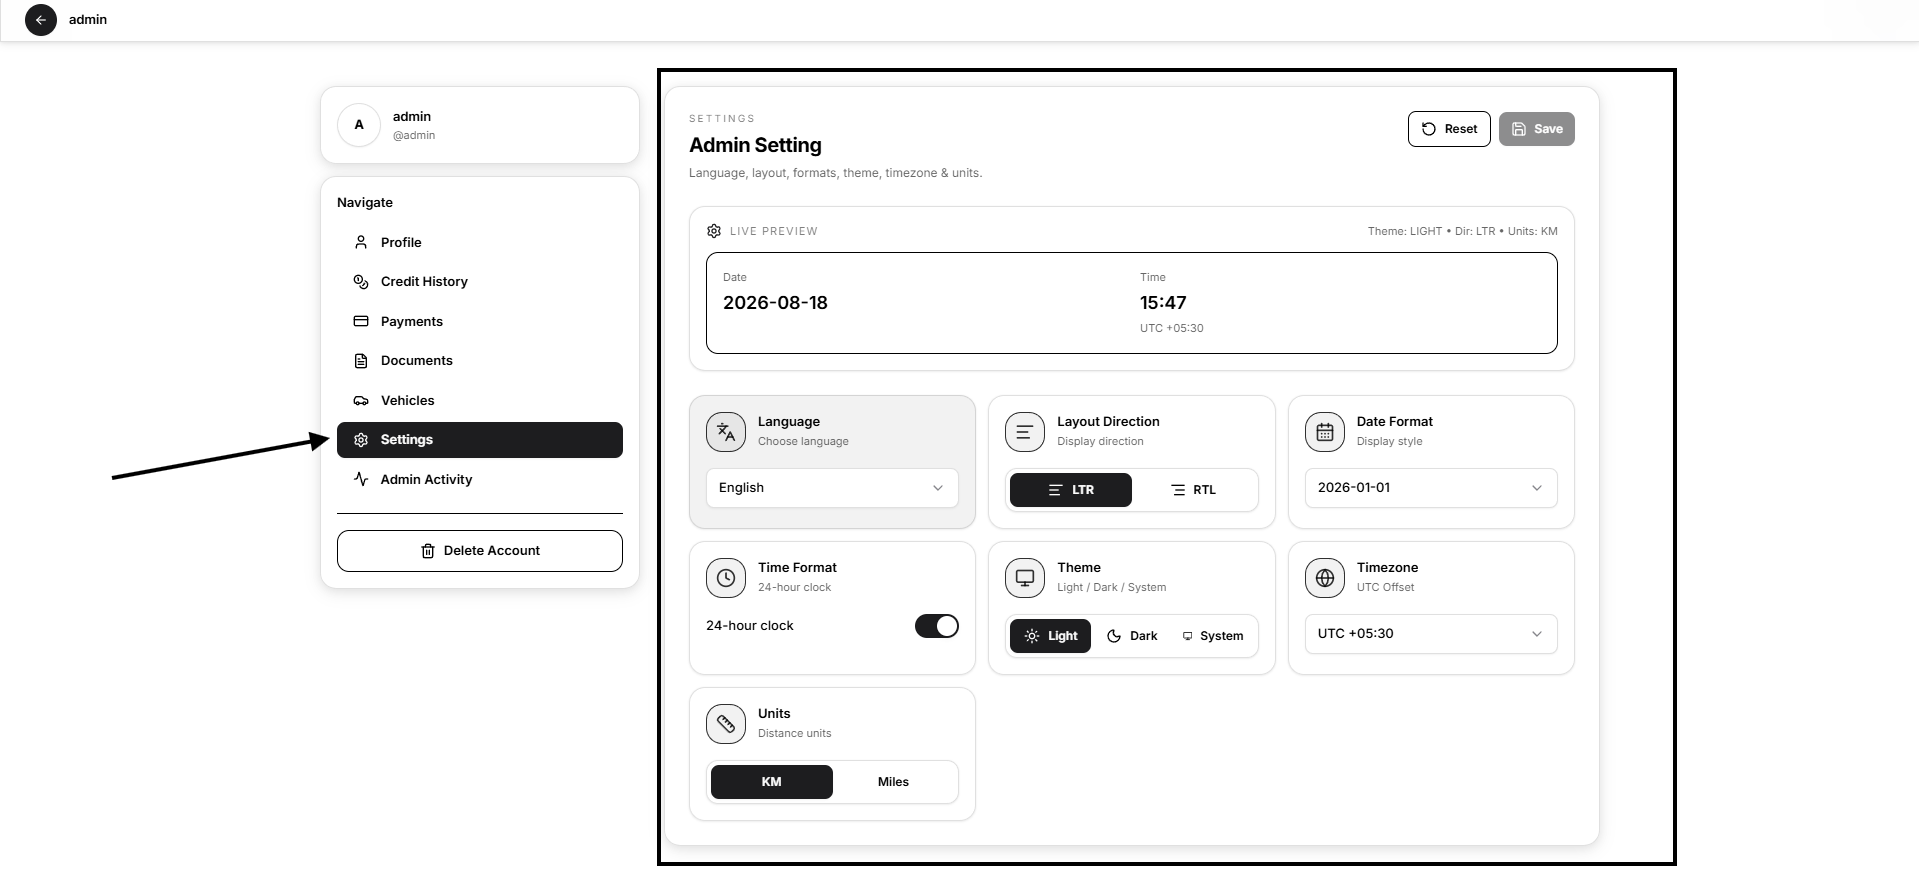
Available settings include:
Language
Sets the Administrator interface language.
Layout Direction
Choose:
- LTR
- RTL
Date Format
Controls how dates are displayed.
Time Format
Enable or disable the 24-hour clock.
Theme
Choose:
- Light
- Dark
- System
Timezone
Select the UTC offset used to display dates and times.
Units
Choose:
- KM
- Miles
The Live Preview shows how the selected date, time, theme, direction, and unit settings will appear.
Select Save to apply the changes. Select Reset to restore the current saved values before submission.
Admin Activity
The Admin Activity section provides an audit trail of recent actions performed by the selected Administrator.
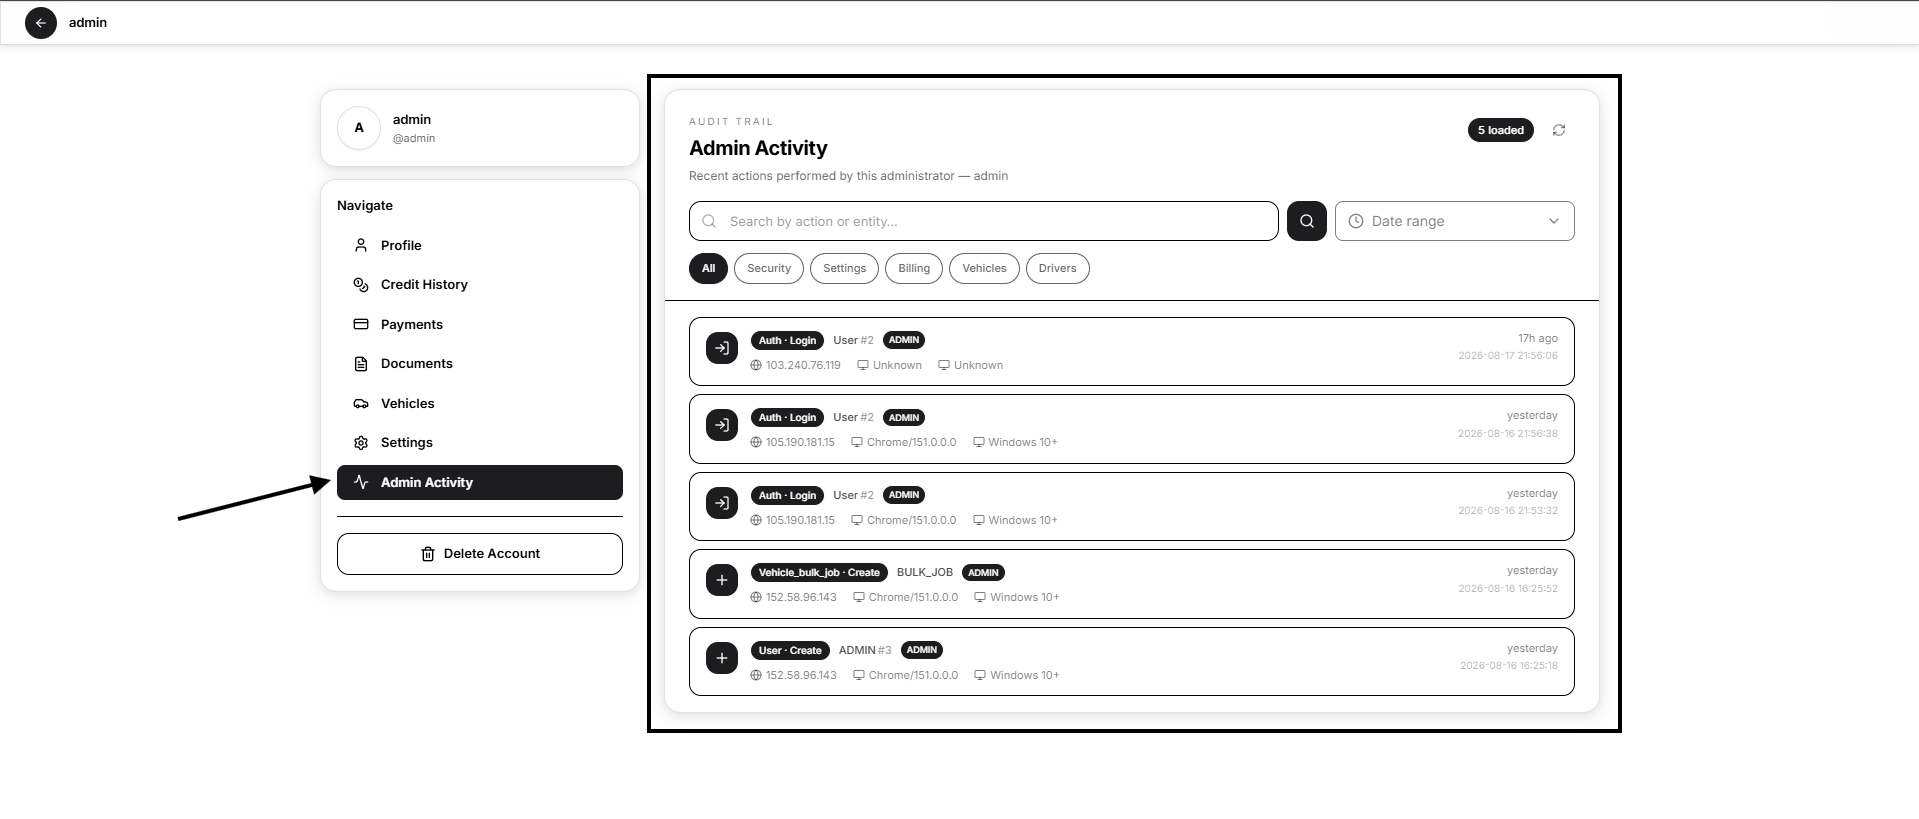
Use the search field to find activity by action or entity.
Available category filters include:
- All
- Security
- Settings
- Billing
- Vehicles
- Drivers
The date-range control limits results to a selected period.
Each activity entry can display:
- Action
- Related entity
- Administrator role
- IP address
- Browser
- Operating system
- Relative time
- Exact date and time
Use this section for:
- Support investigations
- Security review
- Billing verification
- Vehicle-change review
- Account activity monitoring
Delete the Administrator Account
The Delete Account button appears at the bottom of the left navigation panel.
Deleting an Administrator is permanent and cannot be undone.
Open VTS displays a confirmation before attempting deletion. The account cannot be deleted while it still has protected associated records such as devices, SIM cards, transactions, tickets, or other dependent business data.
Remove or reassign the relevant associated records before deleting the Administrator.
Use Set Inactive instead when the objective is only to suspend access temporarily.
Recommended Account-Management Workflow
After creating an Administrator:
- Open the Administrator record.
- Verify the Profile and company information.
- Update the password when required.
- Confirm the account is Active.
- Assign the required credits.
- Record payments separately when received.
- Upload verification or business documents.
- Review registered vehicles.
- Configure language, timezone, theme, and units.
- Monitor Admin Activity when support or auditing is required.
Security and Operational Notes
- Create one Administrator account for each separate business operation.
- Do not share Administrator credentials between companies or employees.
- Use strong, unique passwords.
- Use Set Inactive for temporary suspension.
- Treat credit assignments and payment records as separate operations.
- Review credit amounts carefully before assigning or deducting.
- Do not publish Administrator documents or personal information without authorization.
- Mask emails, phone numbers, addresses, IMEIs, SIM numbers, IP addresses, and financial information in documentation screenshots.
- Delete an account only after reviewing all dependent records.
Next Step
After the Administrator account is configured, continue to Superadmin Vehicles to review vehicle records across the complete Open VTS platform.
The Administrator can then sign in to its own workspace and begin creating Users, Vehicles, Drivers, Team Members, and Inventory records.