
Superadmin Support
Manage support tickets from Administrators, create tickets on behalf of an Administrator, review conversations and attachments, reply to requests, and update ticket status.
Last updated August 18, 2026
Superadmin Support
The Superadmin Support page provides a central inbox for managing support conversations between the Superadmin and Administrators.
From this page, the Superadmin can:
- Review tickets submitted by Administrators
- Search and filter support tickets
- Open complete ticket conversations
- Reply to tickets
- Attach supporting files
- Update ticket status
- Create a ticket on behalf of a selected Administrator
The Support page keeps each issue, reply, attachment, priority, and status together in one structured conversation.
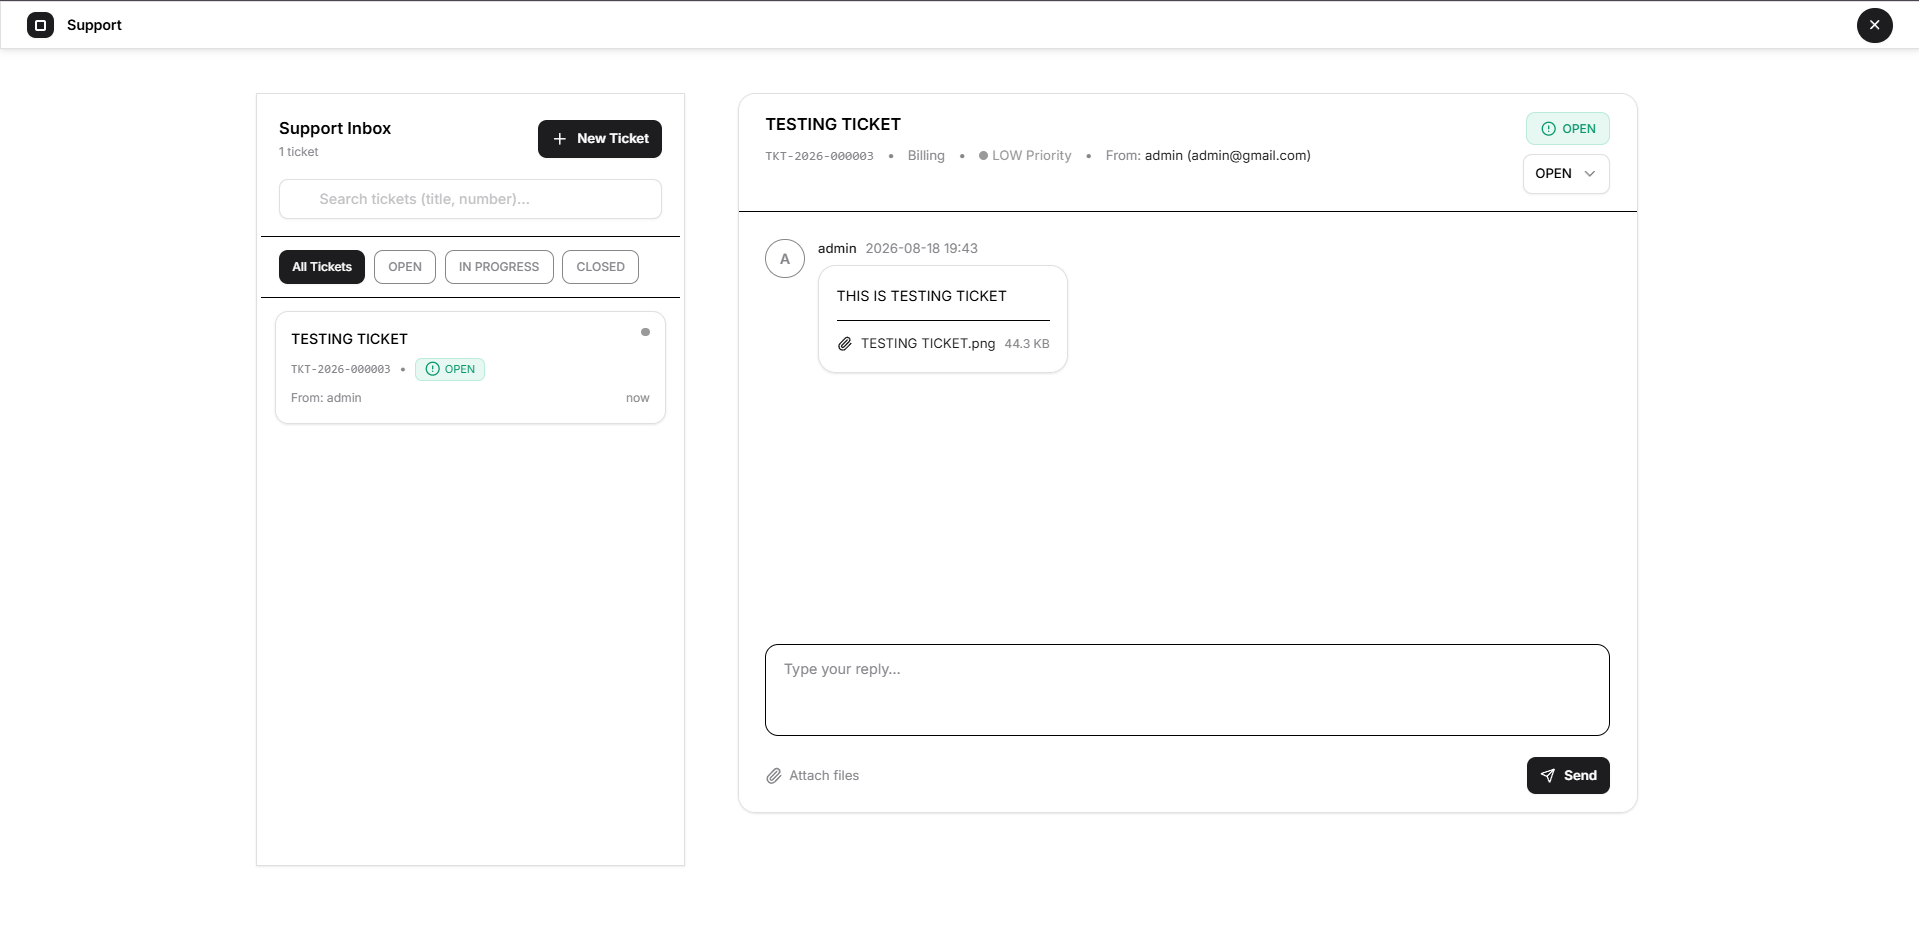
Recommended filename: superadmin-support-inbox.webp
How Support Communication Works
Open VTS follows a role-based support hierarchy.
RoleCan create a ticket forSuperadminOn behalf of an AdministratorAdministratorTo the Superadmin, or on behalf of a UserUserTo the Administrator only
Superadmin
The Superadmin receives and manages tickets associated with Administrators.
The Superadmin can also create a ticket on behalf of a selected Administrator. This is useful when a support conversation needs to be recorded in that Administrator’s context.
Administrator
An Administrator can:
- Submit a ticket to the Superadmin
- Create a ticket on behalf of one of their Users
User
A User can submit support tickets only to their Administrator.
This hierarchy keeps support requests connected to the account level responsible for handling them.
Understanding the Support Page
The Support page is divided into two main areas:
- Support Inbox on the left
- Ticket conversation workspace on the right
The left panel is used to find and select tickets. The right panel displays the selected ticket and its conversation.
When no ticket is selected, the right side shows the Select a ticket message and a Create Ticket (as Admin) action.
Support Inbox
The Support Inbox displays the total number of available tickets and provides access to all ticket records.
Each ticket card can show:
- Ticket title
- Ticket number
- Current status
- Administrator or sender name
- Ticket date
- Priority indicator
Tickets appear in a scrollable list so older records can be reviewed without leaving the page.
Search Tickets
Use the search field to find a ticket by:
- Ticket title
- Ticket number
The search applies to the tickets currently available in the Support Inbox.
Clear the search text to restore the complete list.
Ticket Status Filters
Use the status filters to narrow the inbox.
The available filters are:
- All Tickets
- Open
- In Progress
- Closed
All Tickets
Shows tickets from every status.
Open
Shows newly created or unresolved tickets that have not yet been moved into active handling.
In Progress
Shows tickets currently being reviewed or worked on.
Closed
Shows tickets whose support conversation has been completed.
Select All Tickets to return to the complete inbox.
Ticket Card Information
Each ticket card gives a quick summary of the request.
Ticket Title
Shows the short issue title provided when the ticket was created.
Ticket Number
Displays the ticket’s unique reference number.
Example:
TKT-2026-000021
Use this number when referring to a specific support request.
Status
The card displays the current status, such as:
- Open
- In Progress
- Closed
From
Shows the Administrator associated with the ticket.
Date
Shows the ticket date.
Priority Indicator
A coloured indicator helps identify the ticket’s priority level while scanning the inbox.
Create a Ticket on Behalf of an Administrator
The Superadmin can create a support ticket in an Administrator’s context.
Select either:
- New Ticket in the Support Inbox, or
- Create Ticket (as Admin) in the empty conversation workspace
This opens the Create Ticket (on behalf of Admin) window.
Recommended filename: superadmin-support-create-ticket.webp
Complete the Ticket Form
Admin
Select the Administrator on whose behalf the ticket is being created.
This is a required field.
The ticket will be associated with the selected Administrator.
Title
Enter a brief and specific title describing the issue.
The title is required and supports up to 80 characters.
A useful title should identify the affected feature or problem clearly.
Example:
Vehicle not appearing on Map
Avoid unclear titles such as:
Issue
Category
Select the category that best represents the request.
The screenshot shows Other as the selected category. Available categories depend on the options configured in the platform.
Priority
Select the importance of the request.
The visible default is Medium.
Use the priority to communicate how urgently the ticket should be reviewed.
Message
Describe the issue in detail.
The message is required and supports up to 1,000 characters.
Include useful information such as:
- What happened
- Which module is affected
- What was expected
- What actually occurred
- When the issue started
- Whether the issue can be reproduced
- Any relevant vehicle or account context
Do not include passwords, secret keys, or other confidential credentials.
Attachments
Use Click to attach files to add supporting evidence.
The current interface allows:
- Maximum 5 files
- Maximum 5 MB per file
Attachments can be used for:
- Screenshots
- Error messages
- Supporting documents
- Configuration references
- Visual evidence of the issue
Create Ticket
After completing the required fields, select Create Ticket.
Select Cancel or the X to close the window without creating the ticket.
Open a Ticket
Select any ticket card from the Support Inbox.
The complete ticket appears in the right-side conversation workspace.
Recommended filename: superadmin-support-ticket-conversation.webp
Ticket Header
The header provides the main ticket context.
It can show:
- Ticket title
- Ticket number
- Category
- Priority
- Administrator name
- Administrator email
- Current status
This information helps the Superadmin confirm the ticket identity before replying or changing its status.
Ticket Priority
The selected ticket can display its priority clearly in the header.
Example:
HIGH Priority
Priority communicates the urgency assigned to the ticket. It does not automatically change the ticket status.
Ticket Status
The current status appears in the upper-right corner of the conversation.
Use the status selector to update the ticket when its handling stage changes.
The available states are:
- Open
- In Progress
- Closed
Open
Use Open when the request is waiting to be reviewed or has not yet been taken into active handling.
In Progress
Use In Progress when the issue is being investigated or worked on.
Closed
Use Closed when the request has been completed and no further action is currently required.
Update the status according to the actual support progress so the inbox remains accurate.
Conversation History
The conversation area displays messages in chronological order.
Messages from the Administrator and Superadmin appear on opposite sides, making it easy to understand who sent each response.
A message can show:
- Sender name
- Date and time
- Message text
- Attached files
The complete conversation remains attached to the ticket, providing a record of the issue and its resolution.
Attachments in a Conversation
Files attached to a message appear beneath the message text.
The attachment entry can show:
- Filename
- File size
- Attachment icon
Review an attachment only when it comes from a trusted account and is relevant to the support request.
Do not upload or share files containing:
- Passwords
- Private keys
- Environment secrets
- Database credentials
- Customer data that is not required for support
- Unmasked personal information
Reply to a Ticket
Use the reply field at the bottom of the conversation to send a response.
A useful reply should be:
- Clear
- Direct
- Relevant to the issue
- Specific about the next action
- Written in a respectful and professional tone
Example:
We have reviewed the issue. Please restart the Listener service and confirm whether the vehicle begins reporting again.
Attach Files to a Reply
Select Attach files beneath the reply field to include supporting files with the response.
Attachments may be useful for:
- Setup instructions
- Corrected configuration files
- Screenshots
- Troubleshooting references
- Evidence that a reported issue has been resolved
Files attached to the reply appear inside the ticket conversation after the message is sent.
Send a Reply
After entering the response and adding any required files, select Send.
The reply is added to the ticket conversation.
Before sending, confirm that:
- The response is intended for the correct ticket
- Sensitive information has been removed
- The attachment is correct
- The ticket status reflects its current progress
Recommended Support Workflow
Use the following process when handling a ticket:
- Open Support.
- Review the newest Open or In Progress tickets.
- Select a ticket from the inbox.
- Read the complete conversation before responding.
- Review any attachments.
- Confirm the Administrator, category, and priority.
- Change the status to In Progress when investigation begins.
- Enter a clear reply.
- Attach supporting files when necessary.
- Select Send.
- Change the ticket to Closed only after the issue has been completed.
Creating a Clear Support Ticket
When creating a ticket on behalf of an Administrator, include enough information for another support team member to understand the issue without additional explanation.
A strong ticket should answer:
- Which Administrator is affected?
- Which module or page is affected?
- What action was being performed?
- What result was expected?
- What result occurred?
- Is the issue continuous or intermittent?
- Is there a screenshot or file that supports the report?
Support Page States
No Ticket Selected
The right workspace displays:
- Select a ticket
- Choose a ticket to view the conversation
- Create Ticket (as Admin)
No Search Results
When no ticket matches the search query, the ticket list displays no matching records.
Clear or change the search term to restore results.
Empty Status Filter
A status filter may display no records when no tickets currently have that status.
Select another filter or return to All Tickets.
Create Ticket Disabled
The Create Ticket button remains unavailable until the required fields are completed.
Reply Without a Message
A reply cannot be sent until valid message content is entered.
Important Differences Between Role Workflows
Superadmin Support
The Superadmin:
- Receives Administrator-level support tickets
- Replies to Administrator tickets
- Updates ticket status
- Creates a ticket on behalf of an Administrator
Administrator Support
An Administrator:
- Creates tickets to the Superadmin
- Manages tickets from their Users
- Can create a ticket on behalf of a User
User Support
A User:
- Creates tickets to their Administrator
- Cannot directly create a ticket to the Superadmin
This structure ensures that support requests follow the Open VTS account hierarchy.
Best Practices
- Use a specific ticket title.
- Keep one primary issue per ticket.
- Use the correct Administrator when creating a ticket on their behalf.
- Assign an appropriate priority.
- Move actively handled tickets to In Progress.
- Read previous replies before sending another response.
- Add attachments only when they help explain or resolve the issue.
- Close tickets only after the support action is complete.
- Refer to the ticket number in related communication.
- Never share credentials through a support ticket.
Security and Privacy
Support tickets may contain sensitive operational and account information.
Before publishing screenshots, videos, or documentation, hide or replace:
- Administrator names
- Email addresses
- Ticket numbers
- Customer company names
- Vehicle identifiers
- IMEI numbers
- Screenshots containing live locations
- Uploaded filenames
- Internal issue details
- Personal information
Use demonstration accounts and sample tickets in public documentation.
Next Step
Continue to Superadmin Payments to review payments and financial records associated with the platform and its Administrators.