
User Dashboard
Learn how to use the User Dashboard in Open VTS to switch dashboards, create a new dashboard, arrange widgets, and manage your personal dashboard layout.
Last updated August 19, 2026
User Dashboard
The User Dashboard page is the main workspace for viewing dashboard widgets in the Open VTS User Panel.
It allows you to create your own dashboards, switch between saved dashboards, and arrange widgets in a layout that matches the information you want to see most often. Each dashboard belongs to the signed-in User and can be customized independently.
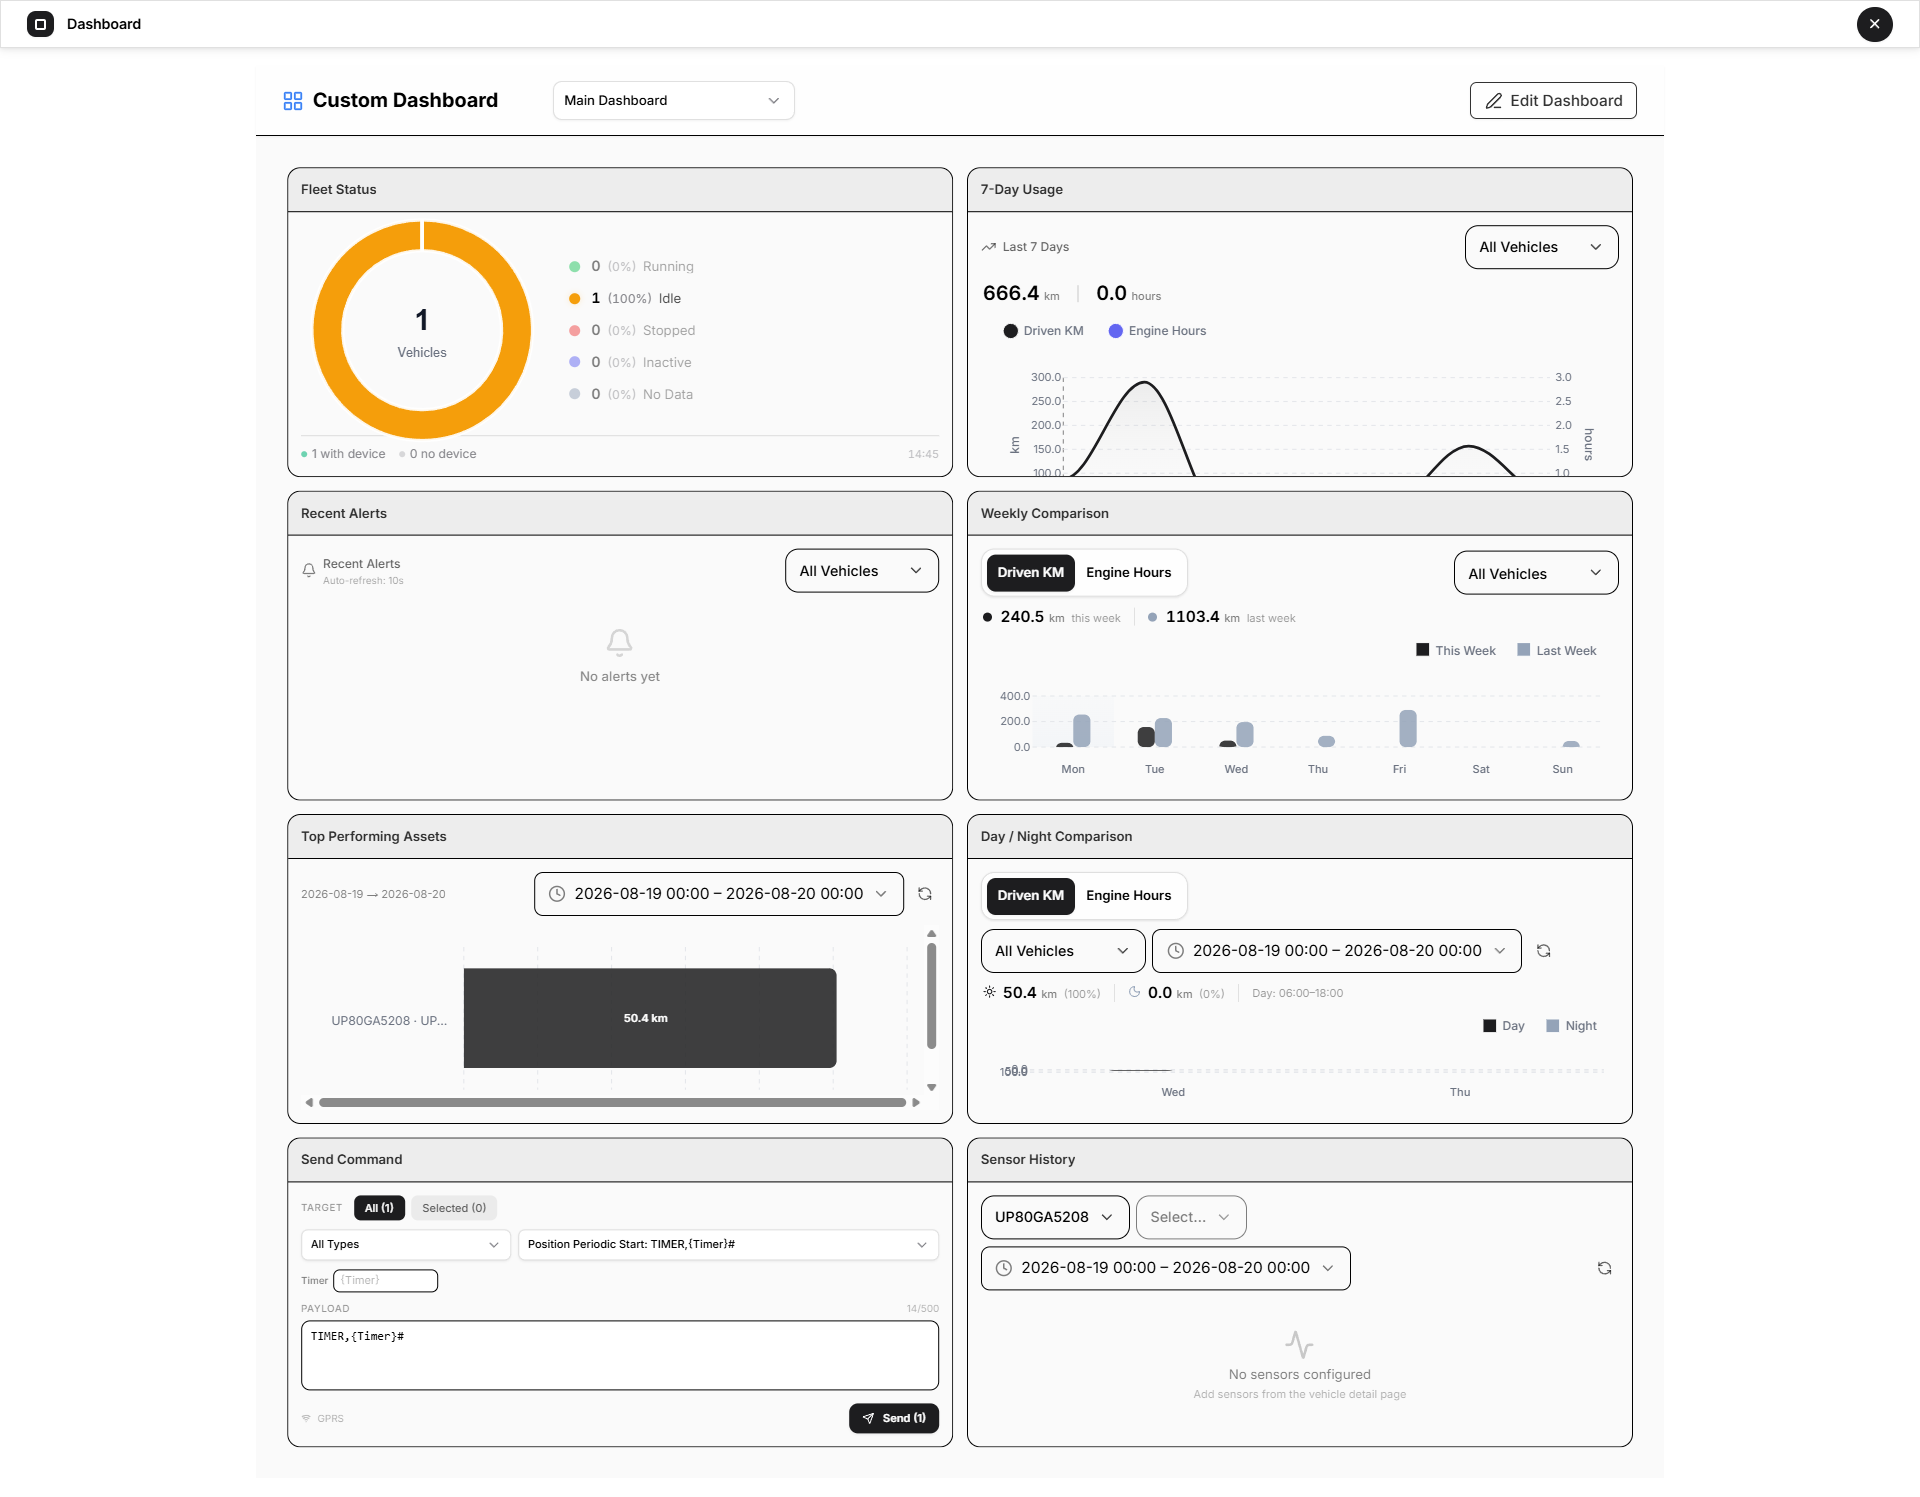
A dashboard can contain widgets such as fleet overview, usage data, alerts, comparisons, sensor history, and other supported components.
What You Can Do on This Page
On the User Dashboard page, you can:
- Open and switch between your saved dashboards
- Create a new dashboard
- Rename an existing dashboard
- Delete a dashboard
- Enter edit mode to change the layout
- Add widgets to the current dashboard
- Drag and adjust widgets inside the layout
- Remove widgets from the current dashboard
- Save or discard layout changes
If you create a new dashboard, it starts as an empty dashboard until you add widgets to it.
Understanding the Page
The Dashboard page is built around three main areas:
Dashboard Header
The header shows the page title Custom Dashboard and the dashboard selection area.
From this section, you can choose an existing dashboard and enter dashboard editing tools.
Dashboard Layout Area
This is the main canvas where dashboard widgets appear. Each widget is shown inside its own panel.
When you open edit mode, the layout area becomes editable and you can move or adjust widgets.
Edit Actions
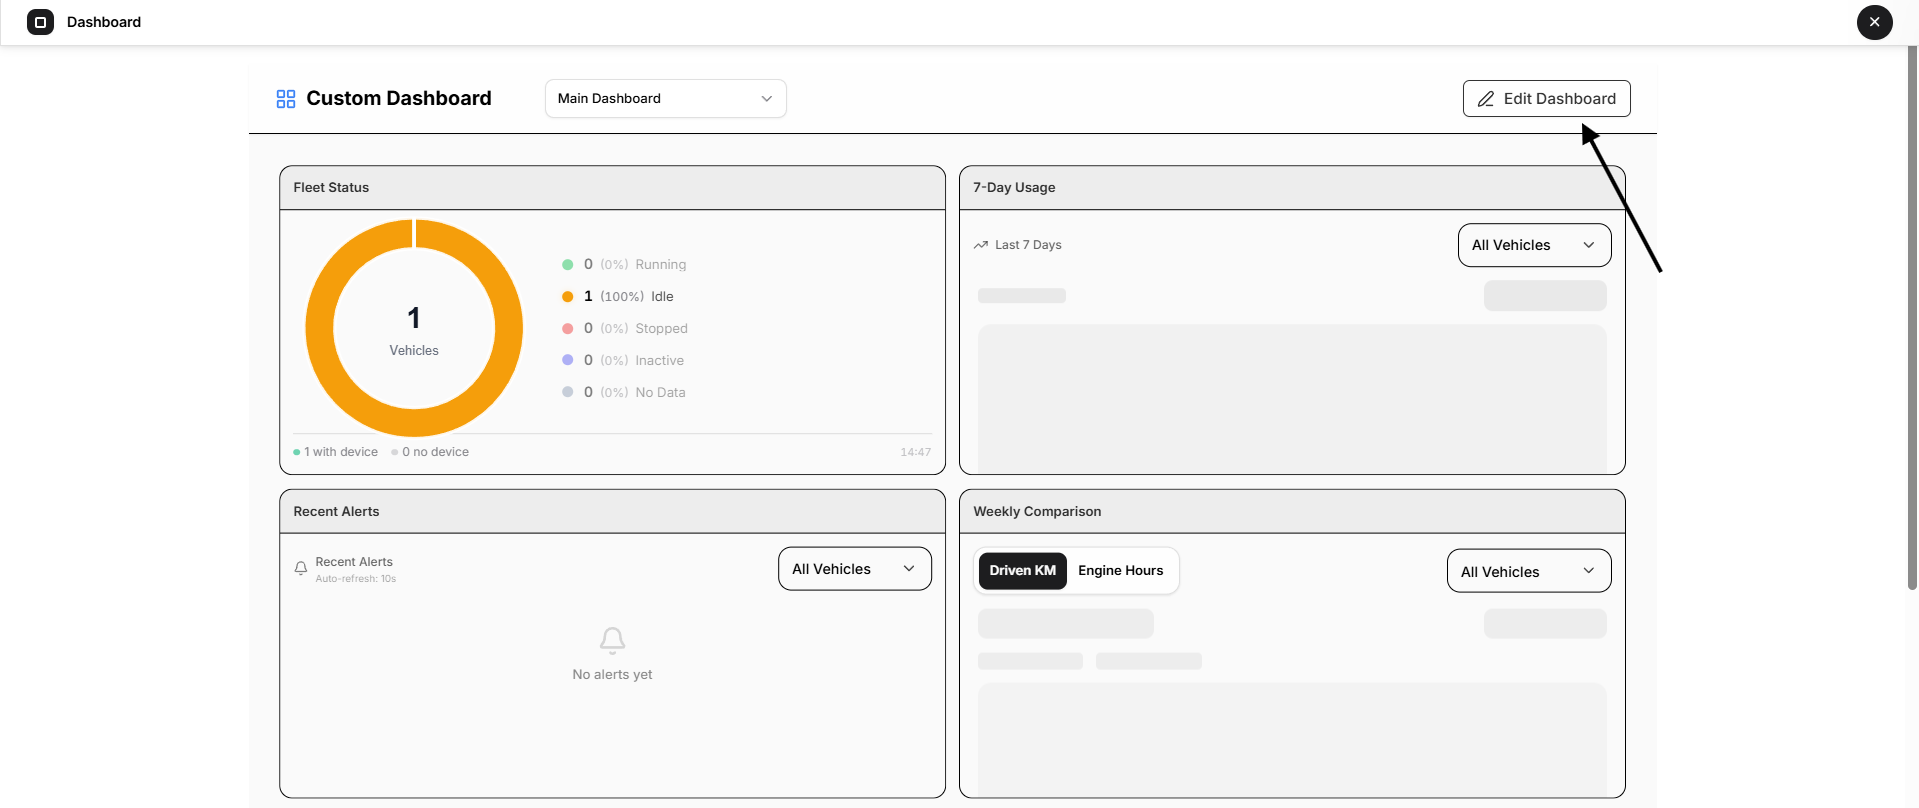
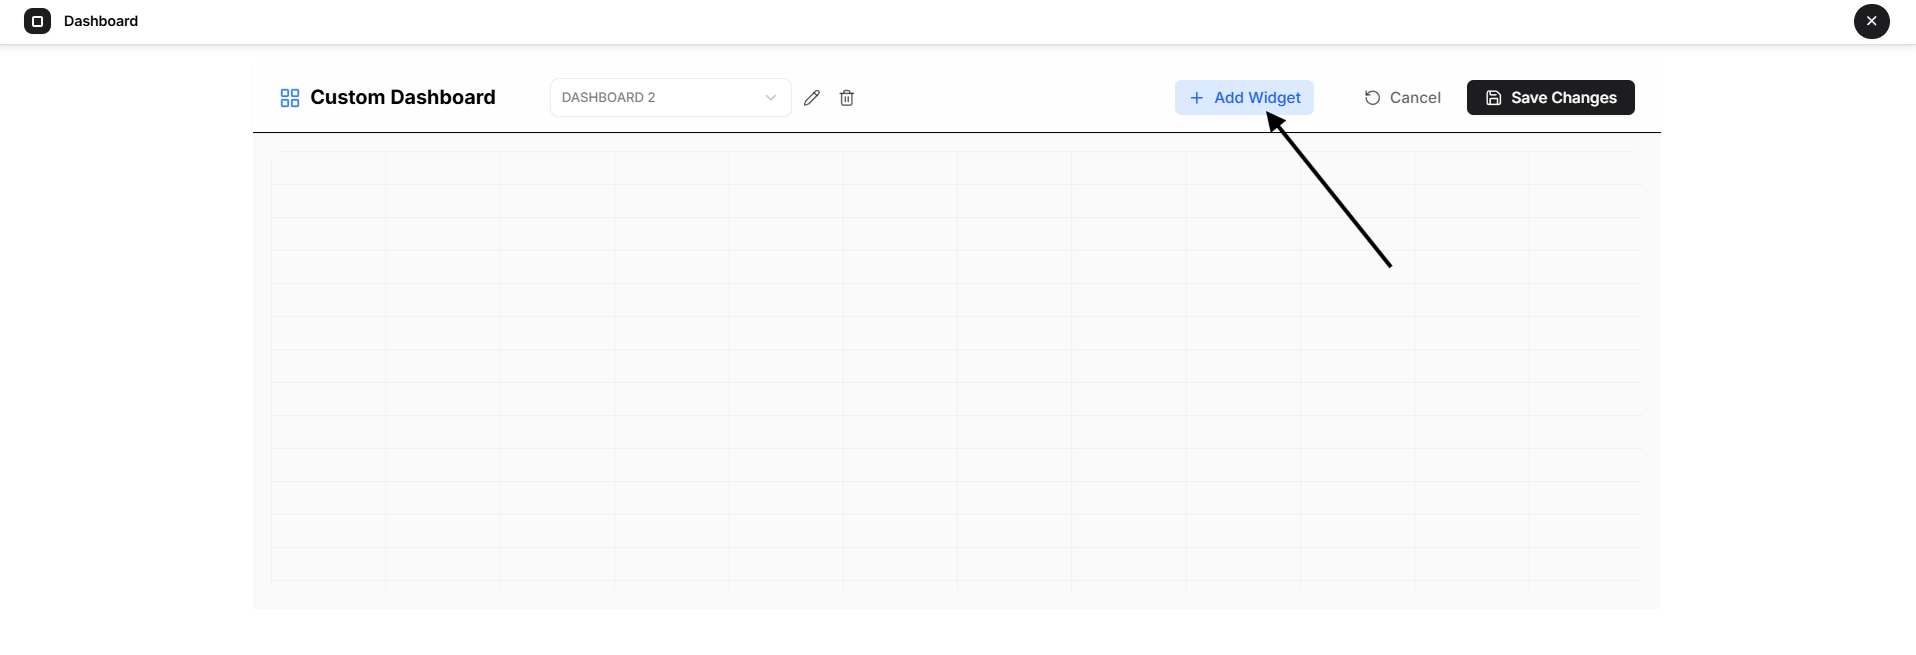
When editing is active, the page shows the controls needed to manage the dashboard layout, including Add Widget, Cancel, and Save Changes.
How to Use the Page
A typical dashboard workflow is:
- Open Dashboard from the User Home page.
- Use the dashboard selector to open an existing dashboard or create a new one.
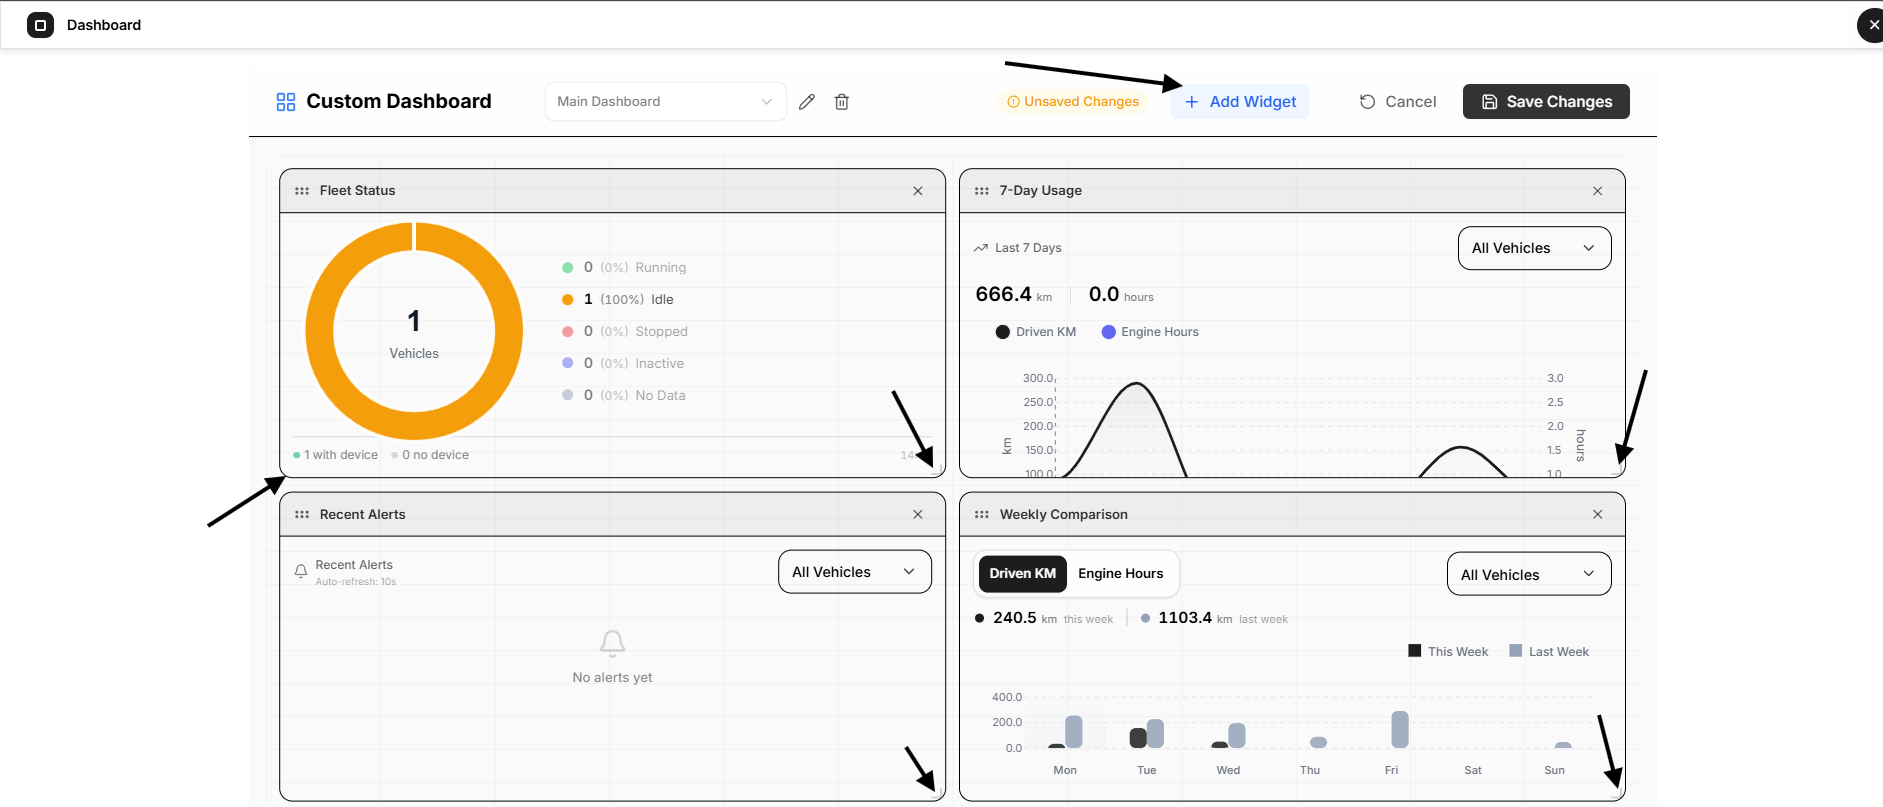
- Select Edit Dashboard or enter edit mode.
- Use Add Widget to add components to the dashboard.
- Drag or adjust widgets into the layout you want.
- Remove any widget you no longer need.
- Select Save Changes to keep the updated layout.
If you decide not to keep your changes, select Cancel to return to the last saved version of the dashboard.
Features and Controls
Dashboard Selector
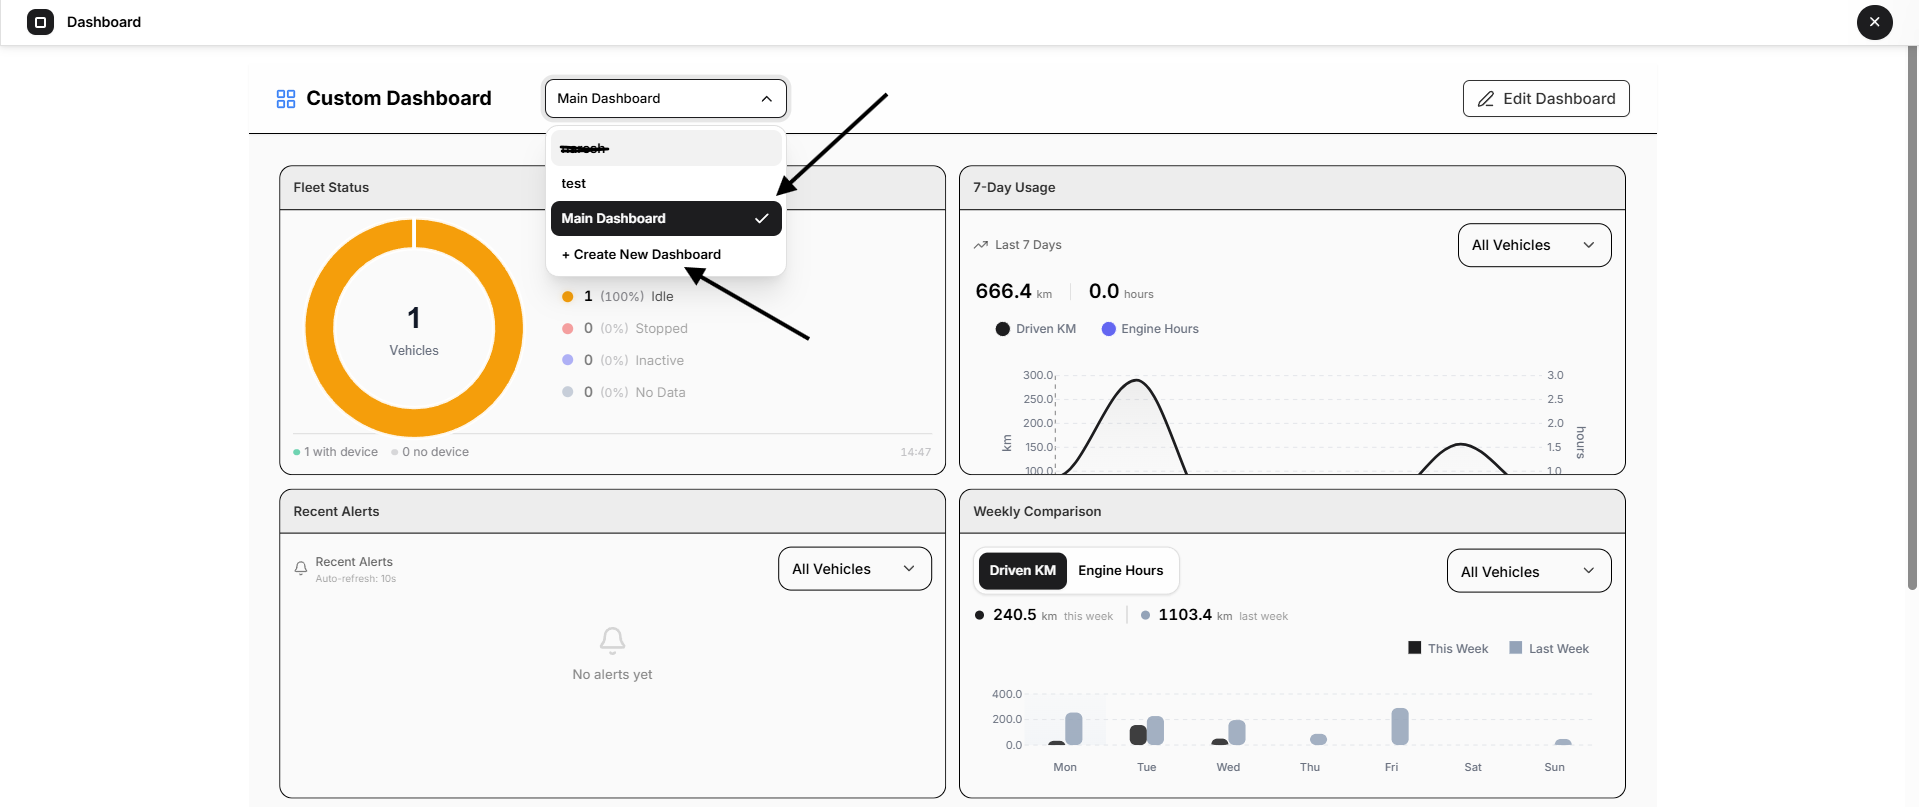
The dashboard selector displays the currently selected dashboard and allows you to switch to another saved dashboard.
When you open the selector, Open VTS lists the dashboards available to your User account.
From the same selector area, you can also create a new dashboard.
Create New Dashboard
Select + Create New Dashboard to create another dashboard.
This opens the Create New Dashboard dialog.
The dialog contains:
- Dashboard Name — required field used to name the dashboard
- Cancel — closes the dialog without creating the dashboard
- Create Dashboard — creates the new dashboard
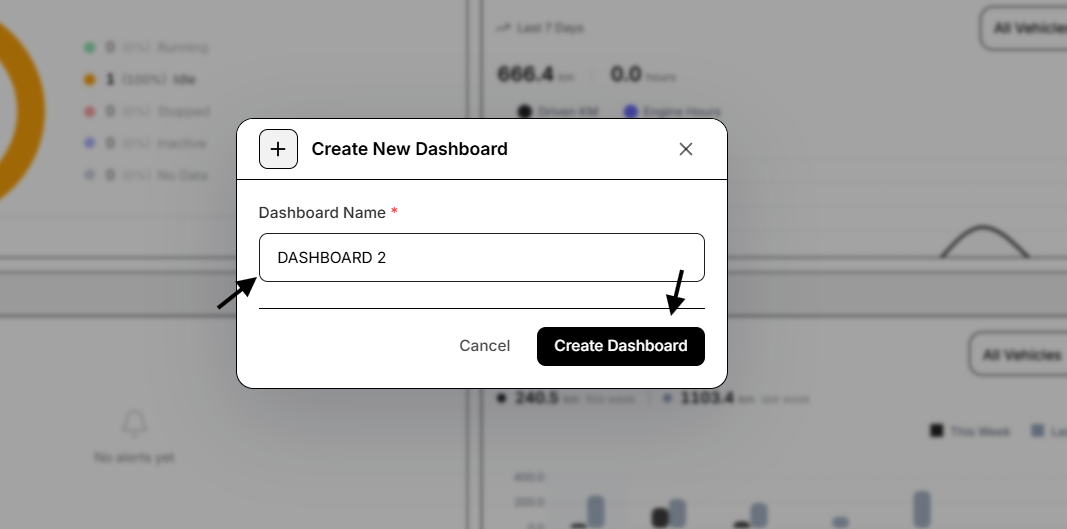
A dashboard name is required. Based on the current implementation, the dashboard name must contain between 2 and 50 characters. Duplicate dashboard names for the same User are not accepted.
A User can maintain up to 25 dashboards.
Edit Dashboard
Select Edit Dashboard to start editing the current dashboard.
In edit mode, the page displays the layout editing controls and marks the dashboard as having Unsaved Changes when the current layout differs from the saved version.
While editing, you can:
- drag widgets to change their position
- adjust widgets to change their layout size
- remove a widget using its X
- add more widgets
- rename the dashboard
- delete the dashboard
- save or cancel your changes
Add Widget
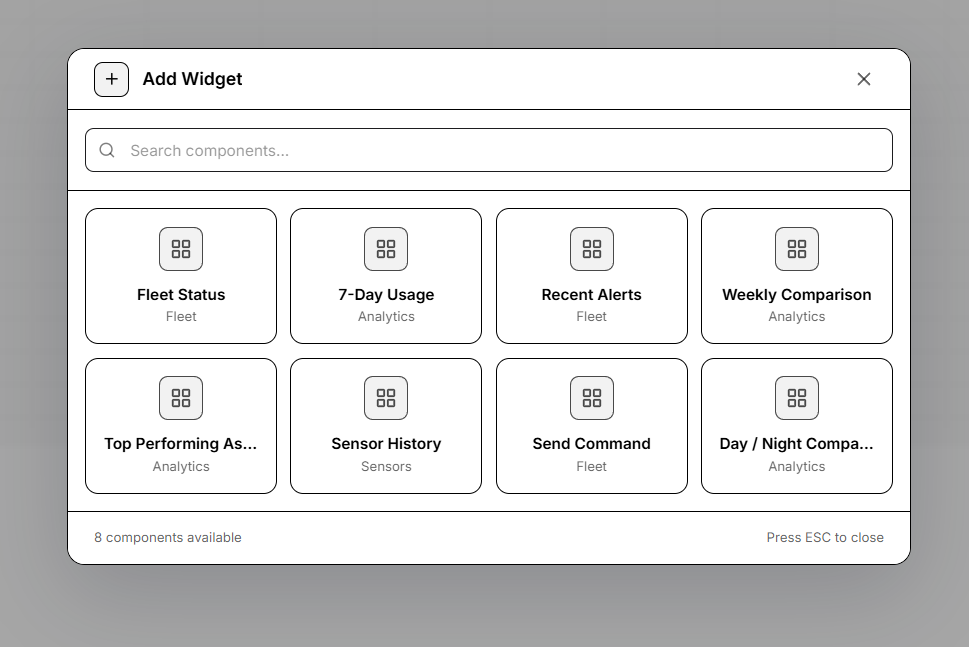
Select Add Widget to open the widget library.
The Add Widget window contains:
- Search components... — search field for filtering available widgets
- a list of available widget tiles
- a component count at the bottom
- X to close the window
- a note showing that Esc can also close the window
The current Dashboard widget library includes the following components:
- Fleet Status
- 7-Day Usage
- Recent Alerts
- Weekly Comparison
- Top Performing Assets
- Sensor History
- Send Command
- Day / Night Comparison
Select a widget tile to add it to the dashboard.
The new widget is placed into the current dashboard layout and can then be moved or adjusted while edit mode is active.
A single dashboard can contain up to 60 widget instances.
Searching Widgets
Use Search components... when you want to quickly find a widget by its name or visible matching text.
Dragging and Adjusting Widgets
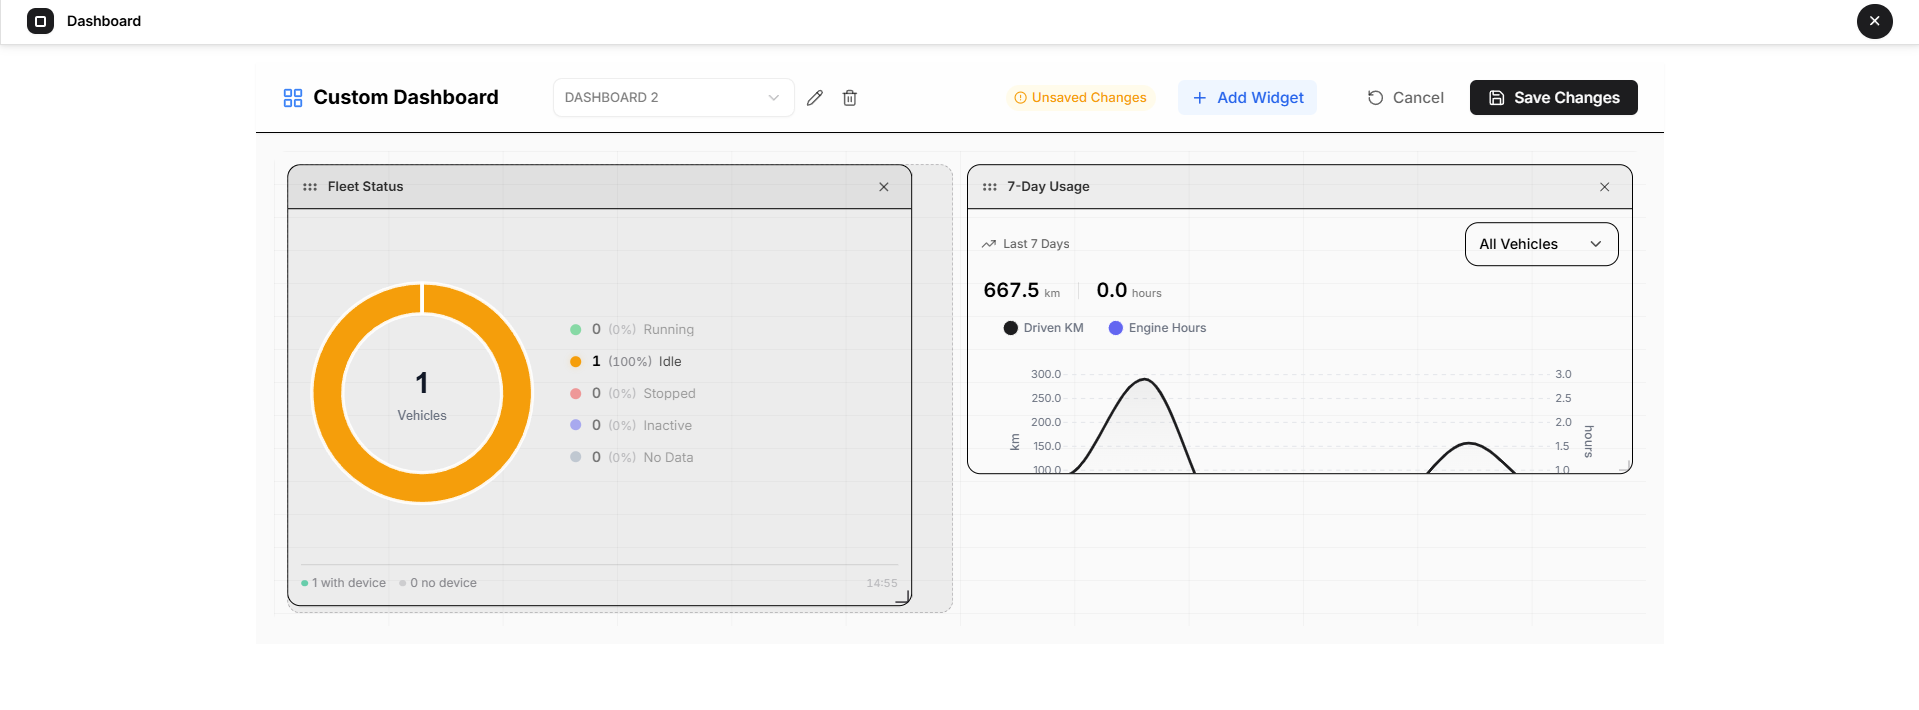
In edit mode, each widget appears inside an editable layout block.
You can drag a widget to move it to a different position on the dashboard. You can also adjust the widget layout so it takes more or less space depending on the dashboard design you want.
This makes it possible to give more space to important widgets and place related widgets together.
Changes made in edit mode are not stored until you select Save Changes.
Removing a Widget
Each widget in edit mode shows an X in the top-right corner.
Select X to remove that widget from the current dashboard layout.
The widget is removed from the draft layout immediately. If you want to keep that removal, select Save Changes. If you select Cancel, the dashboard returns to its last saved state.
Save Changes
Select Save Changes to store the updated dashboard layout.
This saves changes such as:
- added widgets
- removed widgets
- moved widgets
- adjusted widget layout
- other current dashboard layout changes
After saving, the page returns to the normal dashboard view.
Cancel
Select Cancel while editing if you do not want to keep the current unsaved layout changes.
This exits edit mode and restores the last saved dashboard layout.
Rename Dashboard
Select the pencil icon beside the dashboard selector to rename the current dashboard.
This opens the Rename Dashboard dialog.
The dialog contains:
- Dashboard Name — required field
- Cancel — closes the dialog without applying changes
- Save Changes — updates the dashboard name
The same naming rules apply here: the name is required and must fit within the supported dashboard name limits.
Delete Dashboard
Select the trash icon beside the dashboard selector to remove the current dashboard.
This opens a confirmation dialog because dashboard deletion is permanent.
The dialog clearly warns that the action cannot be undone and that all widgets and layout information for that dashboard will be permanently removed.
The dialog contains:
- Cancel — closes the dialog without deleting the dashboard
- Delete Dashboard — permanently removes the selected dashboard
The last remaining dashboard cannot be deleted from this interface. The delete action is only available when another dashboard exists.
Widget Content
The widgets shown inside a dashboard present different types of operational information depending on the selected widget.
Some widgets may include their own controls, such as a vehicle selector or a date range field. These controls work within the widget itself and affect the data shown by that widget.
For example, a widget may allow you to switch from one vehicle scope to another or to view a different time range.
Additional Workflows
Create a New Dashboard
To create a new dashboard:
- Open the dashboard selector.
- Select + Create New Dashboard.
- Enter a name in Dashboard Name.
- Select Create Dashboard.
- Open the new dashboard in edit mode if you want to begin adding widgets.
A newly created dashboard starts empty until you add components.
Build a Custom Dashboard
To build a dashboard layout:
- Open the dashboard you want to configure.
- Select Edit Dashboard.
- Select Add Widget.
- Add the widgets you need.
- Drag and adjust the widgets into the preferred arrangement.
- Remove any unwanted widgets.
- Select Save Changes.
Rename a Dashboard
To rename a dashboard:
- Open the required dashboard.
- Select the pencil icon.
- Enter the updated name.
- Select Save Changes.
Delete a Dashboard
To delete a dashboard:
- Open the dashboard you want to remove.
- Select the trash icon.
- Review the warning message carefully.
- Select Delete Dashboard to confirm.
Important Notes
The Dashboard page is User-specific. A User only manages the dashboards available under their own account.
Dashboard widgets are layout components. The information shown inside a widget depends on the available system data and the User’s permitted access.
Dashboard changes are not saved automatically while you are editing. Select Save Changes when you want to keep them.
Selecting Cancel during editing restores the last saved dashboard layout.
Deleting a dashboard permanently removes that dashboard together with its widget layout.
A newly created dashboard begins as an empty dashboard and must be populated using Add Widget.