
Inventory Management
Manage GPS tracking devices and SIM cards from one centralized inventory. Add individual inventory items, create linked device-and-SIM records, maintain inventory status, activate or deactivate records, edit assignments, and onboard large inventories through CSV bulk upload.
Last updated August 19, 2026
Inventory
The Inventory section gives administrators a central place to manage the physical tracking resources used across Open VTS.
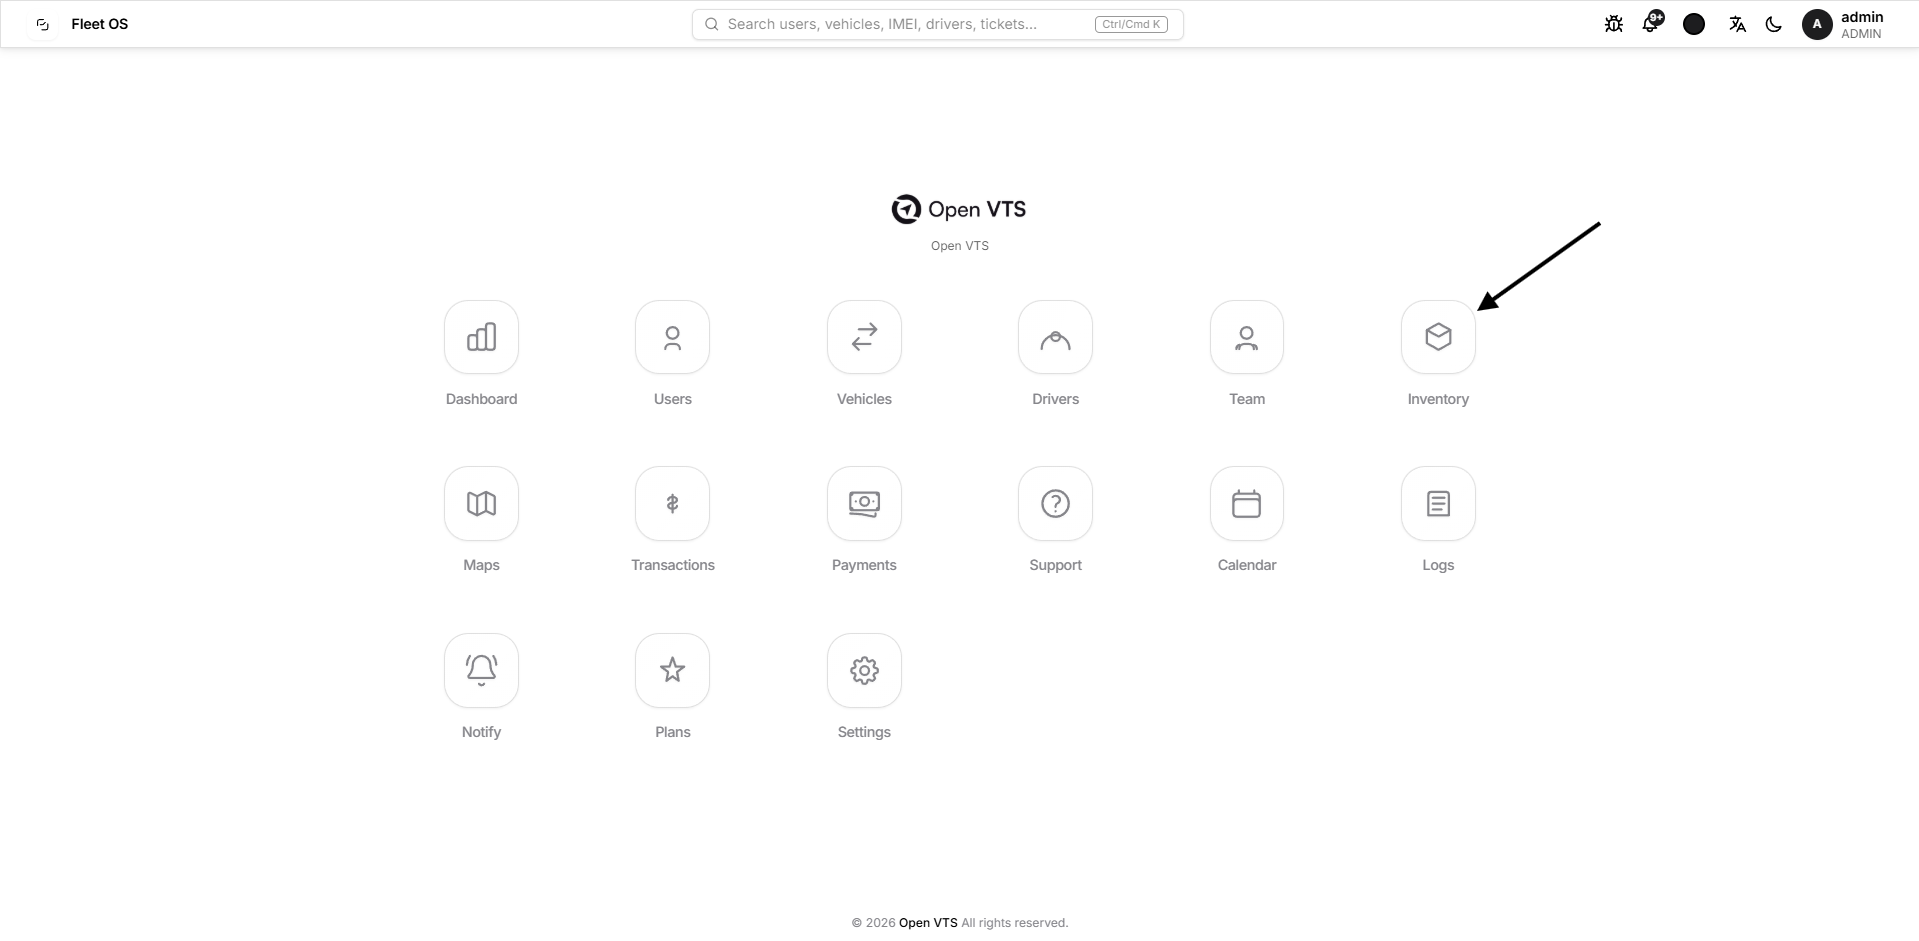
Inventory is divided into two primary views:
- Devices — manage GPS tracking devices by IMEI, device type, SIM assignment, inventory status, and activation state.
- SIM Cards — manage SIM numbers and their optional provider, IMSI, ICCID, associated device, inventory status, and activation state.
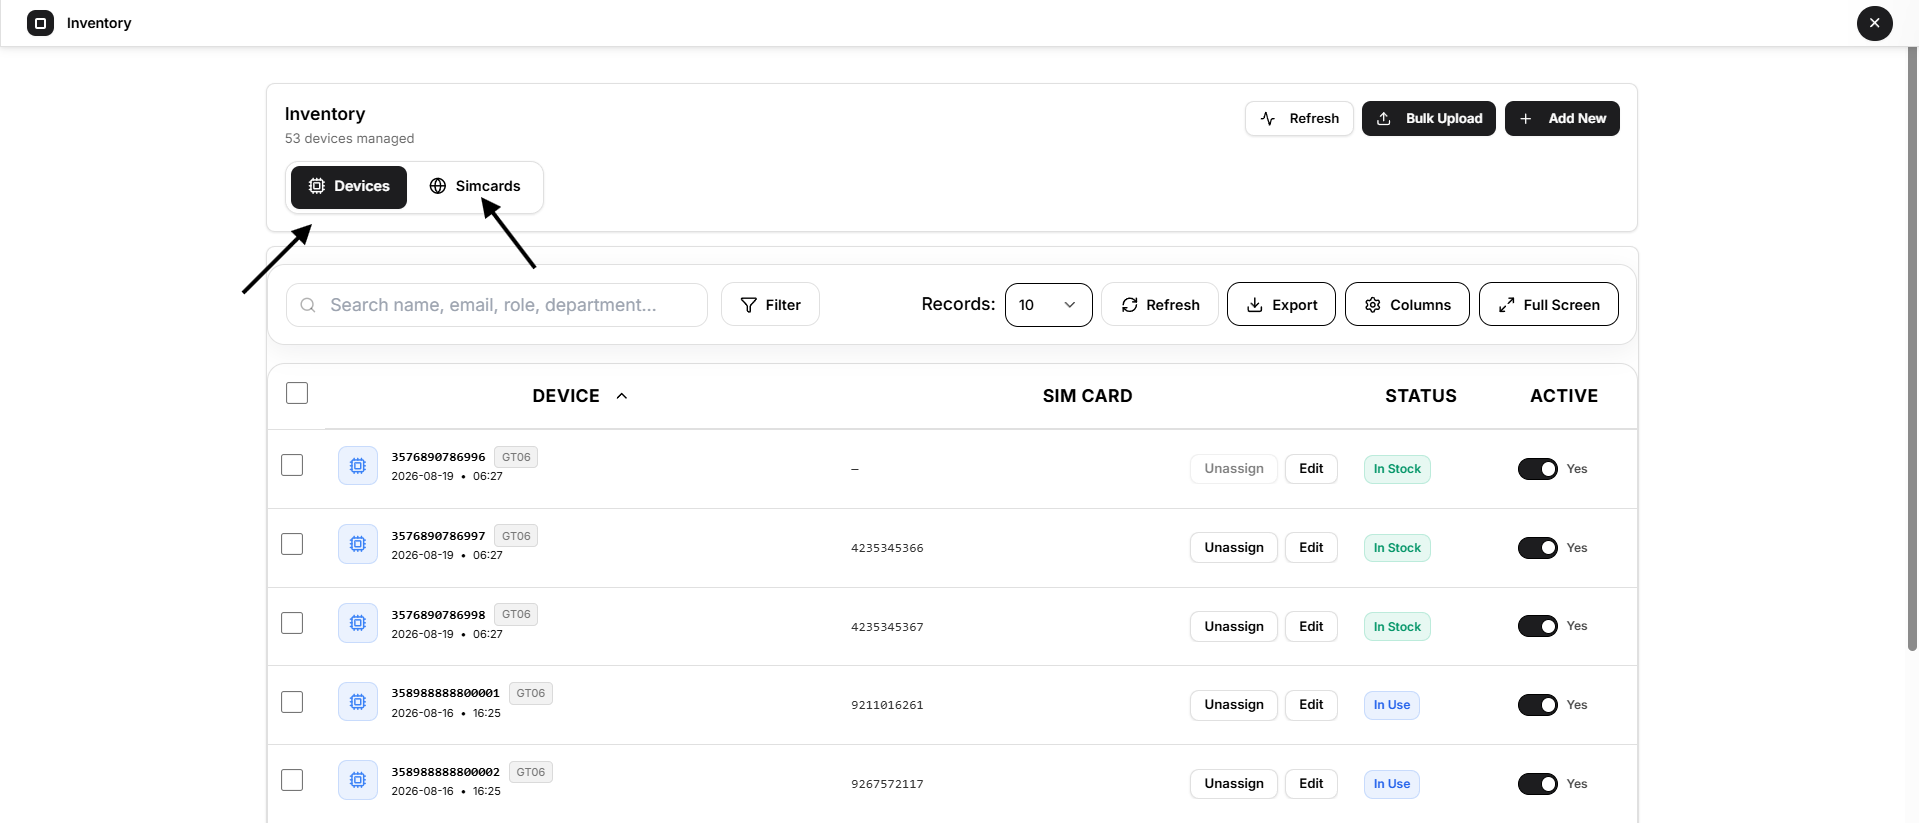
From the Inventory page, administrators can create records individually or upload larger inventories in bulk.
Devices
Select Devices to view and manage GPS tracking devices.
Each device record can display:
- Device IMEI
- Device Type
- Assigned SIM Card
- Inventory Status
- Active state
The device list can also be searched, filtered, refreshed, exported, customized, and viewed in full-screen mode.
Search and Filters
Use the search field for quick record lookup or select Filter for more specific filtering.
Available device filters include:
- IMEI
- Device Type
- SIM Number
- Status
- Active state
Select Apply to use the filters or Clear all to reset them.
Device Inventory Status
A device can have one of the following inventory states:
In Stock
The device is available in inventory and is not currently being treated as deployed inventory.
In Use
The device is currently marked as being used.
In Scrap
The device has been moved out of normal usable inventory.
Note: Inventory Status and the Active switch are separate controls. The status describes the device's inventory state, while the Active switch enables or disables the device record.
Add a Device
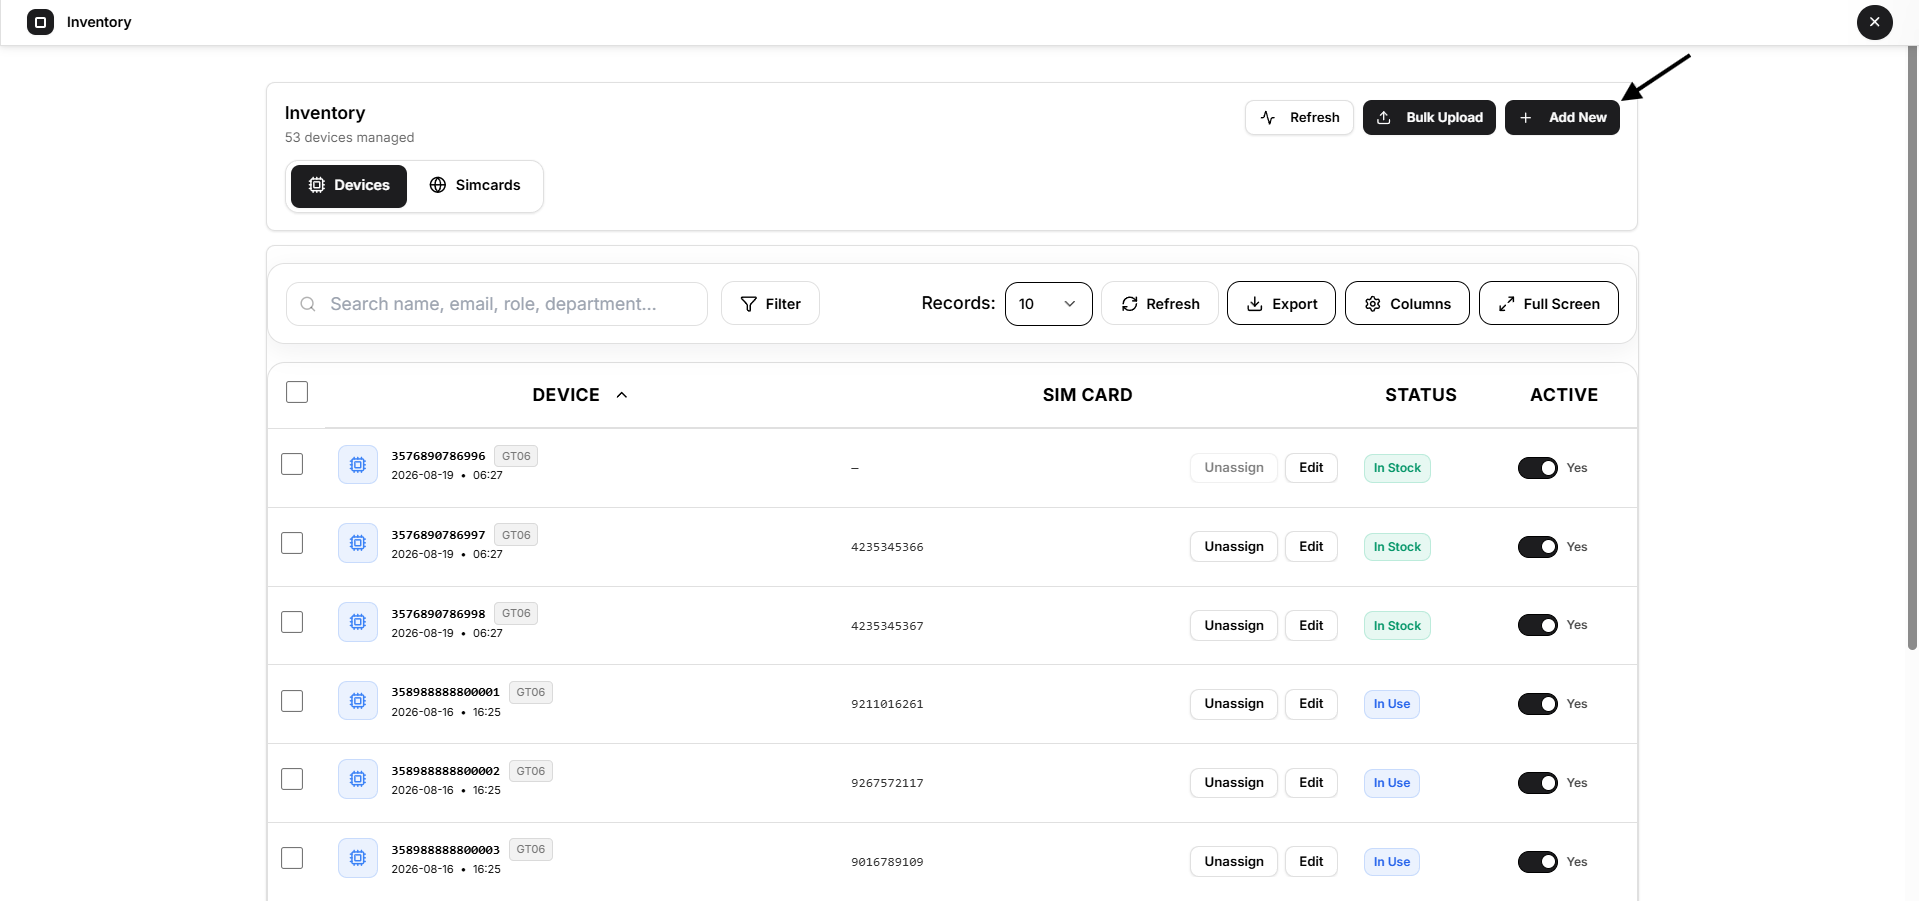
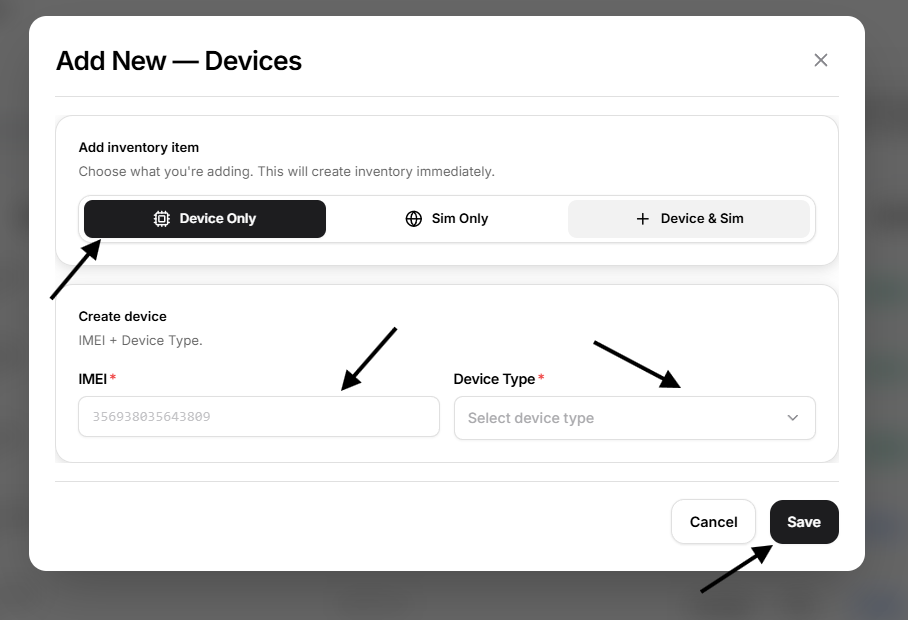
Select Add New and choose Device Only.
Enter:
- IMEI — required
- Device Type — required
Select Save to create the device.
The device is then added to the Devices inventory.
Edit a Device
Select Edit beside a device to modify its inventory configuration.
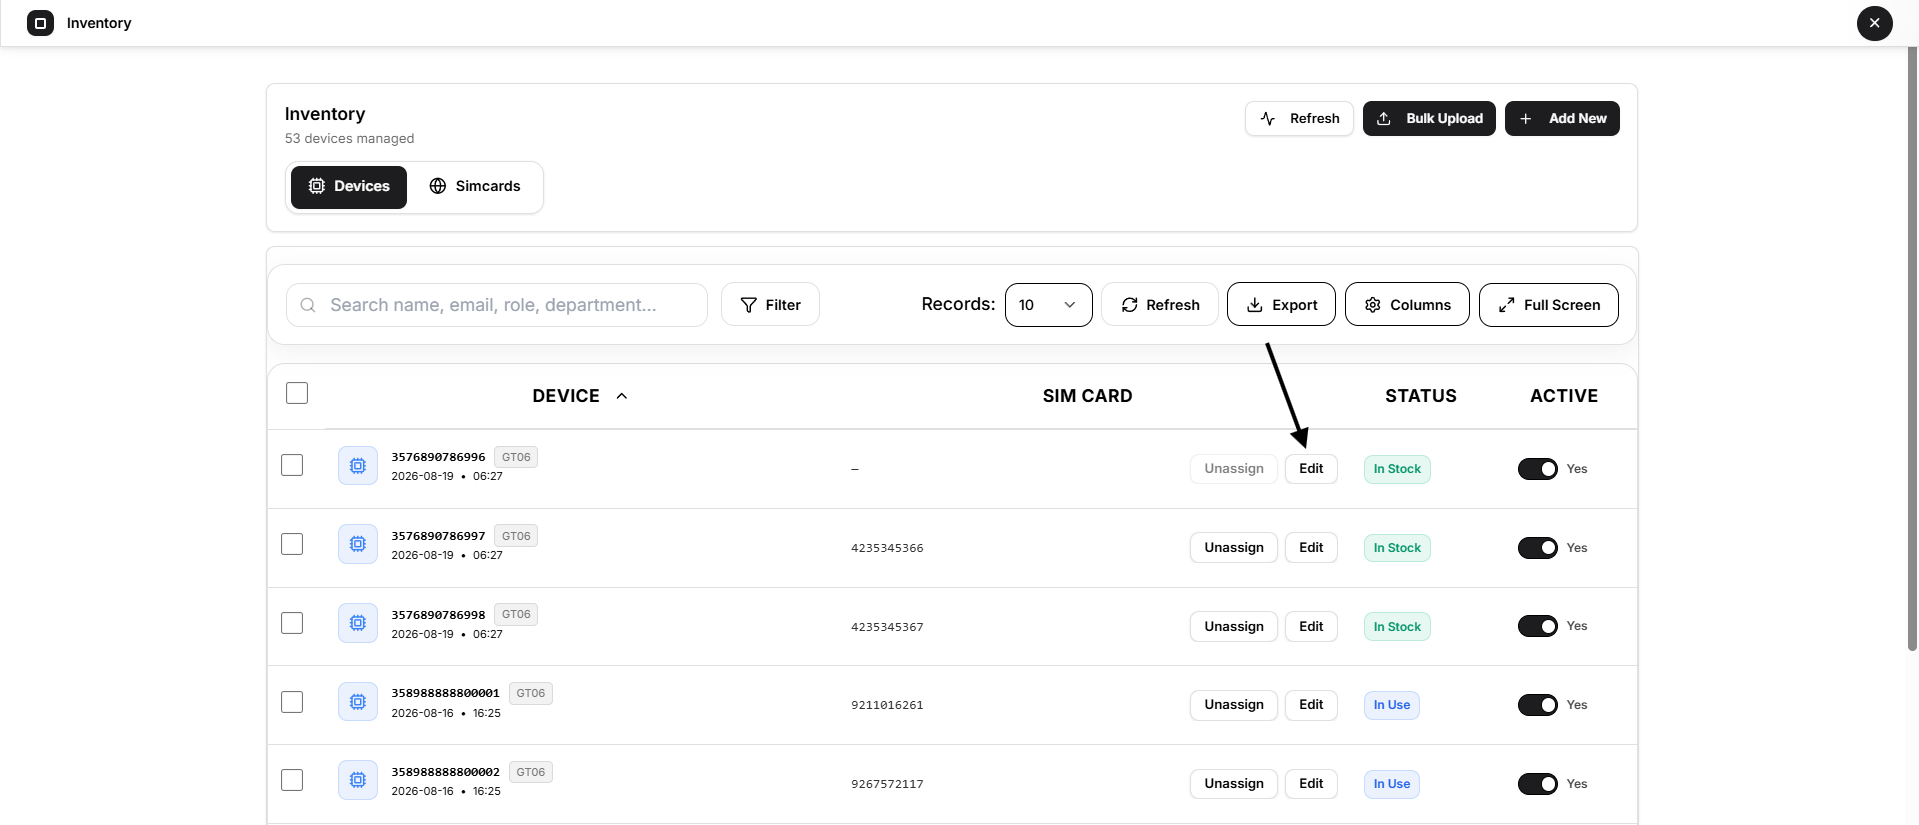
You can manage:
- Device Type
- SIM Number
- Status
- Active state
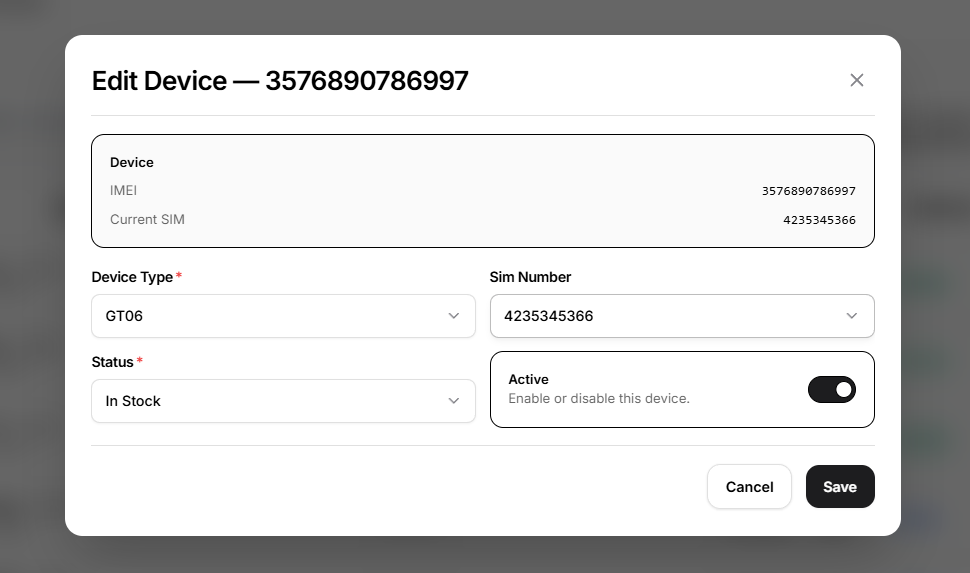
The device IMEI is shown as the device identifier.
Select Save after making the required changes.
Device Type
The Device Type identifies the GPS tracker profile associated with the device.
Available types depend on the device types configured in Open VTS and may include entries such as:
- GT06
- JV200
- WETRECK
- GT300
- JM09
- LT05
Use the searchable dropdown to select the appropriate device type.
Assign or Unassign a SIM Card
A SIM card can be linked to a device through its SIM assignment.
When a SIM is currently assigned, the device row displays its SIM number and provides an Unassign option.
Select Unassign to remove the SIM-device relationship.
After unassignment, the device remains in inventory without the SIM assignment and can be managed or reassigned as required.
Activate or Deactivate a Device
Use the Active switch to enable or disable an individual device.
For multiple devices:
- Select the required device checkboxes.
- Use Activate or Deactivate from the bulk-action bar.
This allows administrators to update several device records together.
Delete Devices
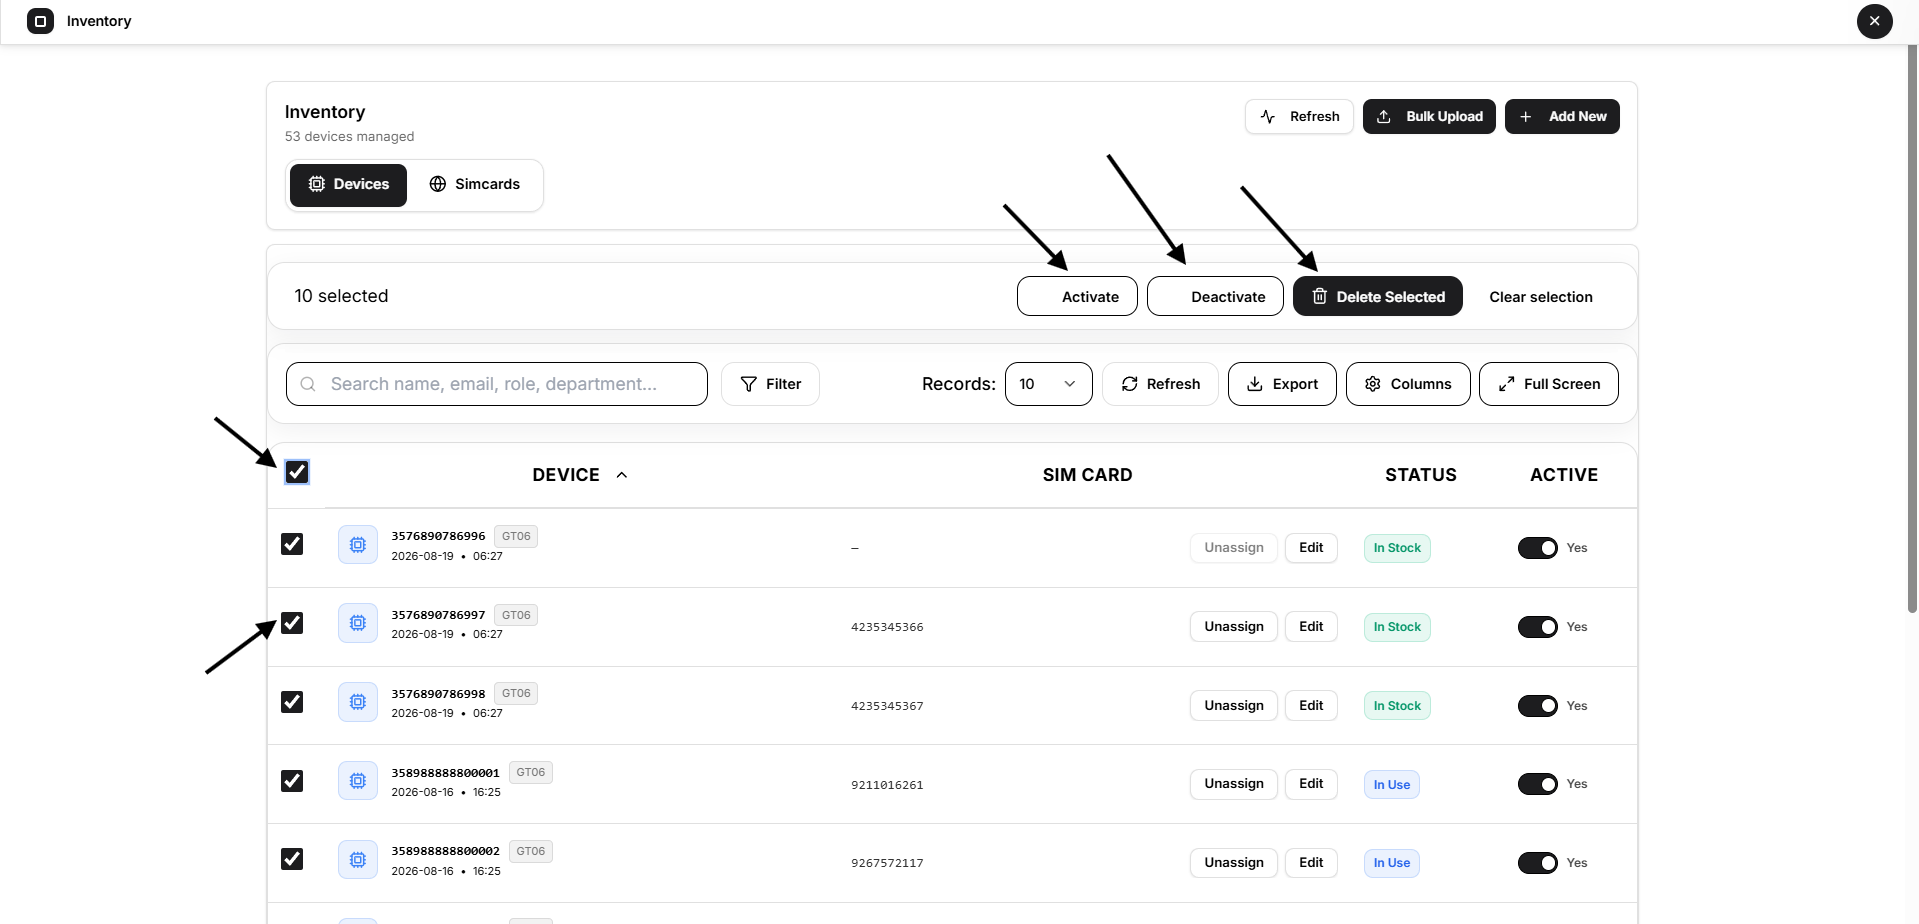
To remove devices in bulk:
- Select one or more devices.
- Click Delete Selected.
- Review the confirmation dialog.
- Click Delete to continue.
Deleting a device is permanent and cannot be undone.
SIM Cards
Select the Simcards tab to manage SIM inventory.
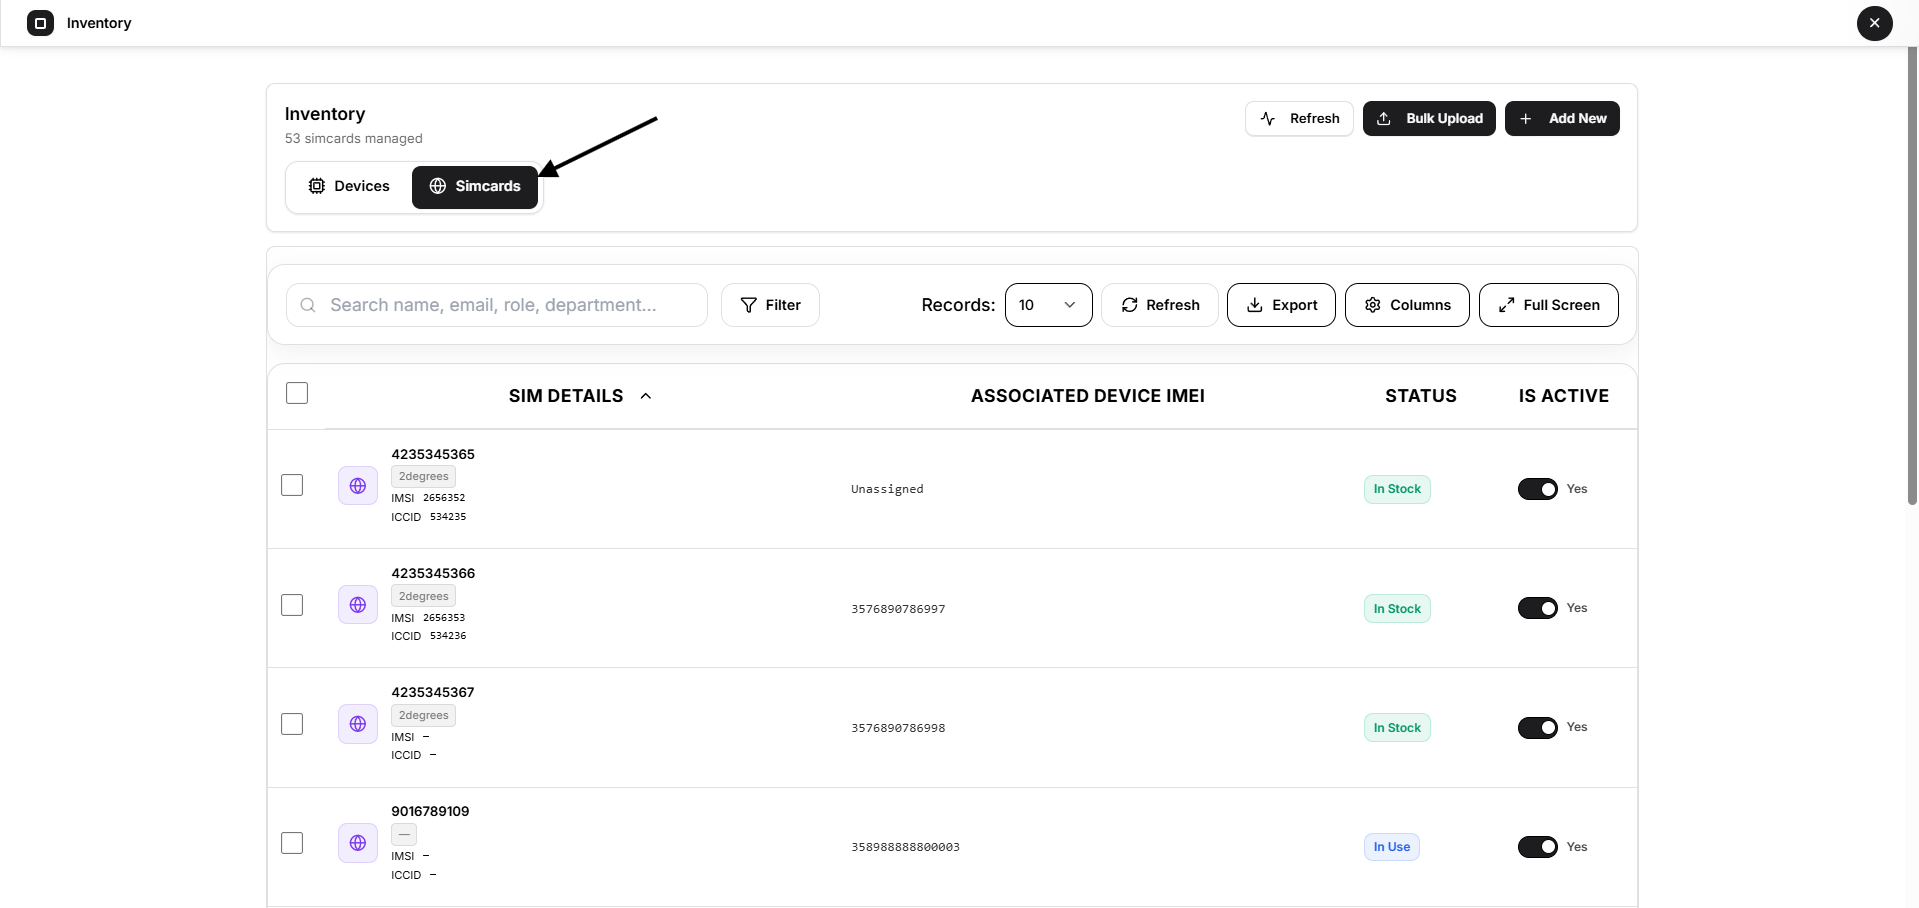
Each SIM record can display:
- SIM Number
- IMSI
- ICCID
- Associated Device IMEI
- Status
- Active state
SIM Card Filters
The SIM inventory includes dedicated filters for:
- SIM Number
- Provider
- ICCID
- IMSI
- Status
- Active state
Select Apply to filter the list or Clear all to remove the filters.
Add a SIM Card
Select Add New and choose Sim Only.
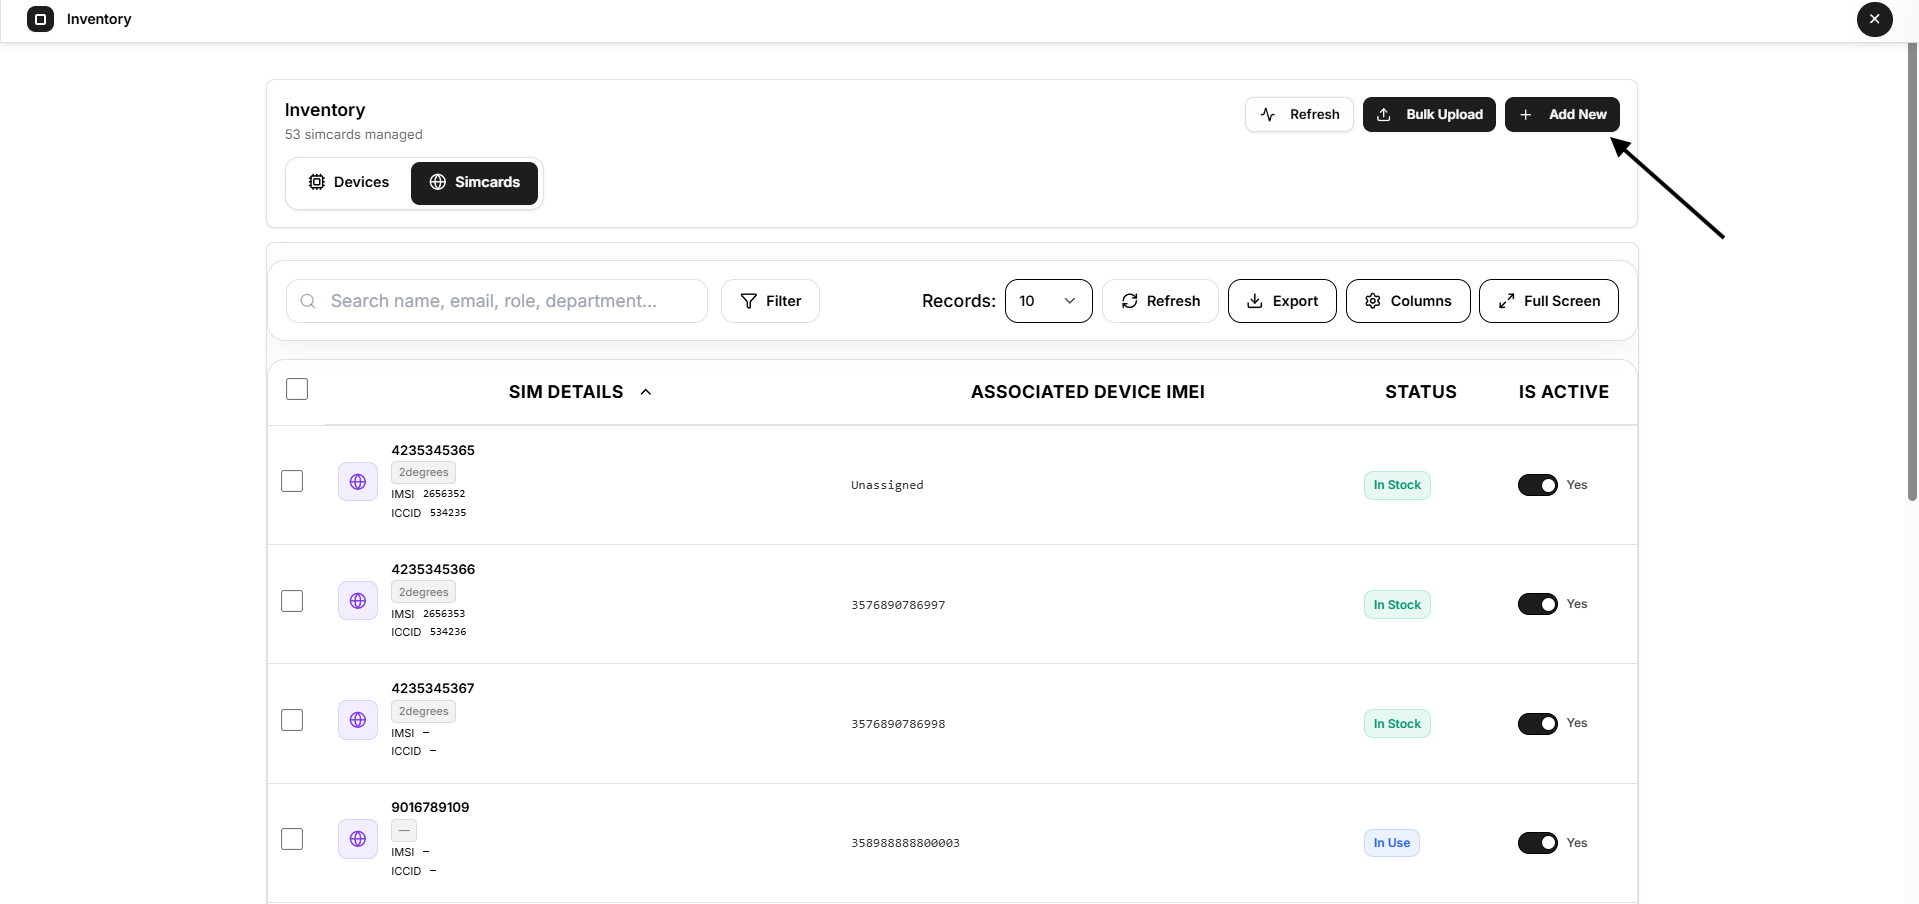
Enter the SIM information:
- SIM No. — required
- SIM Provider — optional
- IMSI — optional
- ICCID — optional
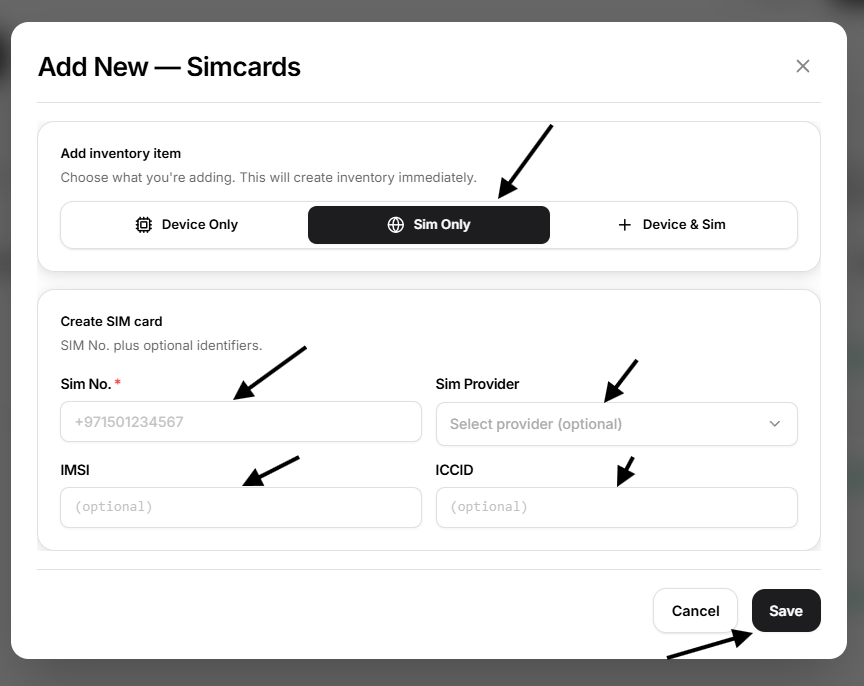
Select Save to add the SIM card to inventory.
SIM Provider
The SIM Provider field lets you associate a configured network provider with the SIM card.
The provider list comes from the SIM providers available in Open VTS and can be searched from the dropdown.
Edit a SIM Card
Open a SIM record for editing to manage:
- SIM Number
- SIM Provider
- IMSI
- ICCID
- Status
- Active state
The panel also shows the currently assigned device when one exists.
Select Save to apply your changes.
SIM Card Status
SIM cards use the same inventory-state concept:
- In Stock
- In Use
- In Scrap
The Active switch independently controls whether the SIM record is enabled.
Add a Device and SIM Together
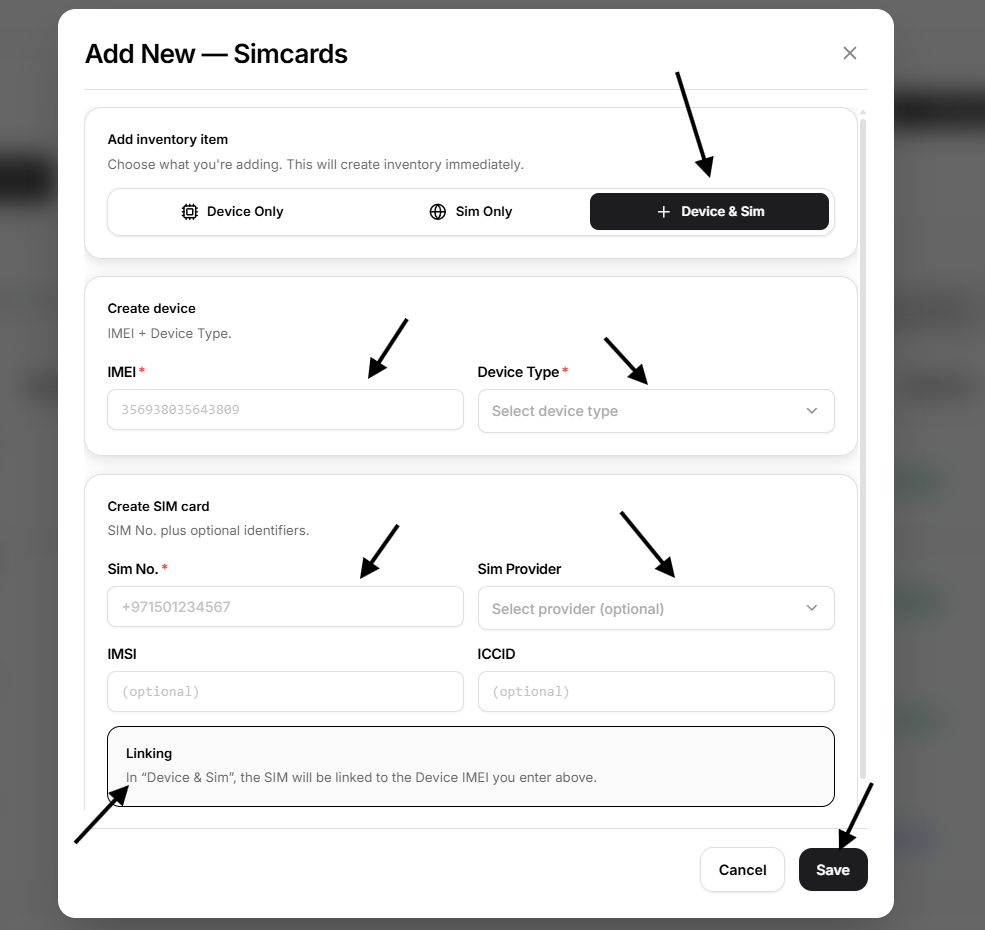
When both items need to be created at the same time, select:
Add New → Device & Sim
This mode creates a device and SIM together and links them during creation.
Device information
Enter:
- IMEI
- Device Type
SIM information
Enter:
- SIM Number
- SIM Provider
- IMSI
- ICCID
When saved, Open VTS creates both inventory records and associates the SIM with the device IMEI entered in the same form.
This is useful when onboarding a complete tracker package that already includes its SIM card.
Bulk Upload
For larger inventory onboarding, select Bulk Upload.
Open VTS provides three upload modes:
Devices | Sim Cards | Devices & Sim Cards
All three use the same guided process:
Upload → Map → Validate → Process
Bulk Upload — Devices
Choose Devices when importing only GPS devices.
First select the required Device Type.
The CSV primarily requires:
imei
You can:
- Download the sample CSV
- Upload a CSV file
- Drag and drop a CSV
- Paste CSV data directly into the provided field
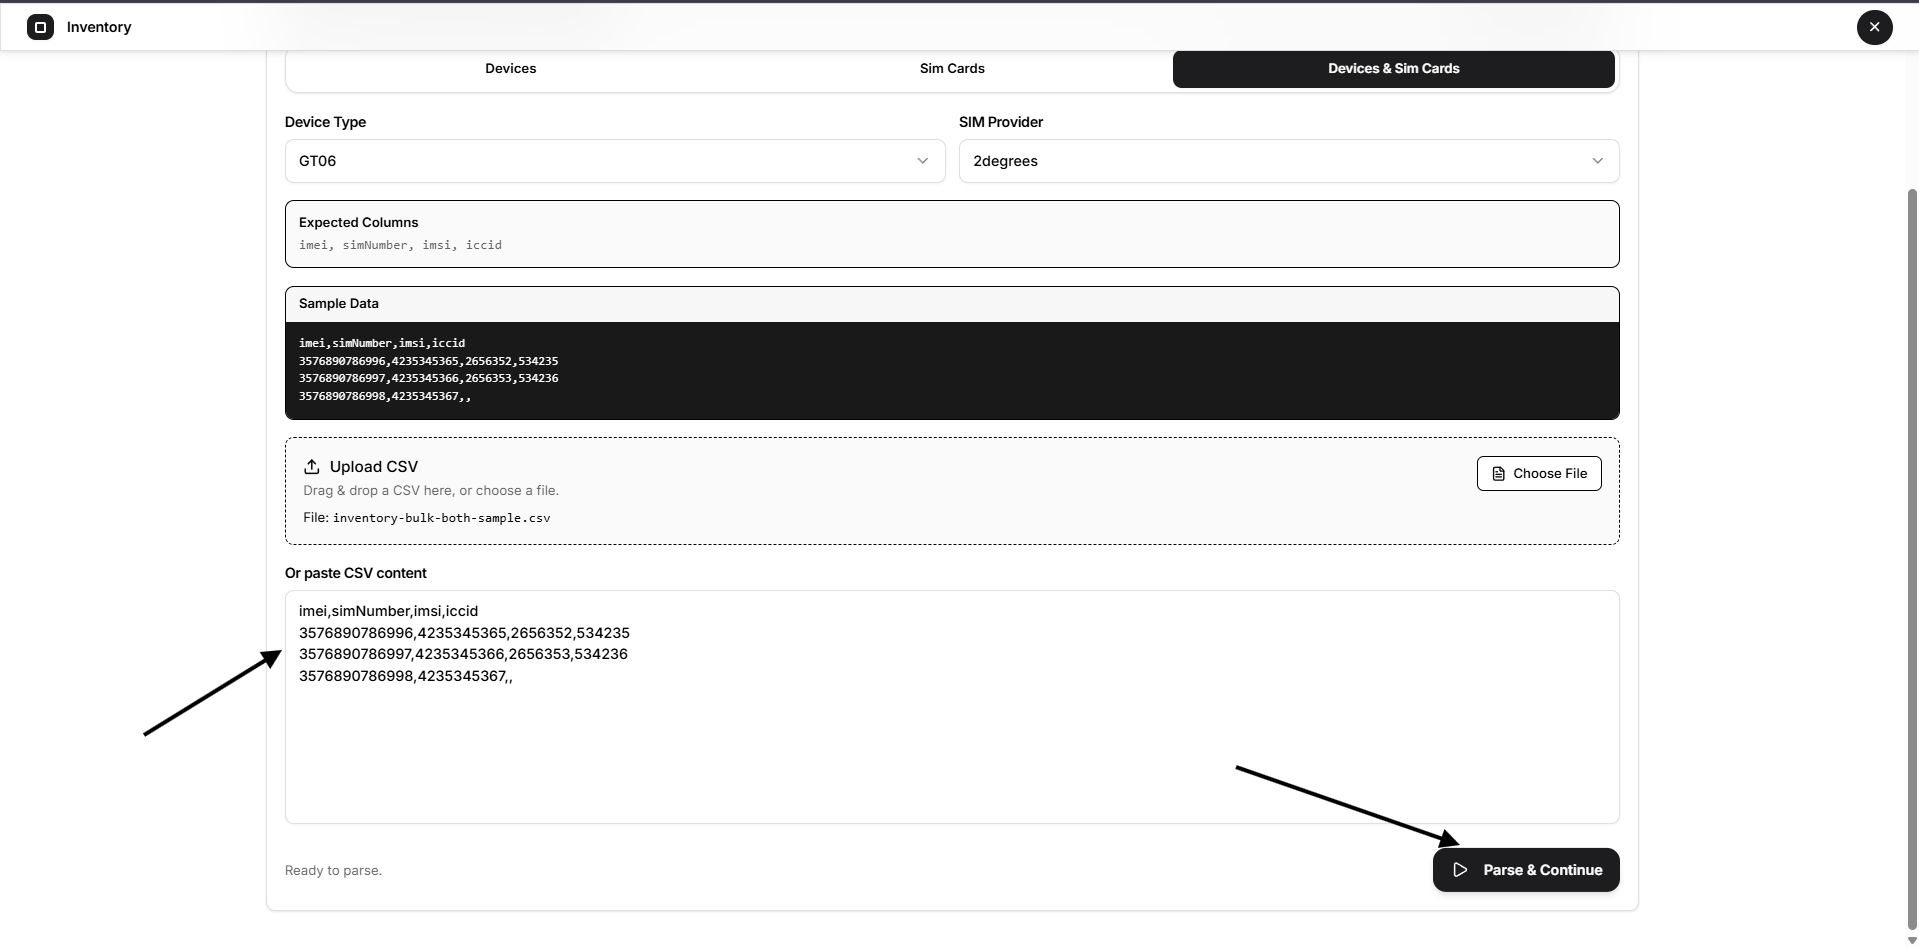
Select Parse & Continue when the data is ready.
Bulk Upload — SIM Cards
Choose Sim Cards when importing SIM inventory only.
You can select a SIM Provider before processing the records.
Expected CSV fields include:
simNumber, imsi, iccid
The optional identifiers can be included when available.
Bulk Upload — Devices & SIM Cards
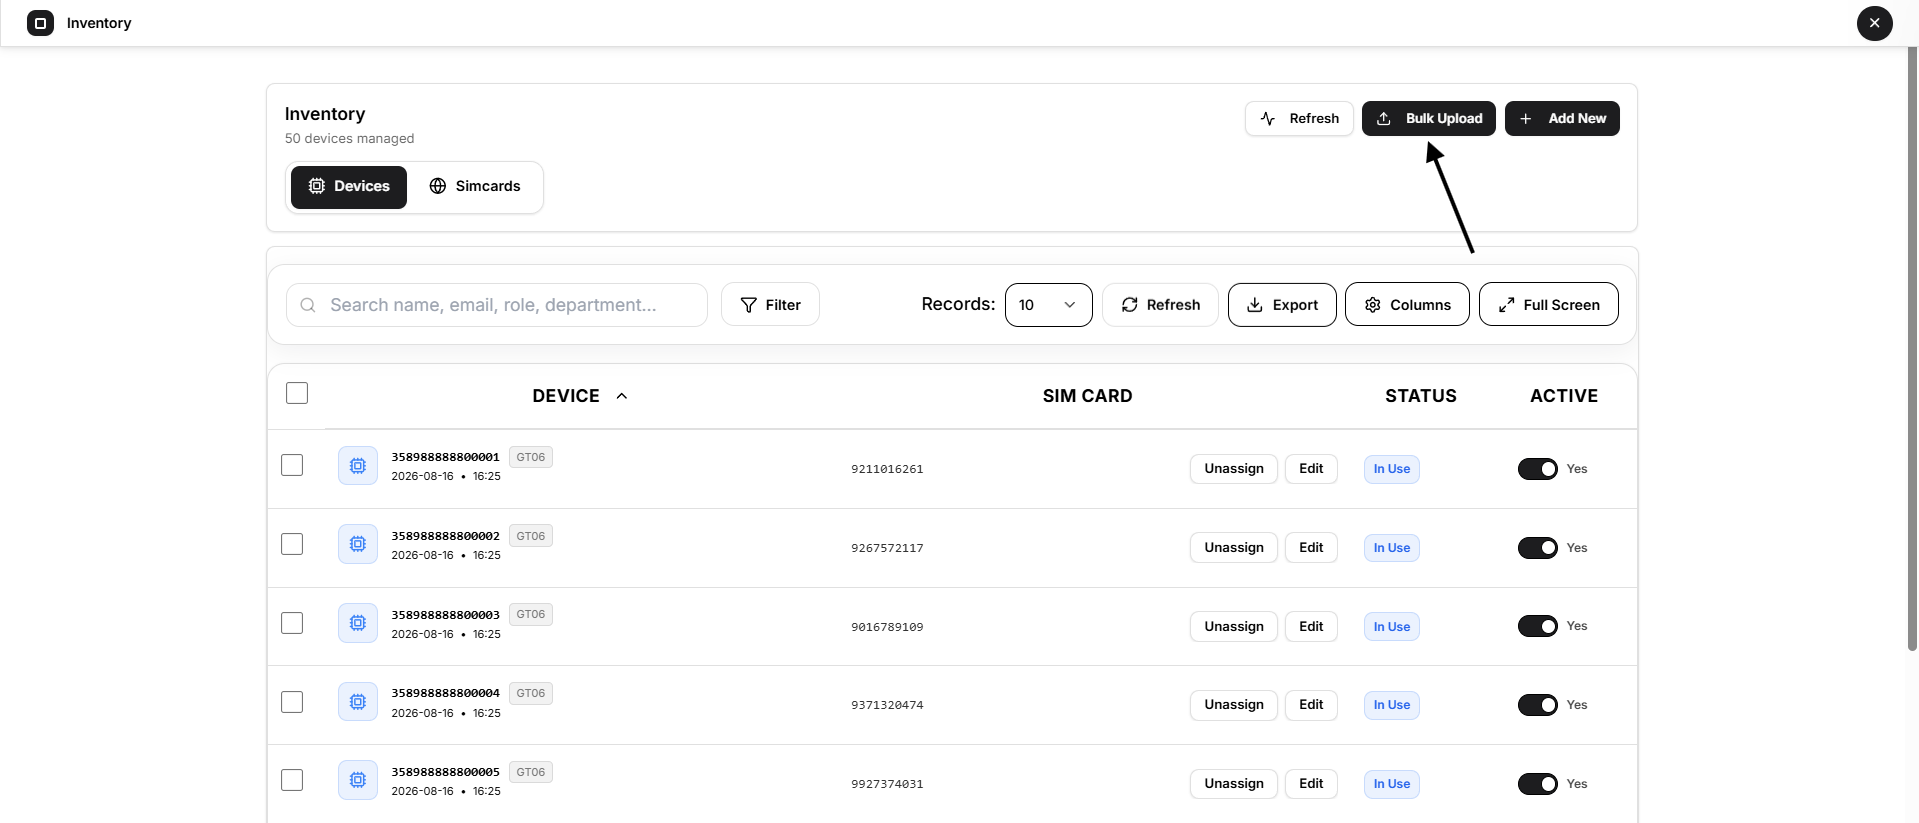
Choose Devices & Sim Cards when devices and their SIMs should be imported together.
Select:
- Device Type
- SIM Provider
Expected CSV columns are:
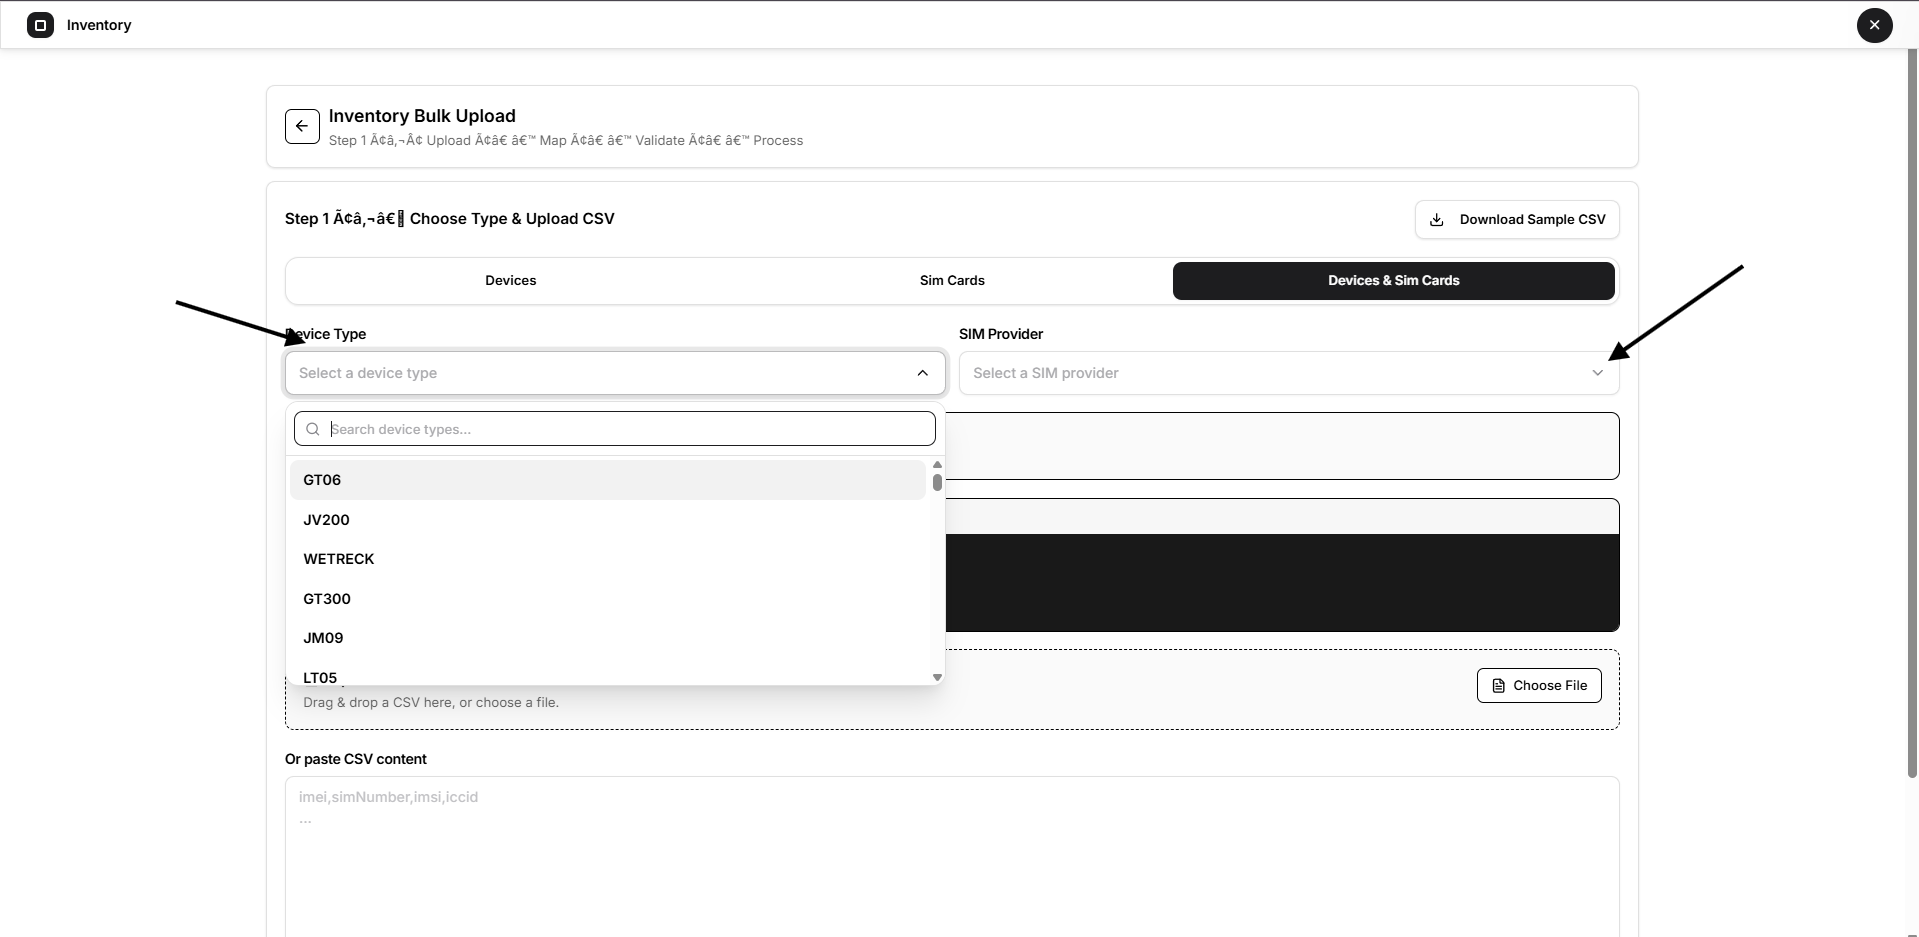
imei, simNumber, imsi, iccid
Each row represents the device and SIM information that will be processed together.
Step 1 — Upload CSV
The first step prepares the inventory data.
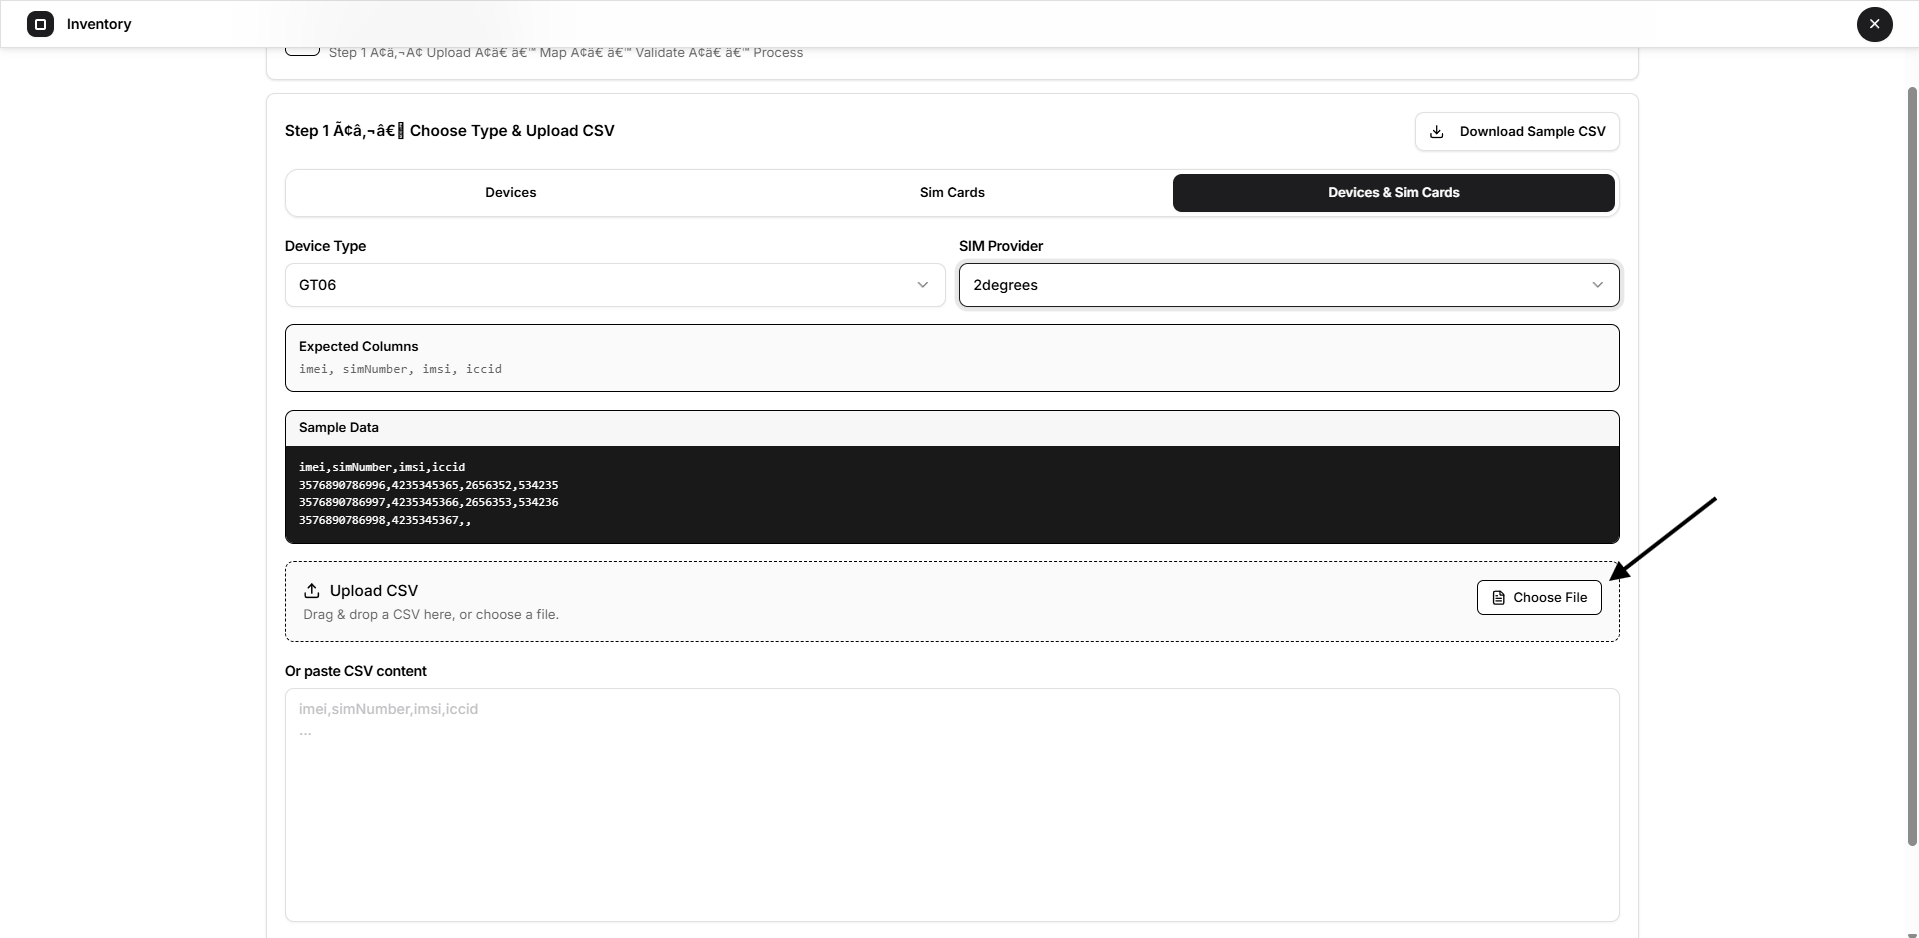
The page displays:
- Selected import type
- Device Type or SIM Provider where applicable
- Expected columns
- Sample data
- File upload area
- Paste CSV area
You can also select Download Sample CSV to obtain the expected structure before preparing a larger import.
Step 2 — Preview & Column Mapping
After parsing the CSV, Open VTS detects the records and opens the Preview & Column Mapping stage.
Here you can verify that each CSV column maps to the correct Open VTS field.
For example, a combined device-and-SIM upload can map:
- imei → IMEI
- simNumber → SIM Number
- imsi → IMSI
- iccid → ICCID
A preview of the detected rows appears underneath the mapping fields.
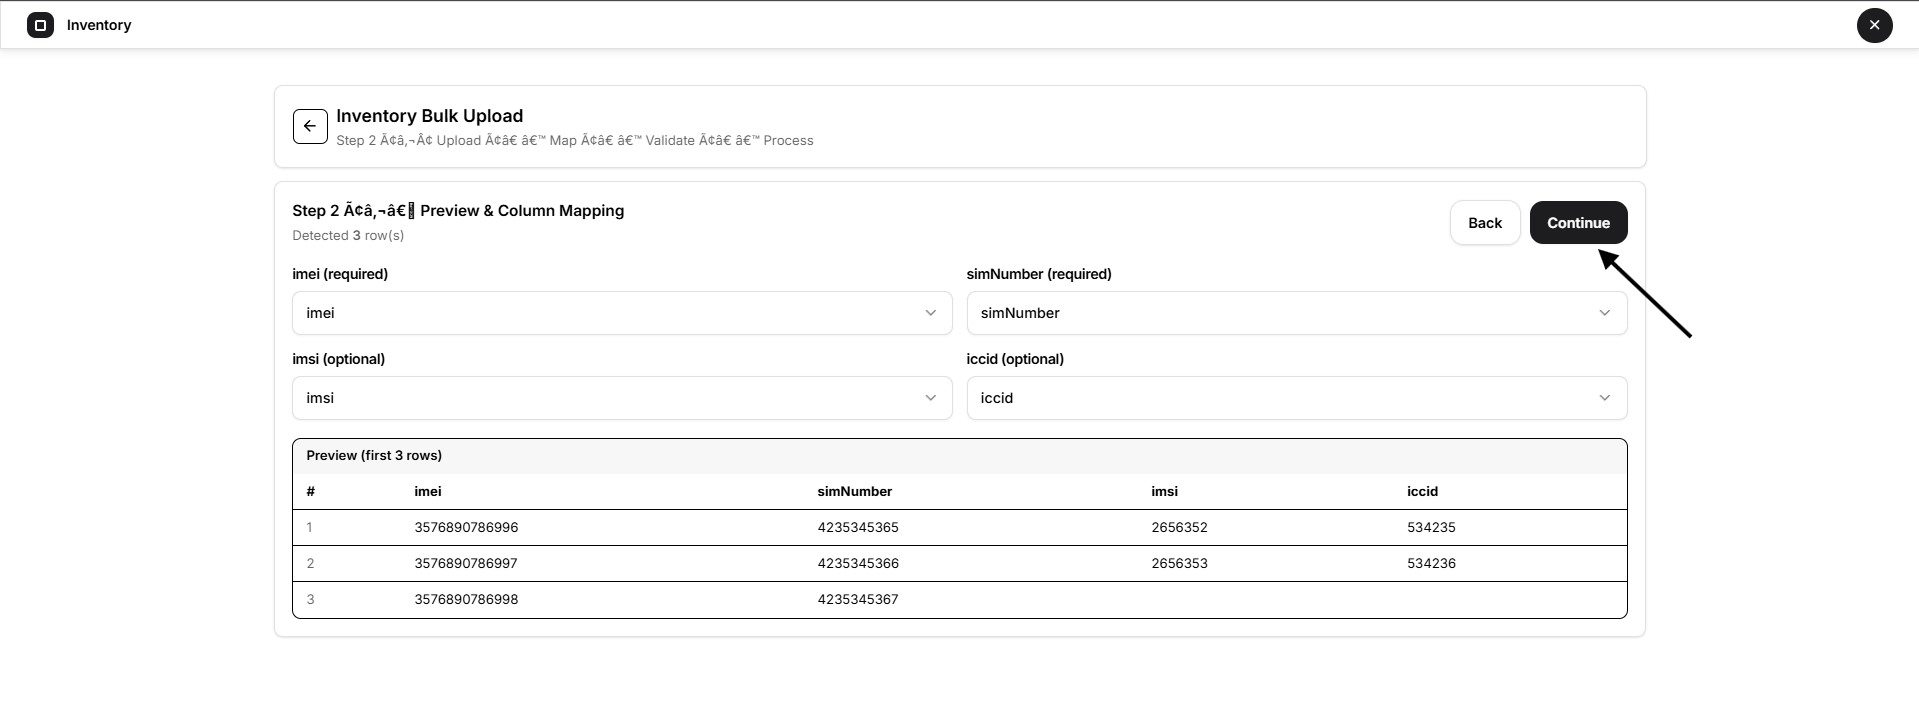
Review the information and select Continue.
Step 3 — Validation
Before anything is created, Open VTS validates the uploaded records.
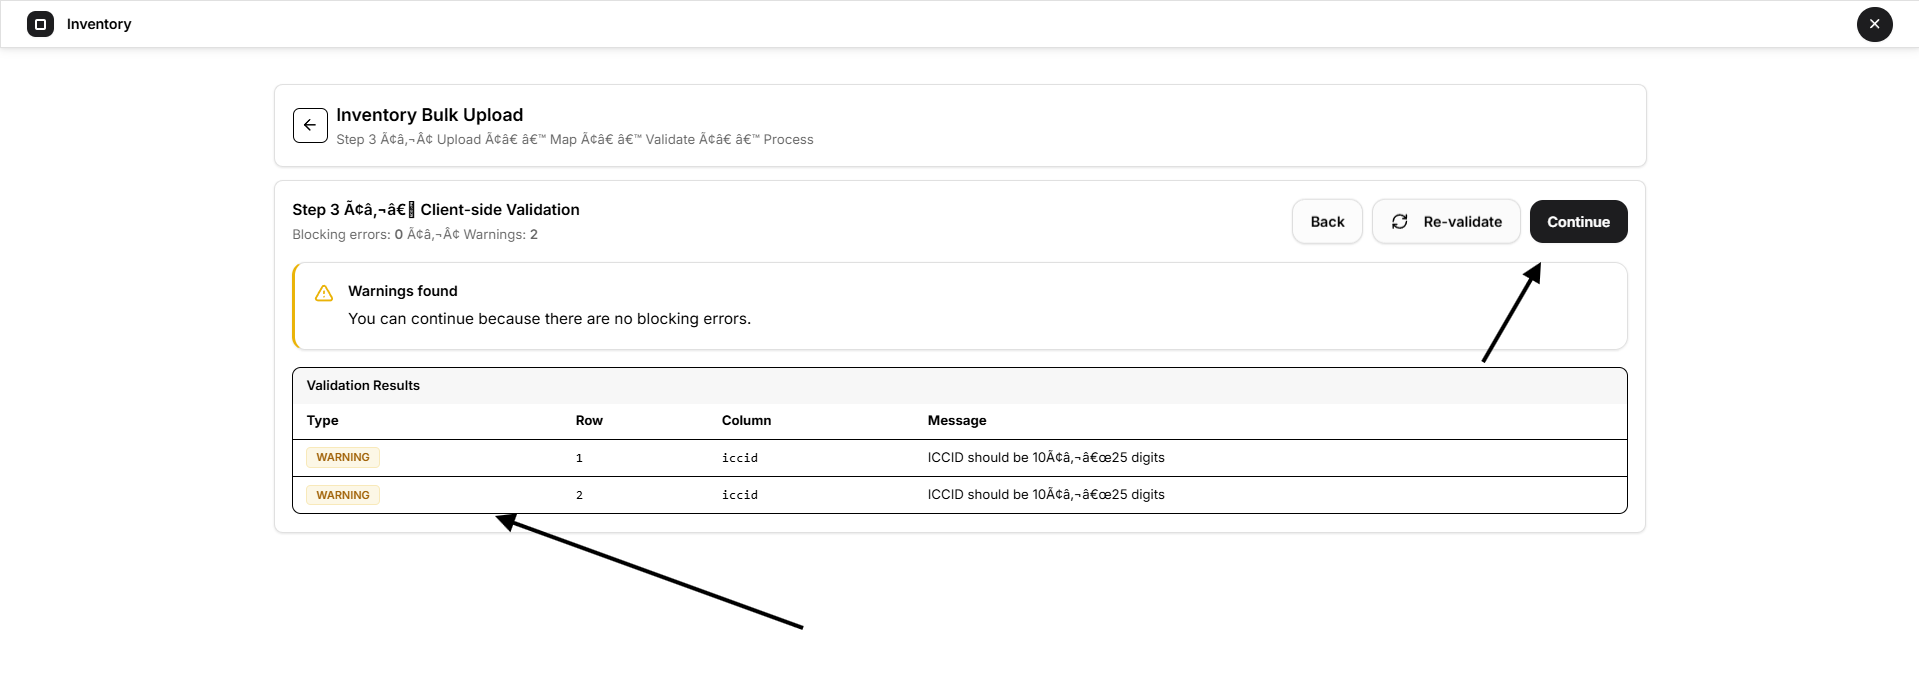
The validation page separates issues into:
- Blocking errors
- Warnings
If a blocking error exists, the affected data must be corrected before processing.
Warnings provide information about values that may require attention but do not necessarily prevent the upload.
For example, an identifier with an unexpected length may appear as a warning while the upload is still allowed to continue.
Use Re-validate after correcting your data.
Processing the Upload
Once validation is complete, continue to processing.
Open VTS processes the imported rows and tracks the result of each record.
Depending on the result, a row can be marked as successfully created or failed.
Bulk Upload Completed
After processing finishes, the completion page provides a summary of the upload.
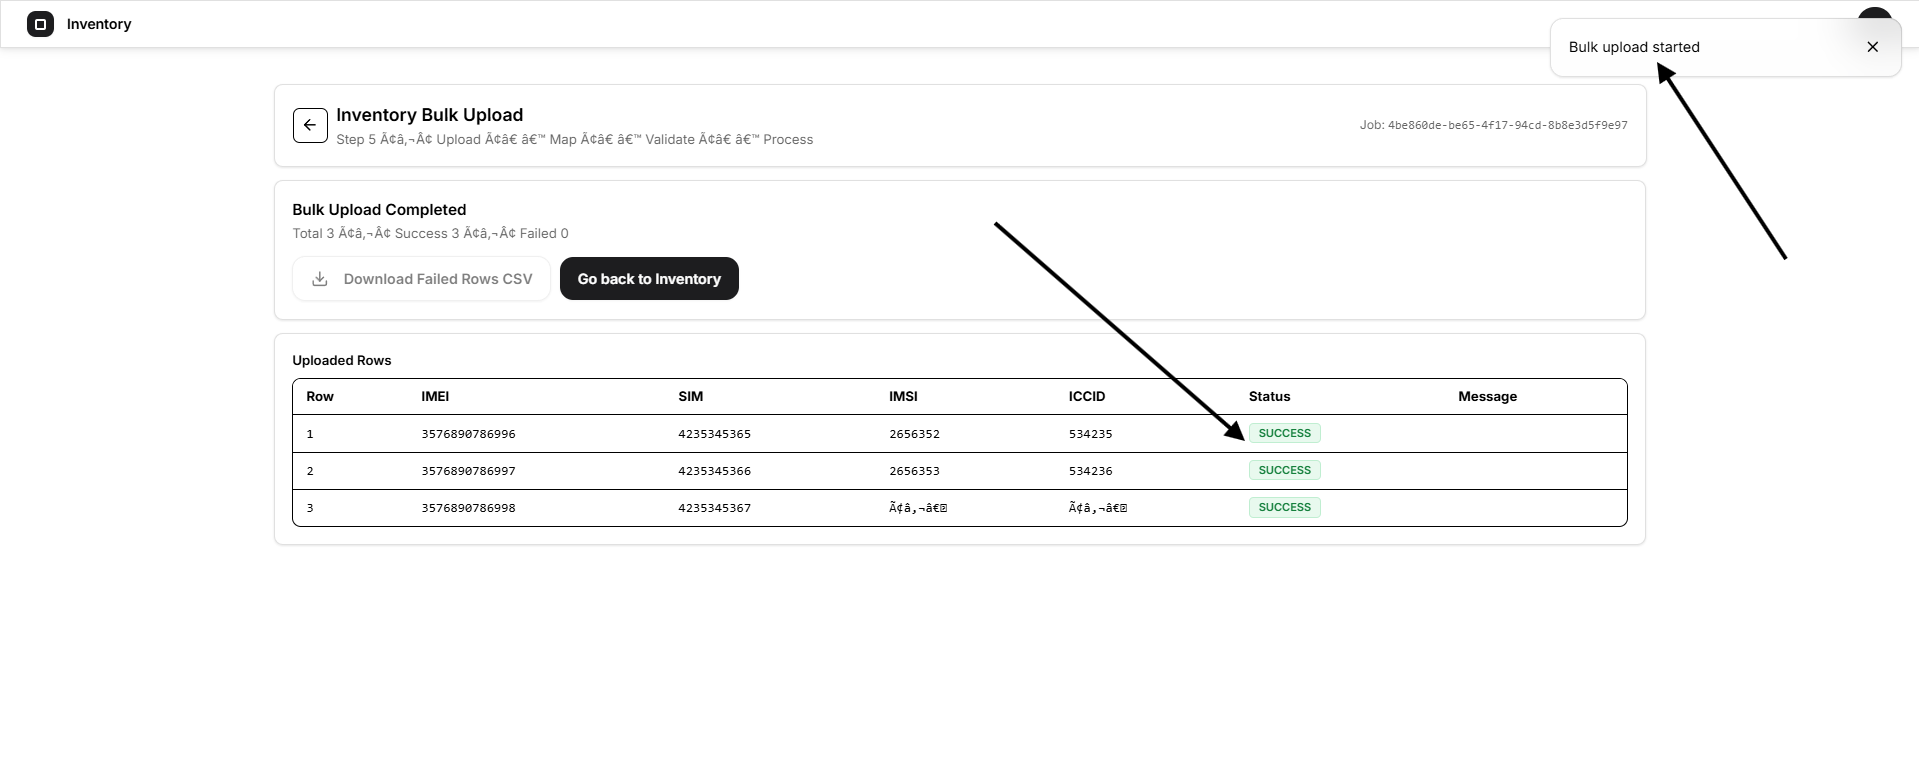
It shows:
- Total records
- Successful records
- Failed records
- Record-level results
- Status
- Failure messages when applicable
If any records fail, use Download Failed Rows CSV to retrieve them for correction and another upload.
Select Go back to Inventory when finished.
Bulk Actions
Selecting multiple inventory records opens the bulk-action toolbar.
For device records, available actions include:
- Activate
- Deactivate
- Delete Selected
- Clear selection
Bulk actions are useful when managing larger batches of inventory without modifying each record individually.
Export Inventory
Select Export to export the current inventory data.
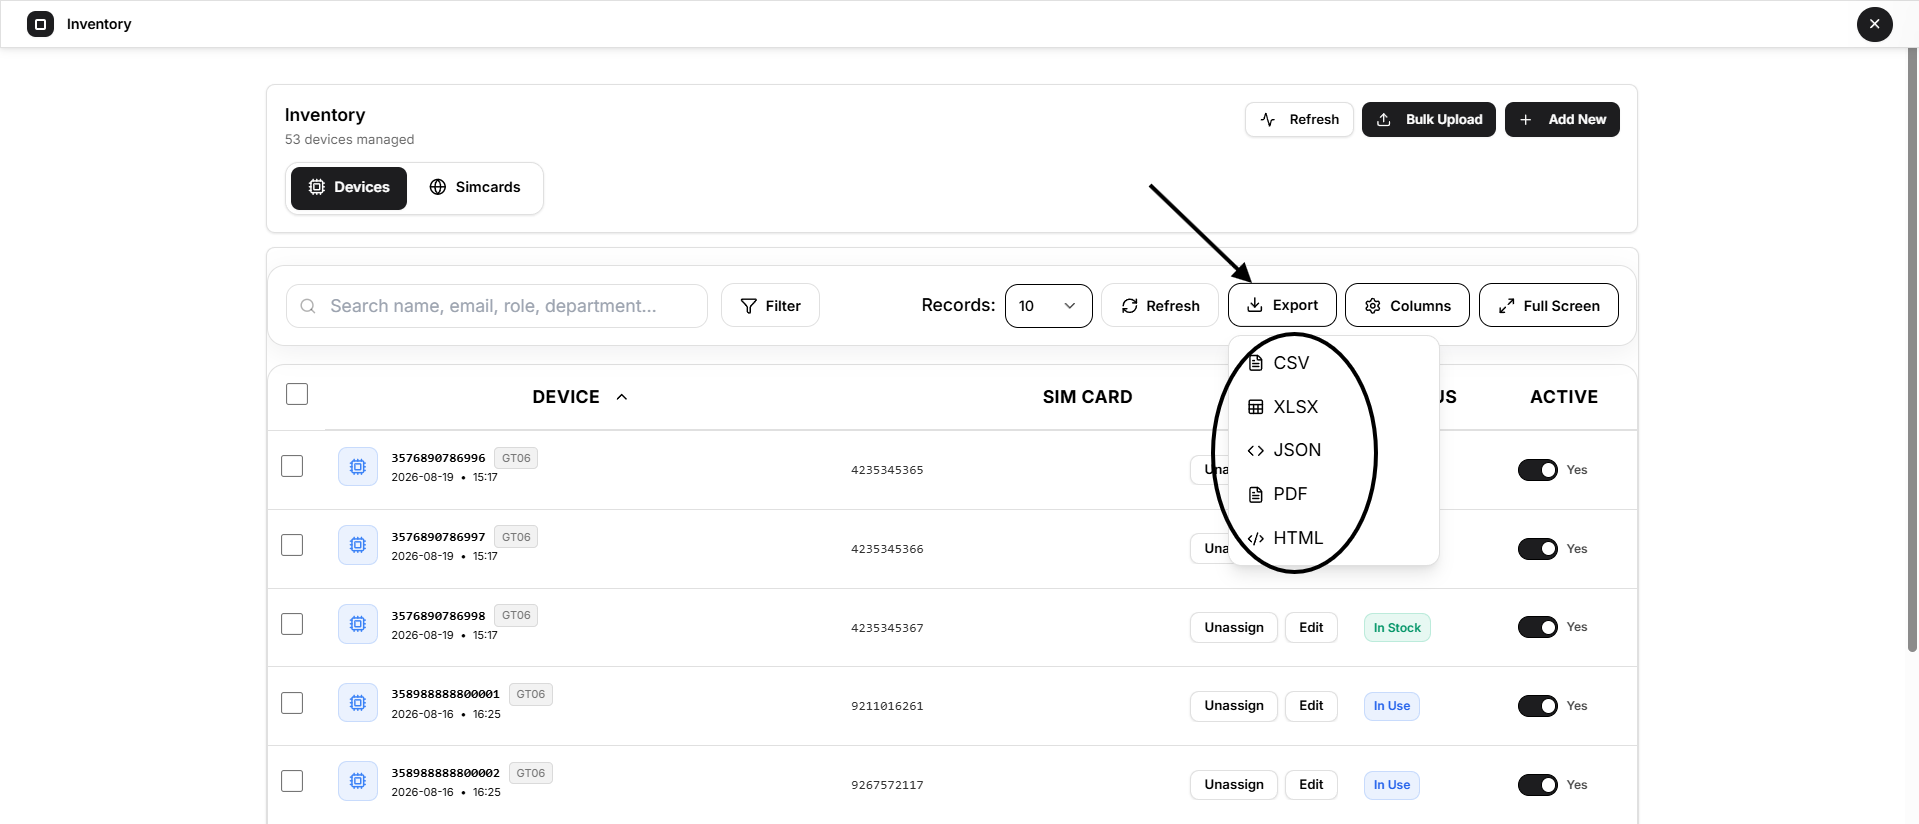
Depending on the configured table tools, available export formats can include formats such as:
- CSV
- XLSX
- JSON
- HTML
This is useful for auditing, inventory reconciliation, or maintaining external records.
Customize the Inventory Table
Select Columns to control which table fields are displayed and their order.
Use this when different operational tasks require different inventory information.
The Records selector controls how many items are displayed per page, while pagination is available at the bottom of the table.
Select Full Screen when working with larger inventory lists.
Recommended Inventory Workflow
For a clean operational setup, the usual workflow is:
Add or import inventory → verify device/SIM information → link device and SIM → set inventory status → activate the record → assign it during vehicle onboarding
When devices are no longer deployed, update their relationships and inventory status so the Inventory page continues to represent the actual physical stock available to the organization.
Key Takeaway
The Inventory module separates physical tracking resources from vehicles and users.
A device can exist before it is installed in a vehicle. A SIM can exist before it is linked to a device. Both can be tracked as stock, moved into use, or marked as scrap.
This gives administrators a clear inventory layer for managing the hardware that powers their Open VTS deployment.